JeepParts
My Garage
My Account
Cart
OEM 2002 Chrysler Sebring ABS Control Module
Anti Lock Brake Control Module- Select Vehicle by Model
- Select Vehicle by VIN
Select Vehicle by Model
orMake
Model
Year
Select Vehicle by VIN
For the most accurate results, select vehicle by your VIN (Vehicle Identification Number).
4 ABS Control Modules found

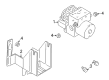
2002 Chrysler Sebring Control Module Part Number: 5093774AA
$601.57 MSRP: $744.00You Save: $142.43 (20%)Ships in 1-2 Business DaysProduct Specifications- Other Name: Control - Anti-Lock Brake; ABS Control Module; ABS Control Unit; Control Unit Anti-Lock Brake
- Replaces: 5080634AA, 5093740AA
- Item Weight: 1.90 Pounds
- Condition: New
- Fitment Type: Direct Replacement
- SKU: 5093774AA
- Warranty: This genuine part is guaranteed by Mopar's factory warranty.

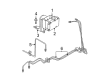
2002 Chrysler Sebring Modulator Valve Part Number: MR370625
Product Specifications- Other Name: Master Cylinder - Anti-Lock Brake System; ABS Hydraulic Assembly; ABS Control Module; Modulator; Hydraulic Control Unit Anti-Lock Brake System
- Item Weight: 7.90 Pounds
- Condition: New
- Fitment Type: Direct Replacement
- SKU: MR370625
- Warranty: This genuine part is guaranteed by Mopar's factory warranty.
2002 Chrysler Sebring Control Module Part Number: MR370624
Product Specifications- Other Name: Master Cylinder - Anti-Lock Brake System; ABS Hydraulic Assembly; Modulator Valve; Modulator; Hydraulic Control Unit Anti-Lock Brake System
- Item Weight: 6.70 Pounds
- Condition: New
- Fitment Type: Direct Replacement
- SKU: MR370624
- Warranty: This genuine part is guaranteed by Mopar's factory warranty.

2002 Chrysler Sebring Modulator Valve Part Number: 5018254AA
Product Specifications- Other Name: Accumulator - Anti-Lock Brake System; ABS Hydraulic Assembly; ABS Control Module; ABS Control Unit; Modulator; Hydraulic Control Unit Anti-Lock Brake System
- Condition: New
- Fitment Type: Direct Replacement
- SKU: 5018254AA
- Warranty: This genuine part is guaranteed by Mopar's factory warranty.
2002 Chrysler Sebring ABS Control Module Parts and Q&A
- Q: How to Service and Repair an ABS Control Module in the Hydraulic Control Assembly on 2002 Chrysler Sebring?A: Before servicing or repairing the Hydraulic Control Assembly for Antilock Brakes, detach the remote ground cable from the strut tower and use a ground cable insulator to stop accidental grounding. Place the brake pedal positioning tool to take the brake pedal past the first inch which isolates the master cylinder reservoir. Eliminate the air cleaner housing and get rid of debris from the fittings right above the Integrated Control Unit (ICU). Disconnect the two brake tubes from the ports on the master cylinder at the ICU, then take out the four chassis brake tubes from the junction block. Pull up the lock to unlock the connector from the CAB to remove the 24-way wiring harness. Unscrew the three mounting bolts and get the ICU out of your vehicle. To take apart the machine, cut the wiring from the Pump/Motor to the Command Arm Board (CAB) and remove the four bolts that keep the CAB on the Hydraulic Control Unit (HCU). Set the CAB onto the HCU and attach it with four bolts, tightening them to 2 Nm (17 inch lbs.). Attach the pump/motor wiring harness to the CAB again, fit the ICU in the vehicle and bleed the base and ABS hydraulic pipes. Once you have the ICU on its back, place it onto its bracket with isolators and washers in place. After that, tighten the three HCU mounting bolts to 11 Nm (97 inch lbs.). Check that you've installed the seal in the 24-way connector and only then slide it into the CAB socket as you lock it down. Slide the four chassis brake tubes into the top of the ICU and secure the connectors with 17 Nm (145 inch lbs. of torque) with a crow foot wrench. Afterward, attach the two tubes from the master cylinder ports using the same torque value. Set the air cleaner housing back in place, get the brake pedal holding tool out, attach the ground cable from the remote to the left shock tower study bolt, bleed the hydraulic system and check the operation of both brakes and the air cleaner by driving onto the road.
Related 2002 Chrysler Sebring Parts
 2002 Chrysler Sebring Brake Booster
 2002 Chrysler Sebring Brake Caliper
 2002 Chrysler Sebring Brake Caliper Bracket
 2002 Chrysler Sebring Brake Disc
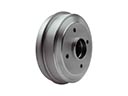 2002 Chrysler Sebring Brake Drum
 2002 Chrysler Sebring Brake Dust Shield
 2002 Chrysler Sebring Brake Line
 2002 Chrysler Sebring Brake Master Cylinder
 2002 Chrysler Sebring Brake Proportioning Valve
 2002 Chrysler Sebring Speed Sensor
 2002 Chrysler Sebring Wheel Bearing Dust Cap
 2002 Chrysler Sebring Wheel Stud