JeepParts
My Garage
My Account
Cart
OEM 2001 Chrysler Sebring Shock Absorber
Suspension Shock Absorber- Select Vehicle by Model
- Select Vehicle by VIN
Select Vehicle by Model
orMake
Model
Year
Select Vehicle by VIN
For the most accurate results, select vehicle by your VIN (Vehicle Identification Number).
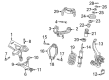
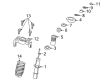
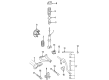
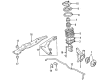
12 Shock Absorbers found


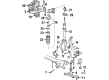
2001 Chrysler Sebring Strut Mount, Passenger Side Part Number: 4764552AC
$294.38 MSRP: $419.00You Save: $124.62 (30%)Ships in 1-2 Business DaysProduct Specifications- Other Name: Bucket Right - Shock Absorber; Mount Bracket; Strut Bracket; Shock Bracket; Bracket; Bracket Shock Absorber
- Position: Passenger Side
- Item Weight: 3.60 Pounds
- Item Dimensions: 10.4 x 6.0 x 5.4 inches
- Condition: New
- Fitment Type: Direct Replacement
- SKU: 4764552AC
- Warranty: This genuine part is guaranteed by Mopar's factory warranty.


2001 Chrysler Sebring Bushing, Front Part Number: 4764483AA
$6.67 MSRP: $9.70You Save: $3.03 (32%)Ships in 1-2 Business DaysProduct Specifications- Other Name: Bushing - Shock Absorber; Front Suspension Shock & Strut Mount; Strut Bearing Insulator; Axle Pivot Bushing; Bushing Shock Absorber
- Position: Front
- Item Weight: 0.40 Pounds
- Item Dimensions: 1.9 x 1.8 x 0.8 inches
- Condition: New
- Fitment Type: Direct Replacement
- SKU: 4764483AA
- Warranty: This genuine part is guaranteed by Mopar's factory warranty.

2001 Chrysler Sebring Strut, Front Part Number: 4895037AB
$68.45 MSRP: $143.00You Save: $74.55 (53%)Ships in 1-2 Business DaysProduct Specifications- Other Name: Strut - Suspension; Front Suspension Strut and Coil Spring Assembly; Complete Strut Kit; Shock Absorber; Shock Absorber Suspension
- Position: Front
- Replaces: 4895037AA
- Item Weight: 4.60 Pounds
- Item Dimensions: 24.7 x 7.7 x 3.4 inches
- Condition: New
- Fitment Type: Direct Replacement
- SKU: 4895037AB
- Warranty: This genuine part is guaranteed by Mopar's factory warranty.

2001 Chrysler Sebring Strut, Front Part Number: 4895047AB
$70.54 MSRP: $138.00You Save: $67.46 (49%)Ships in 1-2 Business DaysProduct Specifications- Other Name: Strut - Suspension; Front Suspension Strut and Coil Spring Assembly; Complete Strut Kit.; Shock Absorber Suspension
- Position: Front
- Item Weight: 4.60 Pounds
- Item Dimensions: 19.6 x 7.7 x 3.6 inches
- Condition: New
- Fitment Type: Direct Replacement
- SKU: 4895047AB
- Warranty: This genuine part is guaranteed by Mopar's factory warranty.

2001 Chrysler Sebring Strut Mount, Driver Side Part Number: 4764553AC
$297.43 MSRP: $409.00You Save: $111.57 (28%)Ships in 1-2 Business DaysProduct Specifications- Other Name: Bucket Left - Shock Absorber; Mount Bracket; Strut Bracket; Shock Bracket; Bracket; Bracket Shock Absorber
- Position: Driver Side
- Item Weight: 3.80 Pounds
- Item Dimensions: 5.4 x 5.9 x 10.3 inches
- Condition: New
- Fitment Type: Direct Replacement
- SKU: 4764553AC
- Warranty: This genuine part is guaranteed by Mopar's factory warranty.


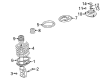
2001 Chrysler Sebring Strut Bushing, Rear Part Number: 4616749
Product Specifications- Other Name: Bushing - Shock Absorber; Suspension Strut Bolt, Rear; Knuckle Bushing; Fork Bushing; Front/Rear Suspension Knuckles; Shock Absorber Bushing
- Position: Rear
- Item Weight: 0.80 Pounds
- Item Dimensions: 2.0 x 1.4 x 1.4 inches
- Condition: New
- Fitment Type: Direct Replacement
- SKU: 4616749
- Warranty: This genuine part is guaranteed by Mopar's factory warranty.

2001 Chrysler Sebring Strut, Rear Part Number: 4879888AC
Product Specifications- Other Name: Absorber - Suspension; Suspension Strut, Rear
- Position: Rear
- Replaces: 4879888AB
- Item Weight: 5.10 Pounds
- Condition: New
- Fitment Type: Direct Replacement
- SKU: 4879888AC
- Warranty: This genuine part is guaranteed by Mopar's factory warranty.

2001 Chrysler Sebring Upper Retainer, Rear Part Number: 4616934
Product Specifications- Other Name: Retainer - Shock Absorber; Suspension Strut Mount Washers (Front & Rear); Shock Mount Insulator; Washer; Shock Retainer; Shock Absorber Bushing Upper; Shock Absorber Assembly
- Position: Rear Upper
- Item Weight: 0.50 Pounds
- Item Dimensions: 1.8 x 1.8 x 0.2 inches
- Condition: New
- Fitment Type: Direct Replacement
- SKU: 4616934
- Warranty: This genuine part is guaranteed by Mopar's factory warranty.

2001 Chrysler Sebring Strut, Front Driver Side Part Number: MR455121
Product Specifications- Other Name: Strut - Shock Absorber; Front Left Suspension Strut and Coil Spring Assembly; Complete Strut Kit.; Strut Shock Absorber; Shock Absorber
- Position: Front Driver Side
- Condition: New
- Fitment Type: Direct Replacement
- SKU: MR455121
- Warranty: This genuine part is guaranteed by Mopar's factory warranty.
2001 Chrysler Sebring Strut, Front Driver Side Part Number: MR455119
Product Specifications- Other Name: Strut Shock Absorber; Front Left Suspension Strut and Coil Spring Assembly; Complete Strut Kit.; Shock Absorber
- Position: Front Driver Side
- Item Weight: 12.30 Pounds
- Condition: New
- Fitment Type: Direct Replacement
- SKU: MR455119
- Warranty: This genuine part is guaranteed by Mopar's factory warranty.

2001 Chrysler Sebring Strut, Rear Part Number: 4879188AA
Product Specifications- Other Name: Absorber - Suspension; Rear Strut Assembly Kit; Complete Strut Kit; Shock Absorber; Shock Absorber Suspension Rear
- Position: Rear
- Item Weight: 4.70 Pounds
- Item Dimensions: 29.4 x 5.9 x 5.7 inches
- Condition: New
- Fitment Type: Direct Replacement
- SKU: 4879188AA
- Warranty: This genuine part is guaranteed by Mopar's factory warranty.
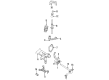
2001 Chrysler Sebring Strut, Front Part Number: 4879185AA
Product Specifications- Other Name: Strut - Suspension; Front Suspension Strut and Coil Spring Assembly; Complete Strut Kit; Shock Absorber; Shock Absorber Suspension
- Position: Front
- Item Weight: 5.30 Pounds
- Condition: New
- Fitment Type: Direct Replacement
- SKU: 4879185AA
- Warranty: This genuine part is guaranteed by Mopar's factory warranty.
2001 Chrysler Sebring Shock Absorber Parts and Q&A
- Q: How to Service and Repair a Shock Absorber in a Suspension Strut on 2001 Chrysler Sebring?A: The first step to serve and fix the suspension strut is to loosen the wheel nuts and lift the vehicle using a jack stand or a frame contact type hoist. Remove the tire and wheel from the front area where you'll take out a shock and mark the two shock assemblies as right or left if they're both being replaced. Detach the bracket for the wheel speed sensor cable routing from the steering knuckle and afterwards remove the cotter pin and castle nut. Attach the Puller, Special Tool, C-3894-A to pull and remove, the upper ball joint stud from the steering knuckle. First, disconnect the bolts connecting the shock absorber clevis to the clevis and the lower control arm, removing the pinch bolt and then the nut and thru-bolt. Tap the clevis off the shock absorber using a soft brass drift and then pull out the four bolts securing the front shock's mounting bracket to the shock tower. Finally, lift the shock off through the front wheel well. Before disassembling, use strut spring compressor W-7200 by Pentastar Service Equipment and if both the spring and shock must be serviced, mark them together. Attach the shock assembly to the compressor, tighten it according to the maker's guidelines and take out all tension from the upper bracket by activating the coil spring. Clip the top-nut socket onto the shock rod and remove both the retainer nut and the upper bushing retainer washer. Take off the clamp from the coil spring and remove the shock absorber along with each of its parts. Review every component for any damage and change them as needed. Connection should follow the steps used for disassembly in reverse and be certain to align the coil spring and isolators properly. Screw the shock assembly into the shock tower, putting together the locating pins and matching holes and use four bolts that are tightly tightened at 95 Nm (70 ft. lbs.). Stick the clevis to the shock absorber and check that it is in place; after that, insert and tighten the pinch bolt to 88 Nm (65 ft. lbs.). Slide the top ball joint into position on the steering knuckle, then secure it with a tightened castle nut (54 Nm or 40 ft. lbs.) and a cotter pin. Connect the bracket for the speed control cable to the routing bracket and check that the lower control arm is taking the weight. When you have done this, tighten the shock absorber clevis to lower control arm bushing thru-bolt nut to ensure the nut is secure. Afterwards, put the tire and wheel back into place, making sure the stud nuts are tightened to 135 Nm (100 ft. lbs.) before the vehicle is lowering.
Related 2001 Chrysler Sebring Parts
 2001 Chrysler Sebring Ball Joint
 2001 Chrysler Sebring Wheel Bearing
 2001 Chrysler Sebring Wheel Hub
 2001 Chrysler Sebring Axle Beam Mount
 2001 Chrysler Sebring Axle Support Bushings
 2001 Chrysler Sebring Bump Stop
 2001 Chrysler Sebring Crossmember Bushing
 2001 Chrysler Sebring Lateral Link
 2001 Chrysler Sebring Leaf Spring Bushing
 2001 Chrysler Sebring Sway Bar Kit
 2001 Chrysler Sebring Sway Bar Link
 2001 Chrysler Sebring Trailing Arm