JeepParts
My Garage
My Account
Cart
OEM 2002 Dodge Dakota Brake Drum
- Select Vehicle by Model
- Select Vehicle by VIN
Select Vehicle by Model
orMake
Model
Year
Select Vehicle by VIN
For the most accurate results, select vehicle by your VIN (Vehicle Identification Number).
1 Brake Drum found

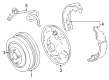
2002 Dodge Dakota Drum, Rear Part Number: 52009595AC
$114.14 MSRP: $208.00You Save: $93.86 (46%)Ships in 1-2 Business DaysProduct Specifications- Other Name: Drum - Brake; Brake Drum, Rear; Drum Brake; Brake Drum
- Position: Rear
- Item Weight: 24.80 Pounds
- Item Dimensions: 15.4 x 14.3 x 6.9 inches
- Condition: New
- Fitment Type: Direct Replacement
- Require Quantity: 2
- SKU: 52009595AC
- Warranty: This genuine part is guaranteed by Mopar's factory warranty.
2002 Dodge Dakota Brake Drum Parts and Q&A
- Q: How to Service and Repair a Brake Drum on 2002 Dodge Dakota?A: To work on the brake drum, raise and support the car, remove the wheel and tire assembly and then continue. Pull off the clip nuts holding the brake drum to the wheel studs and lift out the drum. Should you not be able to remove the drum, unscrew the back plug from the support plate, loosen the self-centering mechanism with a small screwdriver and bring back the brake shoes with the adjuster tool. Clear dust from the brake parts by vacuuming and then remove the shoe return springs with a special tool designed for this purpose. Remove the cable from the anchor pin by sliding it, then unhook it at the adjuster lever. Release the cable guide from the secondary shoe and also remove the anchor plate from the anchor pin, next slide the adjuster lever forward and it will come free from the spring. First take out the adjuster lever spring from the pivot, then detach and remove the shoe spring from the brake shoes and lastly remove the adjuster screw assembly. Disconnect the brake shoe retainers and springs, then remove the secondary brake shoe from the support plate and after that, the strut and spring. Pull out the clip that retains the lever on the secondary shoe, after that take the lever out and unfasten the parking brake lever from the main brake cable. Use a damp cloth or brake cleaner to clean each individual brake part, including the support plate and the wheel cylinder's outside, but not other cleaners. Brake shoe contact pads with light rust and scale should be cleaned with fine sandpaper. Replace wedge cast iron brake shoes when their edge/worst area is nearly all the way up the rivets, but use the same thickness as a guide for bonded lining. Review the impression of the drum lining; if the shoes are bending or the drum is tapering, that pair of shoes must be changed. Review the adjuster screw assembly to spot signs of damage, heavy rust or corrosion and throw out worn or distorted brake springs and retainer parts if you experience brake drag. If any of the brake shoe contact pads are worn, rusty or if the support plate is bent or distorted, replace the entire support plate. Installing the brake should include cleaning and inspecting the braking system, applying grease or Lubriplate to the anchor pin, the brake shoe contact pads and to the adjuster screw socket, nut, button and screw thread surfaces. After that, attach the parking brake cable to the parking brake lever, position the lever on the secondary shoe and clinch it with a retaining clip. Install the main shoe on the support plate, pinning it and attaching new spring retainers and after that, hook the parking brake strut to the main shoe. Place the secondary shoe onto the support plate, moving it onto the anchor pin and holding it with a retaining pin for now. Attach the anchor plate and adjuster cable eyelet on the support plate anchor pin and next install the cable guide in the secondary shoe. Place the adjuster screw between the brake shoes, with the L (left) and R (right) marked sides visible. Attach the adjuster lever and spring, seal the adjuster cable to the lever and install both secondary shoe retainers with their springs. First, fasten the shoe spring to the secondary shoe and then to the primary shoe. Pull up on the adjuster cable to see the lever raise and turn the star wheel. Put together the brake shoes and drum with a brake gauge and finally, attach the wheel and tire assembly.
Related 2002 Dodge Dakota Parts
 2002 Dodge Dakota Brake Caliper
 2002 Dodge Dakota Brake Caliper Bolt
 2002 Dodge Dakota Parking Brake Cable
 2002 Dodge Dakota Speed Sensor
 2002 Dodge Dakota Wheel Stud
 2002 Dodge Dakota Brake Caliper Piston
 2002 Dodge Dakota Brake Disc
 2002 Dodge Dakota Brake Dust Shield
 2002 Dodge Dakota Brake Line
 2002 Dodge Dakota Brake Pad
 2002 Dodge Dakota Hydraulic Hose
 2002 Dodge Dakota Wheel Cylinder