JeepParts
My Garage
My Account
Cart
OEM 2003 Chrysler Voyager Evaporator
A/C Evaporator Core- Select Vehicle by Model
- Select Vehicle by VIN
Select Vehicle by Model
orMake
Model
Year
Select Vehicle by VIN
For the most accurate results, select vehicle by your VIN (Vehicle Identification Number).
2 Evaporators found

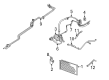
2003 Chrysler Voyager Evaporator Core, Front Part Number: 5019217AG
$244.80 MSRP: $320.00You Save: $75.20 (24%)Ships in 1-2 Business DaysProduct Specifications- Other Name: Evaporatr - A/C Evaporator Core, Front; Repair Kit; Evaporator.
- Position: Front
- Replaces: 5019217AE, 5019217AF, V9900021AB, 5019217AD, 68024435AA, 5019217AC, 68024436AA, V9900021, 5019217AB
- Item Weight: 4.40 Pounds
- Item Dimensions: 7.7 x 14.3 x 20.1 inches
- Condition: New
- Fitment Type: Direct Replacement
- SKU: 5019217AG
- Warranty: This genuine part is guaranteed by Mopar's factory warranty.

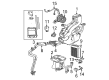
2003 Chrysler Voyager Evaporator Core, Rear Part Number: 68064307AB
Product Specifications- Other Name: Evaporatr - A/C Evaporator Core, Rear; Repair Kit.
- Position: Rear
- Replaces: 5019183AB, V9900107AB
- Item Weight: 2.90 Pounds
- Item Dimensions: 11.3 x 8.8 x 6.5 inches
- Condition: New
- Fitment Type: Direct Replacement
- SKU: 68064307AB
- Warranty: This genuine part is guaranteed by Mopar's factory warranty.
2003 Chrysler Voyager Evaporator Parts and Q&A
- Q: How to Replace a Rear Evaporator Core on 2003 Chrysler Voyager?A: You should start by detaching the rear heater-A/C unit housing from the vehicle, remove the rear evaporator line extension from the expansion valve and finally take out the rear expansion valve from the rear evaporator. Then, pull out the rubber grommet connecting the evaporator inlet and outlet with the rear heater-A/C housing near the expansion valve and take out the three screws and three metal spring clips that help hold the upper half of the rear heater-A/C housing to the lower half. Take out the top half of the housing and pull the evaporator from the lower section. When extending the evaporator line, first remove the rear heater-A/C unit housing as before and then take out the screw holding down the evaporator plate within the housing base. With the capture plate out, unroll the insulator from the expansion valve foam to reach the sealing plate at the evaporator line extension. Take out the two screws fastening the expansion valve bracket to the rear heater-A/C unit, loosen the nut linking the bracket to the expansion valve and free the bracket. After that, unscrew the nut securing the evaporator line extension seal plate to the expansion valve stud and remove the seal plate, along with the evaporator line extension from the expansion valve and housing base. Remove the seals from the fittings on the evaporator line and seal them or tape over the holes and both expansion valve openings. When installing and changing the evaporator, add 60 ml (2 fl oz) of the recommended oil refrigerant to the refrigerant system. Insert the evaporator plus the foam wrap halfway into the rear heater-A/C housing while the top half is free, fit the top on the bottom half, fix them together with the three spring clips and tighten the three screws to 2 Nm (18 in. lbs.). Slide the evaporator inlet and outlet grommet back in place, mount the rear expansion valve to the rear evaporator and reconnect the rear evaporator extension line to the expansion valve. After that, put the rear heater-A/C unit back into the vehicle. When attaching the line for the evaporator extension, pull out the tape or caps from the fittings and put clean refrigerant oil on each new rubber O-ring seal before fitting them. Put the evaporator line fitting onto the expansion valve and support base, put the seal plate on the expansion valve stud and fasten it down with 23 Nm (17 ft. lbs.) of nut tightening. Insert the bracket of the expansion valve onto the stud, secure it using two screws that are tightly put in at 2 Nm (18 in. lbs.) and repeat for the nut securing the bracket, but use 23 Nm (17 ft. lbs.). Cover the expansion valve foam with its insulator, place the capture plate on the housing base, fasten it with a screw tightened to 2 Nm (18 in. lbs.) and install the rear heater-A/C unit housing back in the vehicle.
Related 2003 Chrysler Voyager Parts
 2003 Chrysler Voyager Blower Motor Resistor
 2003 Chrysler Voyager A/C Accumulator
 2003 Chrysler Voyager A/C Clutch
 2003 Chrysler Voyager A/C Condenser
 2003 Chrysler Voyager A/C Expansion Valve
 2003 Chrysler Voyager A/C Hose
 2003 Chrysler Voyager A/C Switch
 2003 Chrysler Voyager Blend Door Actuator
 2003 Chrysler Voyager Blower Control Switches
 2003 Chrysler Voyager Blower Motor
 2003 Chrysler Voyager Cabin Air Filter
 2003 Chrysler Voyager Heater Core