JeepParts
My Garage
My Account
Cart
OEM 2003 Chrysler Voyager A/C Hose
Air Conditioning Hose- Select Vehicle by Model
- Select Vehicle by VIN
Select Vehicle by Model
orMake
Model
Year
Select Vehicle by VIN
For the most accurate results, select vehicle by your VIN (Vehicle Identification Number).
11 A/C Hoses found


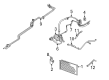
2003 Chrysler Voyager Discharge Hose Part Number: 5005241AA
$43.04 MSRP: $61.85You Save: $18.81 (31%)Ships in 1-3 Business DaysProduct Specifications- Other Name: Line - A/C Discharge; A/C Refrigerant Discharge Hose; A/C Refrigerant Liquid Hose; A/C Hose; A/C Hoses; Line A/C Discharge
- Item Weight: 0.90 Pounds
- Item Dimensions: 19.7 x 9.6 x 3.0 inches
- Condition: New
- Fitment Type: Direct Replacement
- SKU: 5005241AA
- Warranty: This genuine part is guaranteed by Mopar's factory warranty.

2003 Chrysler Voyager A/C Hoses Part Number: 5005240AD
$145.97 MSRP: $186.00You Save: $40.03 (22%)Ships in 1-2 Business DaysProduct Specifications- Other Name: Line - A/C Suction; A/C Refrigerant Suction Hose; A/C Refrigerant Liquid Hose; A/C Hose; Suction Hose; Line A/C Suction
- Replaces: 5005240AB, 5005240AC
- Item Weight: 1.30 Pounds
- Item Dimensions: 30.5 x 11.7 x 2.4 inches
- Condition: New
- Fitment Type: Direct Replacement
- SKU: 5005240AD
- Warranty: This genuine part is guaranteed by Mopar's factory warranty.

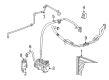
2003 Chrysler Voyager A/C Hoses Part Number: 5066505AA
$103.08 MSRP: $130.68You Save: $27.60 (22%)Ships in 1-2 Business DaysProduct Specifications- Other Name: Line - A/C; A/C Refrigerant Liquid Hose; A/C Hose; Liquid Line; Line A/C Liquid To Expansion Valve
- Item Weight: 1.10 Pounds
- Item Dimensions: 42.9 x 15.0 x 6.6 inches
- Condition: New
- Fitment Type: Direct Replacement
- SKU: 5066505AA
- Warranty: This genuine part is guaranteed by Mopar's factory warranty.
2003 Chrysler Voyager A/C Hoses, Front Part Number: 5005243AF
$182.77 MSRP: $265.00You Save: $82.23 (32%)Ships in 1-2 Business DaysProduct Specifications- Other Name: Line - A/C Suction; A/C Refrigerant Suction Hose, Front; A/C Refrigerant Liquid Hose; A/C Hose; Suction Hose
- Position: Front
- Replaces: 5005243AC, 5005465AA, 5005243AE, 5005243AD
- Item Weight: 2.40 Pounds
- Item Dimensions: 92.8 x 10.8 x 2.3 inches
- Condition: New
- Fitment Type: Direct Replacement
- SKU: 5005243AF
- Warranty: This genuine part is guaranteed by Mopar's factory warranty.

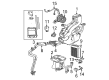
2003 Chrysler Voyager A/C Hoses Part Number: 5066634AA
$15.92 MSRP: $20.19You Save: $4.27 (22%)Ships in 1-2 Business DaysProduct Specifications- Other Name: Line - A/C Liquid; A/C Refrigerant Liquid Hose; A/C Hose; Liquid Line; Line A/C Liquid Drier To Expansion Valve
- Item Weight: 0.80 Pounds
- Condition: New
- Fitment Type: Direct Replacement
- SKU: 5066634AA
- Warranty: This genuine part is guaranteed by Mopar's factory warranty.

2003 Chrysler Voyager Discharge Hose Part Number: 5005211AC
$9.93 MSRP: $67.45You Save: $57.52 (86%)Ships in 1-2 Business DaysProduct Specifications- Other Name: Line - A/C Discharge; A/C Refrigerant Discharge Hose; A/C Refrigerant Liquid Hose; A/C Hose; A/C Hoses; Line A/C Discharge
- Item Weight: 0.90 Pounds
- Item Dimensions: 11.2 x 4.1 x 2.5 inches
- Condition: New
- Fitment Type: Direct Replacement
- SKU: 5005211AC
- Warranty: This genuine part is guaranteed by Mopar's factory warranty.


2003 Chrysler Voyager A/C Hoses Part Number: 5066523AA
Product Specifications- Other Name: Line - Auxiliary A/C Liquid; A/C Refrigerant Liquid Hose; A/C Hose; Liquid Line; Line Auxiliary A/C Liquid; Line A/C Liquid
- Item Weight: 4.20 Pounds
- Item Dimensions: 127.2 x 13.8 x 13.8 inches
- Condition: New
- Fitment Type: Direct Replacement
- SKU: 5066523AA
- Warranty: This genuine part is guaranteed by Mopar's factory warranty.


2003 Chrysler Voyager A/C Hoses Part Number: 5066506AA
Product Specifications- Other Name: Line - A/C Liquid; A/C Refrigerant Liquid Hose; A/C Hose; Liquid Line; Line A/C Liquid To Condenser
- Item Weight: 3.20 Pounds
- Item Dimensions: 24.5 x 6.3 x 6.1 inches
- Condition: New
- Fitment Type: Direct Replacement
- SKU: 5066506AA
- Warranty: This genuine part is guaranteed by Mopar's factory warranty.

2003 Chrysler Voyager A/C Hoses Part Number: 5005210AE
Product Specifications- Other Name: Line - A/C Suction; A/C Refrigerant Suction Hose; A/C Refrigerant Liquid Hose; A/C Hose; Suction Hose
- Replaces: 5005210AC, 5005210AD
- Item Weight: 1.30 Pounds
- Item Dimensions: 31.6 x 11.0 x 2.2 inches
- Condition: New
- Fitment Type: Direct Replacement
- SKU: 5005210AE
- Warranty: This genuine part is guaranteed by Mopar's factory warranty.

2003 Chrysler Voyager A/C Hoses, Rear Part Number: 5066520AA
Product Specifications- Other Name: Line - Auxiliary A/C Suction; A/C Refrigerant Suction Hose, Rear; A/C Refrigerant Liquid Hose; A/C Hose; Line Auxiliary A/C Suction; Line A/C Suction
- Position: Rear
- Item Weight: 2.40 Pounds
- Item Dimensions: 110.1 x 10.5 x 4.8 inches
- Condition: New
- Fitment Type: Direct Replacement
- SKU: 5066520AA
- Warranty: This genuine part is guaranteed by Mopar's factory warranty.

2003 Chrysler Voyager A/C Hoses Part Number: 5066633AA
Product Specifications- Other Name: Line - A/C Liquid; A/C Refrigerant Liquid Hose; A/C Hose; Liquid Line; Line A/C Liquid Drier To Condenser
- Item Weight: 0.80 Pounds
- Item Dimensions: 28.5 x 13.1 x 3.6 inches
- Condition: New
- Fitment Type: Direct Replacement
- SKU: 5066633AA
- Warranty: This genuine part is guaranteed by Mopar's factory warranty.
2003 Chrysler Voyager A/C Hose Parts and Q&A
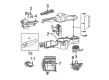
- Q: How to Replace the A/C Hose for Underbody Refrigerant Lines on 2003 Chrysler Voyager?A: Before you work on the underbody refrigerant lines, raise and support your vehicle first. Cut off the rubber hose that goes to the heater and unhook the C-pillar quick connect fitting. Loosen one screw and pull out the other screw at every bracket connected to the underbody in front and then lower the rear of the line to drain the coolant into a container. Loose the hose clamps on the end and extract the line from beneath the hood. Lift the vehicle, secure it so it won't move, recover the A/C system and then loosen and remove one screw at every bracket on the rear A/C lines. Carefully remove the A/C lines from the two clamps in the rear and then take off the compressor fittings on the end of each line in the front. Take out the bolt holding the A/C lines to the block in the rear A/C housing and split the block. Undo the tire, free the ABS harness from where it connects to the flex hoses and remove the big hoses from the bracket on the underbody. Cut off the ends of the rubber heater line hoses at the front of the vehicle, remember to loosen the hose clamps there as well and let the front hoses hang loose before working on the rear A/C lines. Remove the nylon piece that holds the lines inside the rear block. After crossing the rear line, secure it with underbody straps, attach the front hose with a hose clamp and tighten the quick fitting at the end. Only after finishing this work can you lower the vehicle to fill the cooling sytem. In the area of the rear air conditioning lines, replace the O-rings and gaskets first and make sure to wax-free refrigerant oil all the connections. Start by inserting the rear outlet of the A/C into the rear block with the nylon wedge, bind the A/C lines to the underbody brackets, split open the compression fittings in the center section and add the fastener to join the rear A/C housing's sealing block. Install the ABS harness in its clips, put heater hoses in the appropriate underbody brackets, fasten both lines to the front hoses with hose clamps, lift the vehicle to finish the work, evacuate and recharge and then fill the cooling system.
Related 2003 Chrysler Voyager Parts
 2003 Chrysler Voyager Blower Motor Resistor
 2003 Chrysler Voyager A/C Accumulator
 2003 Chrysler Voyager A/C Clutch
 2003 Chrysler Voyager A/C Compressor
 2003 Chrysler Voyager A/C Expansion Valve
 2003 Chrysler Voyager A/C Switch
 2003 Chrysler Voyager Blower Control Switches
 2003 Chrysler Voyager Blower Motor
 2003 Chrysler Voyager Cabin Air Filter
 2003 Chrysler Voyager Evaporator
 2003 Chrysler Voyager Heater Core
 2003 Chrysler Voyager HVAC Pressure Switch