JeepParts
My Garage
My Account
Cart
OEM 2003 Dodge Durango Timing Chain
Engine Timing Chain- Select Vehicle by Model
- Select Vehicle by VIN
Select Vehicle by Model
orMake
Model
Year
Select Vehicle by VIN
For the most accurate results, select vehicle by your VIN (Vehicle Identification Number).
1 Timing Chain found


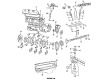
2003 Dodge Durango Timing Chain Part Number: 83507095
Product Specifications- Other Name: Sprocket Package - Timing; Engine Timing Chain Kit; Timing Gear; Gear Assembly; Timing Gear Set; Includes Cam And Crankshaft Sprockets; Chain, Timing
- Item Weight: 4.30 Pounds
- Item Dimensions: 6.4 x 6.5 x 3.4 inches
- Condition: New
- Fitment Type: Direct Replacement
- SKU: 83507095
- Warranty: This genuine part is guaranteed by Mopar's factory warranty.
2003 Dodge Durango Timing Chain Parts and Q&A
- Q: How to Service and Repair a Timing Chain on 2003 Dodge Durango?A: You should start the service and repair of the timing chain by unhooking the negative cable from the battery and emptying the cooling system. Uncover the radiator fan shroud by removing the right and left cylinder head covers first. Line up the TDC mark on the timing chain cover with the timing mark on the crankshaft damper, making certain the marks on the camshaft sprocket for the V8 are facing at 12 o'clock. After taking off the power steering pump, detach the plugs from the cylinder heads to see the fasteners on the chain guide. Take away the oil fill housing to access the tensioner arm fastener on the right side and then remove the crankshaft damper and timing chain cover. After pinning down the first chain tensioner, put something over the oil pan opening to prevent any parts from entering. Then, remove the second chain tensioners and camshaft sensor from the right cylinder head, so you do not damage the camshaft target wheel. After taking out the left and right camshaft sprocket bolts, rotate each of the camshafts to neutral and remove them gently. Release the idler sprocket assembly bolt and gently push the idler sprocket assembly and crank sprocket towards the engine to take out the two chains, chains guides and tensioner arms, along with the tensioner. Review the sprockets for excessive damage, the idler sprocket for any wear and examine the chain guides and tensioner arms for grooves. To install, depress the secondary chain tensioner piston, insert a lock pin and keep it compressed. Placed over the oil pump, tighten the bolts of the primary chain tensioner to a torque of 28 Nm. Place the right side chain tensioner arm and tighten it to 17 Nm with Mopar Lock N. Seal before repeating with the same for the left hand side chain guide and tensioner arm. Device 3 on the right side and tighten it to 28 Nm. Put the two secondary chains onto the idler sprocket, checking that you see the plated links and use tool 8515 to secure the chains. Place the main chain links into line with the timing notches on both sprockets. Put some lubricant on the idler shaft and bushings and join all chains, crankshaft sprocket and idler sprocket as an assembly, using an elastic strap to hold the chains in place. Fit the plated links of the chain on the marks mentioned above and attach the camshafts without tightening and before wiping off the bolts' oil. Make certain that the plated links touch the marks on the sprockets and that the "V8" is set at the 12 o'clock position. Secure the secondary chain tensioners first, tightening their bolts to 28 Nm and next lubricate the washer and tighten the idler sprocket assembly retaining bolt to 34 Nm. Loosen all the pins on the tensioner, making sure you do not push in the ratchet by hand. Fix a tightness gauge on the left and right camshaft sprocket bolts and tighten them to 122 Nm. after the engine rotates two turns, look at the markings and check they are in the proper spot. Coat all three chains with engine oil and check the idler gear to make sure no more than 0.10 - 0.25 mm can be inserted into the hole at its end, replacing it if necessary. Then, put on the timing chain cover and crankshaft damper, then fit the cylinder head covers, coating the special threaded plug in the main cylinder head with sealant before installation. First, put in the oil fill housing; add the left cylinder access cap-plug, the power steering pump and the radiator fan shroud; next, fill the coolant system and join the negative cable back to the battery.
Related 2003 Dodge Durango Parts
 2003 Dodge Durango Cam Gear
 2003 Dodge Durango Camshaft Bearing
 2003 Dodge Durango Camshaft Plug
 2003 Dodge Durango Crankshaft Pulley
 2003 Dodge Durango Crankshaft Thrust Washer Set
 2003 Dodge Durango Dipstick
 2003 Dodge Durango Lash Adjuster
 2003 Dodge Durango Oil Pan Gasket
 2003 Dodge Durango Piston Ring Set
 2003 Dodge Durango Pushrod
 2003 Dodge Durango Rod Bearing
 2003 Dodge Durango Timing Cover