JeepParts
My Garage
My Account
Cart
OEM 2003 Dodge Neon Rack And Pinion
Steering Rack And Pinion- Select Vehicle by Model
- Select Vehicle by VIN
Select Vehicle by Model
orMake
Model
Year
Select Vehicle by VIN
For the most accurate results, select vehicle by your VIN (Vehicle Identification Number).
2 Rack And Pinions found

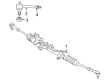
2003 Dodge Neon Steering Gear Part Number: 5093465AA
Product Specifications- Other Name: Gear Power Steering; Rack and Pinion Assembly; Steering Gearbox; Gear Assembly
- Condition: New
- Fitment Type: Direct Replacement
- SKU: 5093465AA
- Warranty: This genuine part is guaranteed by Mopar's factory warranty.
2003 Dodge Neon Steering Gear Part Number: 5093463AA
Product Specifications- Other Name: Gear - Power Steering; Rack and Pinion Assembly; Steering Gearbox; Gear Assembly; Gear Power Steering
- Condition: New
- Fitment Type: Direct Replacement
- SKU: 5093463AA
- Warranty: This genuine part is guaranteed by Mopar's factory warranty.
2003 Dodge Neon Rack And Pinion Parts and Q&A
- Q: How to Remove and Install a Rack and Pinion Steering Gear on 2003 Dodge Neon?A: Put the steering wheel straight ahead and lock it so that the Clock Spring is not turned or moved. In the passenger area, loosen and remove the steering column coupling retainer pin, unscrew and take out the pinch bolt nut and take out the steering column coupling pinch bolt, then part the upper and lower steering column couplings. Raise the car and handle both front tires and wheels as a single set. Use a wrench to loosen the nuts keeping the outer tie rod stud still. To remove the outer tie rods from the steering knuckles and the heat shield, use Remover, Special Tool MB99 1113. Drop the locking attachment on the wiring harness connector for the power steering fluid pressure switch and pull it free. Unscrew the tube nut joining the power steering hose to the grip, loosen the clamp and part the fluid cooler hose from the grip. Release the spring clips covering the routing clips on the front of the rack and pinion and take out the fluid pressure hose and cooler tube. Remove the two screws that are holding the cooler to the front suspension so it hangs loose at the back of the vehicle. Take off the screws that secure the splash shield for the drive-belt and lift off the shield, then remove the strut in the right front corner that joins the body and crossmember and the washer from behind it on the torque strut bolt. Restrict the bolts holding the engine torque strut in place and then release the strut from the car. Make a mark on the body of the car exciting the front suspension crossmember location to guide you in proper reinstallation. Set a transmission jack below the center of the front suspension crossmember and lift it until it supports the part. Unbolt the two bolts securing the crossmember to the frame rails at the front and loosen but maintain the front isolator bushing on two bolts that are now free of the tapping plates. Raise the power steering rack and pinion's side of the front suspension crossmember enough so it doesn't get in the way of removing it from the back. Take out the roll pin that holds the steering column lower coupling to the power steering rack and pinion pinion shaft with a roll pin punch and then push the coupling away from the shaft. Tap in the pinion shaft dash cover seal on the power steering rack and pinion housing and pull it off. Take off the four bolts on the rack and pinion to the suspension crossmember and pull the rack and pinion out. Attach the rack and pinion to the front suspension crossmember, fit the four bolts and tighten them to 90 inches of torque. Carefully center the pinion shaft dash cover seal onto the pinion shaft, then line the holes on the dash cover seal up with the tabs on the housing. Once the steering column lower coupling is partly pushed through the hole, put its flat against the flat on the pinion shaft and slide the coupling on so that the hole for the roll pin lines up with the groove, then insert the roll pin. Start by centering the power steering rack and pinion, above it raise the front suspension crossmember and power steering rack and pinion until the crossmember touches its mounting place. Insert the rear mounting bolts into the holes of the tapping plates and fit and start the tires before putting in and slightly tightening the four wheel mounting bolts to around 2 Nm (20 inch lbs.). Move the front suspension crossmember up to the scratches while using a soft face hammer and tighten the bolts at the back to 203 Nm (150 ft. lbs.) and the bolts at the front to 142 Nm (105 ft. lbs.). Put on the torque strut for the engine and tighten the attaching bolts properly. Set the washer on the torque strut bolt, fit the pencil strut to the right front corner and tighten the nuts until they read 58 Nm (43 ft. lbs.). Install the drive-belt splash shield and its fasteners again and then wipe the open parts and gear ports of the power steering hose clean. Put on a new power steering fluid-lubricated O-ring into the pressure hose. Apply the power steering fluid pressure hose to the rack and pinion, turning on the threads just a little. If your car has one, refit the cooler line, open all of the routing clips and install the low-pressure engine hose into the clips. Be sure that the cooler is set correctly and that its tube goes into the right slot in the routing clip. Then close the clips and tighten the tube nut to 34 Nm (25 ft. lbs.). Screw the cooler in place on the front suspension crossmember with the two provided screws. Take the hose clamp, fit it on the hose, place it over the steel fitting and secure the clamp past the bead that circles the fitting. Bring the fluid return hose around the rack and pinion ahead, secure it and put the harness connector for the power steering fluid pressure switch back in its position with the tab locked down. On every outer tie rod, install the heat shield, fasten the outer tie rod on the knuckle's steering arm and tighten the nut on the stud to 55 Nm (40 ft. lbs.) after it is secure. Following this, screw the wheel mounting nuts to 135 Nm (100 ft. lbs.) and finish by lowering the car onto the ground. Attach the seal for the dash-to-lower coupling over the lower coupling's collar, remembering to put grease on the seal's one side. Inside the car's passenger compartment, position the steering column all the way upward, secure the tilt lever with the cable, connect the lower coupling to the upper coupling, insert the pinch bolt, tighten the nut to 28 Nm (250 inch lbs.) and insert the pinch bolt retainer pin. Take out the steering wheel holder, move the lower coupling in the dashed area without noise, carry out the first use procedure for the power steering pump, carefully check for potential fluid leaks and then adjust the front toe setting.
Related 2003 Dodge Neon Parts
 2003 Dodge Neon Power Steering Pump
 2003 Dodge Neon Steering Wheel
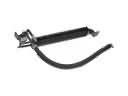 2003 Dodge Neon Power Steering Cooler
 2003 Dodge Neon Power Steering Hose
 2003 Dodge Neon Steering Column
 2003 Dodge Neon Steering Column Cover
 2003 Dodge Neon Steering Gear Box
 2003 Dodge Neon Tie Rod End