JeepParts
My Garage
My Account
Cart
OEM 2003 Dodge Ram 1500 Van Oil Pan
Oil Drain Pan- Select Vehicle by Model
- Select Vehicle by VIN
Select Vehicle by Model
orMake
Model
Year
Select Vehicle by VIN
For the most accurate results, select vehicle by your VIN (Vehicle Identification Number).
3 Oil Pans found


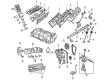
2003 Dodge Ram 1500 Van Oil Pan Part Number: 53020916
Product Specifications- Other Name: Pan - Engine Oil; Engine Oil Pan; Pan, Oil Partial; Pan Engine Oil
- Item Weight: 14.30 Pounds
- Item Dimensions: 24.5 x 21.6 x 11.1 inches
- Condition: New
- Fitment Type: Direct Replacement
- SKU: 53020916
- Warranty: This genuine part is guaranteed by Mopar's factory warranty.


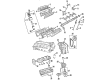
2003 Dodge Ram 1500 Van Oil Pan Part Number: 53020914AB
Product Specifications- Other Name: Pan - Engine Oil; Engine Oil Pan; Pan Engine Oil
- Item Weight: 9.90 Pounds
- Item Dimensions: 22.9 x 10.6 x 9.5 inches
- Condition: New
- Fitment Type: Direct Replacement
- SKU: 53020914AB
- Warranty: This genuine part is guaranteed by Mopar's factory warranty.

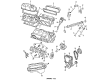
2003 Dodge Ram 1500 Van Oil Pan Part Number: 53020911
Product Specifications- Other Name: Pan - Engine Oil; Engine Oil Pan; Oil Pan Gasket Set; Pan, Oil, Partial; Pan Engine Oil
- Item Weight: 7.50 Pounds
- Item Dimensions: 18.5 x 10.6 x 9.4 inches
- Condition: New
- Fitment Type: Direct Replacement
- SKU: 53020911
- Warranty: This genuine part is guaranteed by Mopar's factory warranty.
2003 Dodge Ram 1500 Van Oil Pan Parts and Q&A
- Q: How to remove and reinstall the oil pan on 2003 Dodge Ram 1500 Van?A: Before taking out the oil pan, first remove its negative cable, the engine oil dipstick and then the air cleaner inlet duct. Leave the engine controller connected and place it aside out of the way, separated from the cowl. Afterward, take out both the fasteners on top of the shroud for the cooling fan and the engine cover, then raise the car on a hoist and drain the engine oil. Take off the transmission oil cooler lines from the oil pan clip, then remove the braces between the engine and the transmission, the starter motor and the transmission cover. Unscrew the engine mount insulator nuts on the left and right and next, unbolt the oil pan, remove it from the vehicle and rotate the crankshaft so the #1 and #2 journal counterweight is moved out of the way. When cleaning, scrub both surfaces of the block and pan gasket, remove or cut off any excess sealant on the rear main cap oil pan groove, do not remove the sealant inside the rear main cap slots and if required, trim any leftover sealant in the engine. Spray a good solvent on the oil pan and wipe it dry and also clean the oil screen and pipe very well in fresh solvent as you check for any damage on the screen. If you find the oil drain plug damaged or threaded part worn out, replace it and if the flange on the oil pan is bent, straighten it or change it. Installation is made easier if you cut the heads off four 5/16 x 1 1/2 in. bolts and make a slot at the top, then press the dowels into the cylinder block holes. A small bit of Mopar Silicone Rubber Adhesive Sealant or equivalent should be applied to the corner of the cap and cylinder block, place the gasket over the dowels, align it with the block, center the pan over the dowels and gasket, screw the bolts in until you reach 24 Nm (215 in. lbs.) and finish with one extra turn of the bolts (a total of two turns). After removing all the dowels, tighten the remaining pan bolts to 24 Nm (215 in. lbs.) and install the oil pan drain plug at 34 Nm (25 ft. lbs.). Place the engine lowest in position and make certain the mount insulator slides are set over their respective brackets. Insert the insulator mount nuts, screw them tight to a torque of 102 Nm (75 ft. lbs.) and put the transmission inspection cover, starter motor and engine into their brackets. Attach the oil cooler lines to the brackets, lower the car to the ground and put the shroud mounting bolts in the top slots. Install the controller on the cowl panel, put on the air intake duct and put in the oil dipstick. Pour engine oil into the crankcase, attach the battery negative cable, turn on the engine and check everywhere for possible leaks.
Related 2003 Dodge Ram 1500 Van Parts
 2003 Dodge Ram 1500 Van Crankshaft Pulley
 2003 Dodge Ram 1500 Van Dipstick
 2003 Dodge Ram 1500 Van Dipstick Tube
 2003 Dodge Ram 1500 Van Engine Mount
 2003 Dodge Ram 1500 Van Harmonic Balancer
 2003 Dodge Ram 1500 Van Oil Filler Cap
 2003 Dodge Ram 1500 Van Oil Filter
 2003 Dodge Ram 1500 Van Oil Pan Gasket
 2003 Dodge Ram 1500 Van Timing Chain
 2003 Dodge Ram 1500 Van Timing Cover Gasket
 2003 Dodge Ram 1500 Van Transmission Mount
 2003 Dodge Ram 1500 Van Valve Cover Gasket