JeepParts
My Garage
My Account
Cart
OEM Dodge Ram 1500 Van Oil Pan
Oil Drain Pan- Select Vehicle by Model
- Select Vehicle by VIN
Select Vehicle by Model
orMake
Model
Year
Select Vehicle by VIN
For the most accurate results, select vehicle by your VIN (Vehicle Identification Number).
3 Oil Pans found


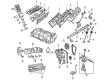
Dodge Ram 1500 Van Oil Pan Part Number: 53020916


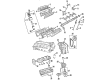
Dodge Ram 1500 Van Oil Pan Part Number: 53020914AB

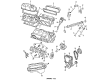
Dodge Ram 1500 Van Oil Pan Part Number: 53020911
Dodge Ram 1500 Van Oil Pan
Choose OEM Oil Pan that meet Dodge factory standards. Dodge designs and tests every component for precision and durability. Each Oil Pan follows strict manufacturing steps to lock in quality and fit. If your Dodge Ram 1500 Van matters to you, OEM parts make the smart choice. You'll get the exact look, feel, and performance you expect. Shop genuine Ram 1500 Van parts at the highly competitive prices online. Enjoy a manufacturer's warranty, a hassle-free return policy, and rapid delivery. No more guesswork with off brands. Get genuine parts with exact fit and true factory performance. Shop with confidence today at JeepPartsDeal.com.
Dodge Ram 1500 Van Oil Pan Parts and Q&A
- Q: How to service and repair the oil pan on Dodge Ram 1500 Van?A:Disconnect the negative wire of the battery, pull out the engine oil dipstick and get rid of the air cleaner duct. Release the engine controller from its place near the cowl and make sure it is secure without removing the wires. Lift off the upper fasteners on the cooling fan shroud, the engine cover and use a hoist to raise the car. Reach under the car and remove the engine oil and the end of the transmission oil cooler lines from their mounting clip on the oil pan. Unbolt the engine to transmission braces, the starter motor and the transmission cover to remove each. Take off both engine mount insulator nuts, the oil pan bolts and lift the oil pan from the car, making sure to turn the crankshaft to clear the #1 and #2 journal counterweight when needed. Scrape the dirt off the gasket surfaces and the oil groove gently, peel out some of the extra sealant's surface but not the whole inside and wipe the oil pan down while it's still in the solvent. Check the oil drain plug and plug hole for signs of damaged or stripped threads. If necessary, repair them. At the same time, examine the oil pan mounting flange for deformations or bents. Prepare four alignment dowels by making bolts from 5/16 x 1 1/2 inch bolts, removing the heads and cutting a slot in each of the tops. Fix the dowels into the block, coat a bit of Silicone Rubber Adhesive Sealant at the corner of the cap and block near each dowel and then put the one-piece gasket over the dowels on the block. Fit the oil pan above the dowels and over the gasket, drive in all of the bolts and tighten them to 24 Nm (215 in. lbs.). Remove the dowels and tighten the bolts remaining in the pan to the same value. Insert and fasten the drain plug in the oil pan to 34 Nm (25 ft. lbs.), guide the engine to a lowered position with the engine insulators fitting with the brackets and fasten the mount insulator nuts at 102 Nm (75 ft. lbs.). After placing the transmission inspection cover, start and engine on their brackets, join the oil cooler tubes in their clips. Lower the car, fit the bolts for the fan shroud in the upper cowl, bolt on the controller and install the air cleaner inlet duct and engine dipstick again. Add engine oil to the crankcase, reattach the battery's negative cable and run the engine to check for any oil leaks.
- Q: How to remove and install the oil pan on Dodge Ram 1500 Van?A:You should disconnect the battery negative cable, remove the oil dipstick and then the air inlet duct to remove the oil pan. Take out the engine controller from the cowl by unbolting it, but keep it attached and ensure it's not hanging loose. Remove next the fasteners and the engine cover at the top of the cooling fan shroud and support the car on a hoist before pouring out the engine oil. Unhook the transmission oil cooler lines from the oil pan clip, take the engine to transmission braces off, remove the starter motor and take the transmission inspection cover off. After removing the left and right engine mount nuts, take out the oil pan fasteners and lift off the oil pan, since the crankshaft may prevent you from getting it out without rotating it to clear the #1&2 journal counterweight. To help with installation, cut the heads off of four 5/16 x 1 1/2 inch bolts and drill slots up their length. Slide the dowels into the cylinder block, put a bit of Mopar Silicone Rubber Adhesive Sealant or similar on the inside corner of the cap and the block and then move the gasket over the dowels and onto the block. Carefully place the oil pan on the dowels and onto the gasket, attach the oil pan bolts and secure them at 24 Nm (215 in. lbs.). After removing the dowels, snap in the oil pan and tighten the bolts to 24 Nm; next, place in the oil pan drain plug and tighten it to 34 Nm. With the engine lowered, put the engine mount insulator brackets over the appropriate bolts and screw on the nuts, tightening to 102 Nm (75 ft. lbs.). Then, install the transmission inspection cover, starter motor and engine to the transmission support brackets. Bring the lines of the transmission oil cooler back to the mounting clips, give the vehicle a lower position, fit the upper cooling fan shroud, connect the controller to the cowling, fit the air feed pipe for the air cleaner and the oil dipstick. Pour engine oil into the crankcase, reattach the battery negative cable, begin driving and examine the car for signs of leaks.


Related Dodge Ram 1500 Van Parts
 Dodge Ram 1500 Van Crankshaft Pulley
 Dodge Ram 1500 Van Dipstick
 Dodge Ram 1500 Van Dipstick Tube
 Dodge Ram 1500 Van Engine Mount
 Dodge Ram 1500 Van Exhaust Valve
 Dodge Ram 1500 Van Harmonic Balancer
 Dodge Ram 1500 Van Oil Filler Cap
 Dodge Ram 1500 Van Oil Filter
 Dodge Ram 1500 Van Oil Pan Gasket
 Dodge Ram 1500 Van Timing Chain
 Dodge Ram 1500 Van Timing Cover Gasket
 Dodge Ram 1500 Van Valve Cover Gasket