JeepParts
My Garage
My Account
Cart
OEM 2005 Chrysler Pacifica Shock Absorber
Suspension Shock Absorber- Select Vehicle by Model
- Select Vehicle by VIN
Select Vehicle by Model
orMake
Model
Year
Select Vehicle by VIN
For the most accurate results, select vehicle by your VIN (Vehicle Identification Number).
4 Shock Absorbers found

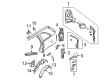
2005 Chrysler Pacifica Shock Reinforcement, Driver Side Part Number: 5054625AD
$16.87 MSRP: $96.75You Save: $79.88 (83%)Ships in 1-2 Business DaysProduct Specifications- Other Name: Reinforcement - Shock Absorber; Shock Absorber Bracket, Left; Reinforcement Shock Absorber
- Position: Driver Side
- Replaces: 5054625AB
- Item Weight: 6.80 Pounds
- Condition: New
- Fitment Type: Direct Replacement
- SKU: 5054625AD
- Warranty: This genuine part is guaranteed by Mopar's factory warranty.

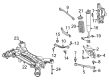
2005 Chrysler Pacifica Shock Absorber, Rear Part Number: 4725865AD
$629.95 MSRP: $736.00You Save: $106.05 (15%)Ships in 1-2 Business DaysProduct Specifications- Other Name: Absorber - Suspension; Shock Absorber, Rear;Strut/Coil Kit;ABS;Complete Strut; Shock; Shock Absorber Suspension
- Position: Rear
- Replaces: 4725865AC, 4725865AB
- Item Weight: 11.50 Pounds
- Item Dimensions: 34.0 x 7.7 x 3.0 inches
- Condition: New
- Fitment Type: Direct Replacement
- SKU: 4725865AD
- Warranty: This genuine part is guaranteed by Mopar's factory warranty.
2005 Chrysler Pacifica Shock Absorber, Rear Part Number: 4766854AD
Product Specifications- Other Name: Absorber - Suspension; Shock Absorber, Rear;Strut/Coil Kit;ABS;Complete Strut; Shock; Shock Absorber Suspension
- Position: Rear
- Replaces: 4766854AC
- Item Weight: 11.70 Pounds
- Item Dimensions: 29.0 x 7.2 x 6.4 inches
- Condition: New
- Fitment Type: Direct Replacement
- SKU: 4766854AD
- Warranty: This genuine part is guaranteed by Mopar's factory warranty.
- Product Specifications
- Other Name: Reinforcement - Shock Absorber; Shock Absorber Bracket, Right; Reinforcement Shock Absorber
- Position: Passenger Side
- Replaces: 5054624AB
- Item Weight: 6.20 Pounds
- Item Dimensions: 18.0 x 9.0 x 4.7 inches
- Condition: New
- Fitment Type: Direct Replacement
- SKU: 5054624AD
- Warranty: This genuine part is guaranteed by Mopar's factory warranty.
2005 Chrysler Pacifica Shock Absorber Parts and Q&A
- Q: How to Service and Repair a Shock Absorber on 2005 Chrysler Pacifica?A: When repairing or servicing the suspension strut assembly, first lift and support the car, then take off the wheel and tire assembly. Put a label on each strut assembly, writing right or left on it. Loosen the screw that fixes the wheel sensor routing bracket to the strut and take it out. To keep the stud from rotating when removing the nut from it, hold an open-end wrench against the machined flat at the end of the stud. Unscrew the nuts on the strut assembly bracket, keeping the attaching bolts in place to prevent turning of the steering knuckle to strut assembly. Take off the two bolts and nuts keeping the strut clevis attached to the steering knuckle. After removing the nuts from the coolant recovery bottle, move it aside when doing servicing of the left strut assembly. Loosen and take out the three nuts holding the strut assembly upper mount to the strut tower, then take the whole assembly out of the car. Use a Strut Spring Compressor, Pentastar Service Equipment (PSE) tool W-7200 or an equivalent device, to draw the coil spring in and make certain the strut shaft nut is not loosened before doing so. Set the strut assembly in place, squeeze the coil spring with a strut handle until all tension is dropped from the upper mount and then lock the strut shaft and release the retaining nut with Special Tool 6864. Unplug the top mount and proceed to replace the pivot bearing, top spring seat or isolator, when the situation demands it. Lift the clamp from the coil spring and then take the strut straight out the bottom. Before you loosen tension on the coil spring, take note of the position of the lower spring coil end. Work the dust shield together with the jounce bumper off the strut shaft as a single group, then free them from each other. Check all the parts of the strut assembly for any damage and replace what needs to be replaced. When putting together, place the coil in the correct position inside the compressor, squeeze as needed for strut insertion and if the isolator and upper seat were replaced, place them when the strut is complete. Add the pivot bearing to the seat above the spring and put the lower isolator underneath the spring on the lower seat. Put the jounce bumper and dust shield onto the strut shaft so that the dust shield snaps into its place. Pass the strut through the bottom of the coil spring so it lines up properly and attach the strut mount on top of the strut's shaft. While making sure the upper mount, pivot bearing and upper seat are aligned, tighten the strut shaft retaining nut to 115 Nm (85 ft. lbs.) and then release the tension from the coil spring. The next step is to attach the strut assembly to the strut tower using three mounting nut/washer assemblies welded at a force of 28 Nm (250 inch lbs.). Additionally, put the coolant recovery bottle back if your motor has one. Do not turn the steering knuckle to strut assembly attaching bolts during the installation; aim the knuckle into the clevis bracket and tighten the bolts at the top of the strut clevis to 81 Nm (60 ft. lbs.), plus an additional 1/4 turn. Put the stabilizer bar link mounting stud in place and hold it still so you can tighten the nut to 88 Nm (65 ft. lbs.). Fit the routing bracket back on the wheel speed sensor, install the tire and wheel assembly and tighten the wheel mounting nuts to 135 Nm (100 ft. lbs.). Afterwards, lower the vehicle and align the wheels if necessary.
Related 2005 Chrysler Pacifica Parts
 2005 Chrysler Pacifica Wheel Bearing
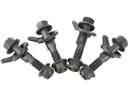 2005 Chrysler Pacifica Alignment Bolt
 2005 Chrysler Pacifica Bump Stop
 2005 Chrysler Pacifica Coil Spring Insulator
 2005 Chrysler Pacifica Coil Springs
 2005 Chrysler Pacifica Control Arm Bushing
 2005 Chrysler Pacifica Crossmember Bushing
 2005 Chrysler Pacifica Lateral Link
 2005 Chrysler Pacifica Shock And Strut Mount
 2005 Chrysler Pacifica Steering Knuckle
 2005 Chrysler Pacifica Sway Bar Link
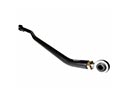 2005 Chrysler Pacifica Track Bar