JeepParts
My Garage
My Account
Cart
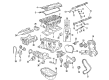
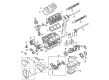
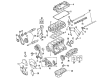
OEM 2004 Dodge Stratus Timing Cover
Engine Timing Cover- Select Vehicle by Model
- Select Vehicle by VIN
Select Vehicle by Model
orMake
Model
Year
Select Vehicle by VIN
For the most accurate results, select vehicle by your VIN (Vehicle Identification Number).
11 Timing Covers found


2004 Dodge Stratus Timing Cover Part Number: 4648934AA
$41.75 MSRP: $52.93You Save: $11.18 (22%)Ships in 1-2 Business DaysProduct Specifications- Other Name: Cover - Timing Belt; Upper Cover; Outer Timing Cover; Cover Timing Belt
- Item Weight: 0.90 Pounds
- Item Dimensions: 12.5 x 9.1 x 1.3 inches
- Condition: New
- Fitment Type: Direct Replacement
- SKU: 4648934AA
- Warranty: This genuine part is guaranteed by Mopar's factory warranty.


2004 Dodge Stratus Timing Cover, Inner Part Number: 4781593AA
$114.56 MSRP: $138.00You Save: $23.44 (17%)Ships in 1-2 Business DaysProduct Specifications- Other Name: Cover - Timing Case; Engine Timing Cover, Inner; Front Cover; Inner Cover; Inner Timing Cover; Cover Timing Belt; Cover Timing Case
- Position: Inner
- Item Weight: 4.40 Pounds
- Item Dimensions: 18.9 x 18.2 x 8.1 inches
- Condition: New
- Fitment Type: Direct Replacement
- SKU: 4781593AA
- Warranty: This genuine part is guaranteed by Mopar's factory warranty.


2004 Dodge Stratus Front Cover, Driver Side Part Number: MD376390
$52.02 MSRP: $56.85You Save: $4.83 (9%)Ships in 1-2 Business DaysProduct Specifications- Other Name: Cover - Timing Belt; Engine Timing Cover, Front; Rear Cover; Cover Timing Belt
- Position: Front Driver Side
- Item Weight: 0.80 Pounds
- Item Dimensions: 10.0 x 6.4 x 3.3 inches
- Condition: New
- Fitment Type: Direct Replacement
- SKU: MD376390
- Warranty: This genuine part is guaranteed by Mopar's factory warranty.


2004 Dodge Stratus Front Cover, Upper Part Number: MD378731
$35.82 MSRP: $65.85You Save: $30.03 (46%)Ships in 1-2 Business DaysProduct Specifications- Other Name: Cover - Timing Belt; Engine Timing Cover, Upper; Upper Cover; Cover Timing Belt; Timing Cover
- Position: Upper
- Item Weight: 1.00 Pounds
- Condition: New
- Fitment Type: Direct Replacement
- SKU: MD378731
- Warranty: This genuine part is guaranteed by Mopar's factory warranty.


2004 Dodge Stratus Timing Cover Part Number: 4792604AA
$257.78 MSRP: $326.78You Save: $69.00 (22%)Ships in 1-2 Business DaysProduct Specifications- Other Name: Cover - Timing Belt; Engine Timing Cover; Front Cover; Cover Timing Belt
- Item Weight: 5.20 Pounds
- Item Dimensions: 14.0 x 13.9 x 6.8 inches
- Condition: New
- Fitment Type: Direct Replacement
- SKU: 4792604AA
- Warranty: This genuine part is guaranteed by Mopar's factory warranty.


2004 Dodge Stratus Front Cover, Passenger Side Part Number: MD376392
Product Specifications- Other Name: Cover - Timing Belt; Engine Timing Cover, Front; Cover Timing Belt
- Position: Front Passenger Side
- Item Weight: 0.80 Pounds
- Item Dimensions: 10.7 x 9.2 x 2.7 inches
- Condition: New
- Fitment Type: Direct Replacement
- SKU: MD376392
- Warranty: This genuine part is guaranteed by Mopar's factory warranty.


2004 Dodge Stratus Front Cover, Lower Part Number: MD363100
Product Specifications- Other Name: Cover - Timing Belt; Engine Timing Cover, Lower; Lower Cover; Cover Timing Belt
- Position: Lower
- Item Weight: 1.10 Pounds
- Item Dimensions: 13.9 x 11.6 x 2.1 inches
- Condition: New
- Fitment Type: Direct Replacement
- SKU: MD363100
- Warranty: This genuine part is guaranteed by Mopar's factory warranty.


2004 Dodge Stratus Front Cover, Lower Part Number: MD325374
Product Specifications- Other Name: Cover - Timing Belt; Engine Timing Cover, Front Lower; Lower Cover; Cover Timing Belt; Timing Cover
- Position: Front Lower
- Item Weight: 0.90 Pounds
- Item Dimensions: 13.3 x 9.5 x 2.9 inches
- Condition: New
- Fitment Type: Direct Replacement
- SKU: MD325374
- Warranty: This genuine part is guaranteed by Mopar's factory warranty.


2004 Dodge Stratus Timing Cover Part Number: 4663459AD
Product Specifications- Other Name: Cover - Timing Belt; Lower Cover; Outer Timing Cover; Cover Timing Belt
- Item Weight: 0.80 Pounds
- Item Dimensions: 11.0 x 9.5 x 1.6 inches
- Condition: New
- Fitment Type: Direct Replacement
- SKU: 4663459AD
- Warranty: This genuine part is guaranteed by Mopar's factory warranty.

2004 Dodge Stratus Front Cover, Inner Part Number: MR984958
Product Specifications- Other Name: Cover - Timing Belt; Engine Timing Cover, Inner, Rear; Inner Cover; Cover Timing Belt
- Position: Inner
- Item Weight: 0.60 Pounds
- Condition: New
- Fitment Type: Direct Replacement
- SKU: MR984958
- Warranty: This genuine part is guaranteed by Mopar's factory warranty.

2004 Dodge Stratus Inner Cover Part Number: MD330008
Product Specifications- Other Name: Cover - Timing Belt; Engine Timing Cover, Inner; Lower Cover; Cover Timing Belt; Timing Cover
- Position: Inner
- Condition: New
- Fitment Type: Direct Replacement
- SKU: MD330008
- Warranty: This genuine part is guaranteed by Mopar's factory warranty.
2004 Dodge Stratus Timing Cover Parts and Q&A
- Q: How to Maintain and Fix a Timing Cover on 2004 Dodge Stratus?A: The process starts with taking out the upper timing belt cover fasteners and afterward the cover as well. Remove the negative battery cable and place the car up on a hoist. Take away the right front wheel, plus the plastic splash guard, then remove the accessory drive belts, crankshaft damper and AC/Generator belt tensioner. Raise your vehicle and free the generator and bracket after disconnecting the connectors first. With the engine still supported, raise the car again and remove the fasteners holding the lower timing cover. Then take off this cover. After that, take off both the upper and lower front timing belt covers, then remove the timing belt and its idler pulley. Both camshaft sprockets should be removed with Special Tool 6847, being careful to avoid rotation and the rear timing belt cover should be removed afterward. To install the components, begin by installing the rear timing belt cover and tightening its bolt, to the correct torque value. Use Special Tool 6847 and tighten the bolts in the center of each camshaft sprocket to 85 ft. lbs. After that, let's install the timing belt idler pulley, the timing belt and finish with installing both the upper and lower front timing belt covers. To secure the lower front cover's fasteners, set them to 6 Nm (50 in. lbs.). Afterward, lower the car, replace the generator and bracket and connect the generator connectors. Raise the vehicle once more to fit the AC/Generator belt tensioner, crankshaft damper and all the drive belts. Once done, secure the belt splash shield and the front wheel, adjust the car, attach the negative battery cable and finish the electric parts as mentioned in step three. Attach the upper front cover, then tighten each fastener to 6 Nm (50 in. lbs.).
Related 2004 Dodge Stratus Parts
 2004 Dodge Stratus Oil Filter
 2004 Dodge Stratus Engine Mount
 2004 Dodge Stratus Cam Gear
 2004 Dodge Stratus Crankshaft
 2004 Dodge Stratus Crankshaft Seal
 2004 Dodge Stratus Dipstick
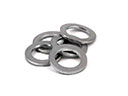 2004 Dodge Stratus Drain Plug Washer
 2004 Dodge Stratus Oil Filler Cap
 2004 Dodge Stratus Piston
 2004 Dodge Stratus Rocker Arm
 2004 Dodge Stratus Timing Belt Tensioner
 2004 Dodge Stratus Valve Stem Seal