JeepParts
My Garage
My Account
Cart
OEM 2004 Jeep Grand Cherokee Piston
Engine Pistons- Select Vehicle by Model
- Select Vehicle by VIN
Select Vehicle by Model
orMake
Model
Year
Select Vehicle by VIN
For the most accurate results, select vehicle by your VIN (Vehicle Identification Number).
2 Pistons found


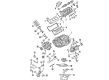
2004 Jeep Grand Cherokee Piston Part Number: 68233351AA
Product Specifications- Replaces: 5012362AF, 5012362AE, 5012362AC, 5012362AD
- Item Weight: 3.00 Pounds
- Item Dimensions: 10.5 x 6.3 x 6.5 inches
- Condition: New
- Fitment Type: Direct Replacement
- SKU: 68233351AA
- Warranty: This genuine part is guaranteed by Mopar's factory warranty.

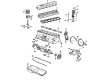
2004 Jeep Grand Cherokee Piston Part Number: 4798332AC
Product Specifications- Other Name: Piston Pin And Rod; Piston Pin And Rod
- Replaces: 4798333AC, 4798331AC, 4798333AB, 4798330AB, 4798330AC
- Item Weight: 3.20 Pounds
- Item Dimensions: 13.3 x 6.1 x 4.4 inches
- Condition: New
- Fitment Type: Direct Replacement
- SKU: 4798332AC
- Warranty: This genuine part is guaranteed by Mopar's factory warranty.
2004 Jeep Grand Cherokee Piston Parts and Q&A
- Q: How to Replace a Piston and Connecting Rod in an Engine on 2004 Jeep Grand Cherokee?A: Start by removing the engine cylinder head cover, rocker arms, bridges, pivots and push rods and after that, the engine cylinder head. Raise the pistons a little, position the reamer above the ridges on the cylinder's top and smooth out the ridge, keeping any debris collected with a lint-free cloth. Lift the vehicle, drain the oil and then take out the oil pan and gasket. Then, once the head is off, take out the main bearing cap brace and both of the connecting rod bearing caps and inserts and mark where they came from on the cylinder bore, since the connecting rod and caps have identifying two-letter stamps. Hang the vehicle close to the ground, but not quite touching the floor, so the rod bolts are a couple of inches above the crankshaft and cylinder parts, using rubber hoses to prevent them from touching. Place the piston and connecting rod assemblies inside of the main cylinder bore and make your assistant push them toward the engine head. For setup, make sure the cylinder bores are clean and then, with a lint-free cloth, add some clean engine oil. After removing the pistons, slide the piston rings on and put a light layer of clean engine oil on them. Again, use rubber hoses to stop connecting rod bolts from damaging the crankshaft journals or the cylinder walls. Mount the connecting rod and piston assembly through the top of the cylinder bores, while having the arrow on the top of the piston face the front of the engine. With the vehicle elevated once more, set each stuffing box insert onto its appropriate journal to obtain the specified clearance, using the correct sized, color-coded bearing inserts described in the Connecting Rod Bearing Fitting Chart. On the adjacent cheek or counterweight of the crankshaft is a clear paint mark showing the rod journal color. If needed, larger upper and smaller lower bearing inserts can be paired and a normal-size insert can be combined with one that is 0.025 mm (0.001 in.) smaller to decrease clearance by 0.013 mm (0.0005 in.). Always match bearing caps with the same connecting rods you were given, because each set wears the oil squirter info for its cylinder on an important surface near the camshaft. Make certain the connecting rod bearing caps and inserts are in their rightful places, turning the oil squirt holes so they face the camshaft and the arrows on the pistons point to the front end of the engine. Install the main bearing cap brace, securing the nuts to 47 Nm (35 ft. lbs.) and then replace the oil pan and its gasket. Bring the vehicle down, attach the engine cylinder head, push rods, rocker arms, bridges, pivots and engine cylinder head cover and pump in the engine oil.
Related 2004 Jeep Grand Cherokee Parts
 2004 Jeep Grand Cherokee Timing Chain
 2004 Jeep Grand Cherokee Oil Pan
 2004 Jeep Grand Cherokee Cam Gear
 2004 Jeep Grand Cherokee Crankshaft Seal
 2004 Jeep Grand Cherokee Cylinder Head Gasket
 2004 Jeep Grand Cherokee Engine Mount Bracket
 2004 Jeep Grand Cherokee Exhaust Valve
 2004 Jeep Grand Cherokee Intake Valve
 2004 Jeep Grand Cherokee Lash Adjuster
 2004 Jeep Grand Cherokee Piston Ring Set
 2004 Jeep Grand Cherokee Timing Chain Tensioner
 2004 Jeep Grand Cherokee Valve Stem Seal