JeepParts
My Garage
My Account
Cart
OEM Jeep Grand Cherokee Piston
Engine Pistons- Select Vehicle by Model
- Select Vehicle by VIN
Select Vehicle by Model
orMake
Model
Year
Select Vehicle by VIN
For the most accurate results, select vehicle by your VIN (Vehicle Identification Number).
33 Pistons found


Jeep Grand Cherokee Connecting Rod Part Number: 68090672AA
$291.72 MSRP: $439.00You Save: $147.28 (34%)


Jeep Grand Cherokee Connecting Rod Part Number: 53022257AE
$221.23 MSRP: $328.00You Save: $106.77 (33%)


Jeep Grand Cherokee Piston Part Number: 68147230AA
$356.10 MSRP: $522.00You Save: $165.90 (32%)Ships in 1-3 Business Days
Jeep Grand Cherokee Connecting Rod Part Number: 68090673AA
$288.41 MSRP: $435.00You Save: $146.59 (34%)

Jeep Grand Cherokee Piston Part Number: 5179423AC
$130.17 MSRP: $825.00You Save: $694.83 (85%)Ships in 1-2 Business DaysJeep Grand Cherokee Connecting Rod Part Number: 53022258AE
$243.53 MSRP: $318.00You Save: $74.47 (24%)Ships in 1-2 Business Days
Jeep Grand Cherokee Piston Part Number: 4778876AB
$199.41 MSRP: $228.00You Save: $28.59 (13%)Ships in 1-2 Business Days
Jeep Grand Cherokee Piston Part Number: 68067507AA
$206.24 MSRP: $237.00You Save: $30.76 (13%)Ships in 1-2 Business Days
Jeep Grand Cherokee Connecting Rod Part Number: 53010928AD
$509.41 MSRP: $769.00You Save: $259.59 (34%)Ships in 1-2 Business DaysJeep Grand Cherokee Piston Part Number: 4778875AC
$178.11 MSRP: $262.00You Save: $83.89 (33%)Ships in 1-2 Business DaysJeep Grand Cherokee Piston Part Number: 4778873AB
$178.11 MSRP: $262.00You Save: $83.89 (33%)Ships in 1-2 Business Days


Jeep Grand Cherokee Piston Part Number: 5086011AB


Jeep Grand Cherokee Piston Part Number: 5037491AB

Jeep Grand Cherokee Piston Part Number: 5086010AB


Jeep Grand Cherokee Piston Part Number: 53021539AD


Jeep Grand Cherokee Piston Part Number: 53021538AD


Jeep Grand Cherokee Piston Part Number: 68031890AD


Jeep Grand Cherokee Piston Part Number: 68031891AD


Jeep Grand Cherokee Piston Part Number: 68233351AA

Jeep Grand Cherokee Piston Part Number: 68031605AD
$173.35 MSRP: $255.00You Save: $81.65 (33%)
| Page 1 of 2 |Next >
1-20 of 33 Results
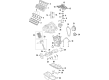
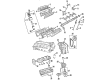
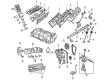
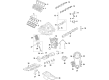
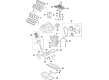
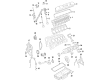
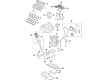
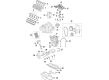
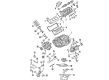
Jeep Grand Cherokee Piston
Choose OEM Piston that meet Jeep factory standards. Jeep designs and tests every component for precision and durability. Each Piston follows strict manufacturing steps to lock in quality and fit. If your Jeep Grand Cherokee matters to you, OEM parts make the smart choice. You'll get the exact look, feel, and performance you expect. Shop genuine Grand Cherokee parts at the highly competitive prices online. Enjoy a manufacturer's warranty, a hassle-free return policy, and rapid delivery. No more guesswork with off brands. Get genuine parts with exact fit and true factory performance. Shop with confidence today at JeepPartsDeal.com.
In Jeep Grand Cherokee vehicles, piston is of much importance given the fact it is fundamental to the internal combustion engine. The major use of a piston in such vehicles is to convert the energy generated during the process of combustion into a mechanical force for propulsion of the vehicle. This is done by what I will shortly describe, The piston applies the force by the expanding gasses directly to the crankshaft. Jeep Grand Cherokee pistons are set to explicit pressures and temperatures and therefore improve the performance of the vehicle. Such pistons are often made of the aluminum alloys, this material offers sufficient weight-to-strength ratio-the requirement of regular driving as well as more critical scenarios. For many years, Jeep Grand Cherokee incorporated different piston type in the engine to maximize the level of efficiency and performance. Usually it's the trunk pistons that are used in Jeep Grand Cherokee both in petrol and diesel engines that contain oil rings for lubrication and side forces. Where as for instance, the Jeep Grand Cherokee high performance models may employ slipper pistons to shave off the grams, the offsetting of mass for better high speed performance. All piston type on the Jeep Grand Cherokee engine is accompanied by cooling cavities and the oil is supplied in order to cope with high condition into the engine, thus making the car long lasting and perform efficiently.
Jeep Grand Cherokee Piston Parts and Q&A
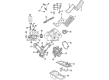
- Q: How to Remove and Replace Piston Assemblies on Jeep Grand Cherokee?A:To get at the piston and connecting rod assembly, you should begin by disconnecting the negative cable on the battery and removing the Oil Pan and gasket/windage tray along with the cylinder head(s). Sometimes, you will have to use a ridge reamer to remove the top ridge of the cylinder bores, covering the pistons as you do this. To remove the piston and rod assembly, turn the Crankshaft to make each rod sit in the cylinder bore's center. Clamping the piece is more accurate than stamping the location with a punch, since the stamp can affect the engine's quality or accuracy; instead, use a permanent ink marker to mark the positions. With the connecting rod cap out of the way, fit Special Tool 8507 Connecting Rod Guides into the connecting rod and bring it out, extending the same treatment to every piston and rod. Quickly set the bearing cap on top of the connecting rod after removal to stop damage. Apply a cleaning solution and warm water to clean the pistons and do not use harsh cleaning tools, since they might damage the mechanical coating on the pistons. Check the journal in the connecting rod for intense wear, gap or score marks and observe any signs that the connecting rod is twisted or bent. Check that the piston has no taper, elliptical shape, wear marks and check the ring lands for sign of cracks or any type of degradation. When installing, start by fitting the piston rings, then put the entire piston head and rings into clean engine oil. Place a ring compressor on top of the piston around the rings to prevent shifting. Put the bearing through the connecting rod hole and smear clean oil over the surface of the bearing. Screw Special Tool 8507 Connecting Rod Guides into the threads where the connecting rod bolts attach. Each piston has a raised "F" to show the correct side toward the engine front and the front of the connecting rod oil slinger must also point that way for both cylinder banks. Put engine oil in the cylinder, then use the engine crank to bring the connecting rod journal to the center of the bore. Push the rod and piston into the bore, making sure the connecting rod is placed on the journal while you tap the piston with the handle of a hammer. These Connecting Rod Bolts are Torque to Yield Bolts, so do not try to reuse them after removal; replace them anytime they are taken out or loosened. Make sure to grease the rod bolts and the surfaces of both bearings with engine oil before placing the rod cap and bearing and tightening each bolt to 27 Nm (20 ft. lbs.) plus 90°. Finally, replace the cylinder head(s), Timing Chain and its cover, cylinder head covers and oil pan and gasket/windage tray, refill the crankcase with proper engine oil and reconnect the negative cable to the battery.
- Q: How to Install Piston and Connecting Rod Assemblies into the Bore on Jeep Grand Cherokee?A:Before putting in the piston and connecting rod assemblies, first install the piston rings. Coat the piston and rings with clean engine oil and place a ring compressor 3 on them, making sure to tighten it enough so the rings do not move. Slide the bearing over the connecting rod so that the holes in each lining up and then apply clean engine oil to the bearing before placing it. Screw Special Tool 8507 Connecting Rod Guides 4 onto the bolt holes of each connecting rod. On the piston pin bore surface, the installation spot for the piston is indicated by a raised "F" 1 which should be facing the front of the engine on both banks of cylinders, with the connecting rod oil slinger slot directed forward. Rubble the inside of the cylinder cleaning it and drop a drop of engine oil into it. Position the bottom-most part of the connecting rod at the heart of the cylinder bore by turning the Crankshaft and pick each connecting rod guide from the rod and position it over the crankshaft journal as the rod and piston go into the cylinder bore. While working under the rod, strike the piston down as you carefully guide the connecting rod onto its journal. All rod bolts on a motorcycle are Torque to Yield bolts which can't be reused. Replace them anytime they have been loosened or taken off. Apply engine oil to the rod bolts and bearing, place the rod cap and bearing onto the connector rod and tighten the bolts until the wrench is closed a 90°. Replace the cylinder head(s), Timing Chain and cover, cylinder head covers and Oil Pan with a gasket/windage tray. Insert enough engine oil into the crankcase as indicated and place the negative cable on the battery.


Related Jeep Grand Cherokee Parts
 Jeep Grand Cherokee Oil Pump
 Jeep Grand Cherokee Valve Cover Gasket
 Jeep Grand Cherokee Camshaft Plug
 Jeep Grand Cherokee Crankshaft Pulley
 Jeep Grand Cherokee Crankshaft Seal
 Jeep Grand Cherokee Cylinder Head Gasket
 Jeep Grand Cherokee Exhaust Valve
 Jeep Grand Cherokee Intake Valve
 Jeep Grand Cherokee Piston Ring Set
 Jeep Grand Cherokee Rocker Arm Pivot
 Jeep Grand Cherokee Rod Bearing
 Jeep Grand Cherokee Timing Chain Tensioner