JeepParts
My Garage
My Account
Cart
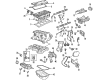
OEM 2004 Jeep Liberty Timing Belt
Engine Timing Belt- Select Vehicle by Model
- Select Vehicle by VIN
Select Vehicle by Model
orMake
Model
Year
Select Vehicle by VIN
For the most accurate results, select vehicle by your VIN (Vehicle Identification Number).
1 Timing Belt found


2004 Jeep Liberty Timing Belt Part Number: 4621844
$67.90 MSRP: $102.00You Save: $34.10 (34%)Ships in 1-2 Business DaysProduct Specifications- Other Name: Belt - Timing; Engine Timing Belt; Timing Belt Kit; Belt, Timing; Belt Timing
- Item Weight: 0.80 Pounds
- Item Dimensions: 20.9 x 1.6 x 1.5 inches
- Condition: New
- Fitment Type: Direct Replacement
- SKU: 4621844
- Warranty: This genuine part is guaranteed by Mopar's factory warranty.
2004 Jeep Liberty Timing Belt Parts and Q&A
- Q: How to Remove and Install a Timing Belt on 2004 Jeep Liberty?A: The first step is lifting the air cleaner cover, housing and tube, then set the vehicle on a hoist so you can remove the accessory drive belts. After that, take out the crankshaft vibration damper and next come the air conditioner/generator belt tensioner and pulley assembly. Remove the bolts fixing the timing belt lower front cover and lift off the cover, then remove the bolts holding the timing belt upper front cover and pull that cover away while lowering the vehicle. Whenever you align the timer marks on the crankshaft and camshaft, turn the engine from the crankshaft, as turning the camshaft after removing the belt may harm the valves. Move the crankshaft until the TDC mark on the oil pump housing is even with the TDC mark on the crankshaft sprocket which is on the trailing part of the sprocket tooth, so that the camshaft timing marks are not misaligned. Put a 6 mm Allen wrench into the tensioner and then insert the long end of a 1/8" or 3 mm Allen wrench into the pin hole on the front. Rotate the tensioner in a counterclockwise direction as you lightly push the 1/8" or 3 mm Allen wrench into the locking hole. Disconnect the negative cable from the battery and eliminate the timing belt before Special Tools 6793 and C-4685-C2 allow you to remove the crankshaft sprocket. It is unsafe to clean a timing belt; and if soiled, it should be replaced, whereas cleaning sprockets can be done using the right solvent. With Special Tool 6792, adjust the timing belt sprocket to its original level so it doesn't affect your engine's timing belt. Place the oil pump housing arrow next to the crankshaft sprocket, this will set it to TDC and set the exhaust camshaft sprocket 1/2 notch below the intake camshaft sprocket so the arrows are facing up. Put the timing belt on first at the crankshaft, move it around the water pump sprocket, the idler pulley, all the camshaft sprockets and end with the tensioner. Unscrew the exhaust camshaft sprocket in the counterclockwise direction to make the engine marks match and help slacken the belt. Slide an Allen wrench into the top face of the belt pulley and turn it counterclockwise until the setting notch is lined up with the spring tang. After that, hold the setting notch in place while tightening the tensioner lock nut to 30 Nm (22 ft. lbs.). With the tensioner tensioned, spin the crankshaft clockwise twice around to fit the belt and then make sure you see the correct timing marks with the camshaft and crankshaft. See if the spring tang is within tolerance; if it's not, go through the tension adjustment process again. Cover all parts with the timing belt front covers and bolts, attach the air conditioning/generator belt tensioner and pulley and put in the crankshaft vibration damper. After that, install the accessory drive belts, drive belt splash shield, air cleaner housing, upper cover and clean air tube.
Related 2004 Jeep Liberty Parts
 2004 Jeep Liberty Oil Filter
 2004 Jeep Liberty Cylinder Head
 2004 Jeep Liberty Rocker Arm
 2004 Jeep Liberty Timing Chain
 2004 Jeep Liberty Timing Chain Tensioner
 2004 Jeep Liberty Balance Shaft Chain
 2004 Jeep Liberty Crankshaft
 2004 Jeep Liberty Crankshaft Pulley
 2004 Jeep Liberty Cylinder Head Gasket
 2004 Jeep Liberty Engine Mount Bracket
 2004 Jeep Liberty Exhaust Valve
 2004 Jeep Liberty Valve Stem Seal