JeepParts
My Garage
My Account
Cart
OEM 2005 Chrysler PT Cruiser Timing Cover
Engine Timing Cover- Select Vehicle by Model
- Select Vehicle by VIN
Select Vehicle by Model
orMake
Model
Year
Select Vehicle by VIN
For the most accurate results, select vehicle by your VIN (Vehicle Identification Number).
3 Timing Covers found


2005 Chrysler PT Cruiser Timing Cover, Upper Outer Part Number: 4884409AA
$72.61 MSRP: $82.15You Save: $9.54 (12%)Ships in 1-2 Business DaysProduct Specifications- Other Name: Cover - Timing Belt; Engine Timing Cover, Outer Upper, Upper Outer; Front Cover; Outer Timing Cover; Cover Timing Belt
- Position: Upper Outer
- Item Weight: 0.90 Pounds
- Item Dimensions: 12.7 x 7.9 x 1.8 inches
- Condition: New
- Fitment Type: Direct Replacement
- SKU: 4884409AA
- Warranty: This genuine part is guaranteed by Mopar's factory warranty.


2005 Chrysler PT Cruiser Timing Cover, Lower Outer Part Number: 4884410AA
$56.44 MSRP: $75.25You Save: $18.81 (25%)Ships in 1-2 Business DaysProduct Specifications- Other Name: Cover - Timing Belt; Engine Timing Cover, Lower Outer, Outer Lower; Front Cover; Outer Timing Cover; Cover Timing Belt
- Position: Lower Outer
- Item Weight: 0.80 Pounds
- Item Dimensions: 2.5 x 9.8 x 12.6 inches
- Condition: New
- Fitment Type: Direct Replacement
- SKU: 4884410AA
- Warranty: This genuine part is guaranteed by Mopar's factory warranty.


2005 Chrysler PT Cruiser Timing Cover, Inner Part Number: 4781593AA
$114.56 MSRP: $138.00You Save: $23.44 (17%)Ships in 1-2 Business DaysProduct Specifications- Other Name: Cover - Timing Case; Engine Timing Cover, Inner; Front Cover; Inner Cover; Inner Timing Cover; Cover Timing Belt; Cover Timing Case
- Position: Inner
- Item Weight: 4.40 Pounds
- Item Dimensions: 18.9 x 18.2 x 8.1 inches
- Condition: New
- Fitment Type: Direct Replacement
- SKU: 4781593AA
- Warranty: This genuine part is guaranteed by Mopar's factory warranty.
2005 Chrysler PT Cruiser Timing Cover Parts and Q&A
- Q: How to Service and Repair a Timing Cover on 2005 Chrysler PT Cruiser?A: To start on the timing belt cover work, loosen the bolts that hold the upper torque strut and set the strut aside. If the vehicle has a turbo charger, evacuate the air conditioning system, then remove the air conditioning lines at the joint block next to the upper timing belt cover. After that, open the fasteners that hold the upper timing belt cover and remove the cover. Remove the negative battery cable, put the car up on a hoist and unbolt the right front wheel and splash shield. Unfasten the belt from the accessories drive drive, unbolt the crankshaft damper, lower the torque strut and separate the exhaust system from the manifold. In addition, remove the A/C pressure switch from the back of the compressor housing. Drop the vehicle, place a jack under the engine, release the A/C system and take off the A/C lines at the coupling block. Take off the upper torque strut, the screw connecting the ground strap to the strut bracket and the torque strut bracket on the strut tower. Start by undoing the upper panel on the radiator and then remove the pump and bracket, but keep the pump's lines attached. Once you've supported the engine, release the bolt on the right engine mount, lift the engine until you can access the bracket bolt and then remove the bracket. After finishing the timing belt service, unscrew the timing belt cover fasteners and then remove the cover. For the rear cover, begin by taking off the front timing belt covers, next handle the timing belt and finally the idler pulley. Install Special Tool 6847, then loosen and remove the sprocket bolts. After completing that step, undo the screws that hold the rear timing belt cover, then pull the cover off the engine. To install, start by snugging up the fasteners holding the upper timing belt cover to 6 Nm (50 inch lbs.) and next fit the upper torque strut. For turbocharged vehicles, connect the air conditioning pipes where they join and run the air conditioning recharge. Adjust the torque strut following the correct procedure. Now, mount the lower timing belt cover, turn bolts until they measure 6 Nm (50 inch lbs.) with the torque wrench, attach the engine support bracket, position the power steering pump and tighten the bolts listed to 61 Nm (45 ft. lbs.). Take a new engine mount, position it, bolt it through the right place on the engine, ensure the nut is tightened to 118 Nm (87 ft lbs.) and fit the engine mount on top. Place the power steering pump and bracket, close the upper front opening on the radiator, put the torque strut bracket onto the strut tower and attach the ground strap to the bracket. Place the upper torque strut, attach the A/C lines and next, charge the AC system. Lift the vehicle, join the exhaust system to the manifold and put the connector from the A/C pressure switch into place. First, assemble the crankshaft damper, drive belts and lower torque strut, then do the strut adjustment process. In the end, set up the front splash shield and wheel and link the negative cable to the battery again. Put in the rear timing belt cover and fasteners, tighten them as instructed, install the timing belt idler pulley and tighten the fastener to 61 Nm (45 ft. lbs.). It is important to avoid tightening camshaft sprocket bolts with an impact wrench to stop damage to the main locating dowel pin between the camshaft and sprocket. Use Special Tool 6847 to hold the camshaft sprockets and tighten the central bolt to 115 Nm (85 ft. lbs.); afterwards, set the timing belt and front timing belt covers into place.
Related 2005 Chrysler PT Cruiser Parts
 2005 Chrysler PT Cruiser Oil Filter
 2005 Chrysler PT Cruiser Balance Shaft Chain
 2005 Chrysler PT Cruiser Camshaft Seal
 2005 Chrysler PT Cruiser Crankshaft Timing Gear
 2005 Chrysler PT Cruiser Cylinder Head Gasket
 2005 Chrysler PT Cruiser Dipstick Tube
 2005 Chrysler PT Cruiser Exhaust Valve
 2005 Chrysler PT Cruiser Lash Adjuster
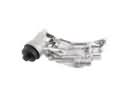 2005 Chrysler PT Cruiser Oil Filter Housing
 2005 Chrysler PT Cruiser Oil Pan Gasket
 2005 Chrysler PT Cruiser Oil Pump
 2005 Chrysler PT Cruiser Timing Belt Idler Pulley