JeepParts
My Garage
My Account
Cart
OEM 2005 Dodge Neon Rack And Pinion
Steering Rack And Pinion- Select Vehicle by Model
- Select Vehicle by VIN
Select Vehicle by Model
orMake
Model
Year
Select Vehicle by VIN
For the most accurate results, select vehicle by your VIN (Vehicle Identification Number).
4 Rack And Pinions found

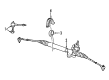
2005 Dodge Neon Steering Gear Part Number: 4656750AG
Product Specifications- Other Name: Gear - Rack And Pinion; Rack and Pinion Assembly; Gear Assembly
- Replaces: 4656750AD, 4656750AF, 5272866AA, 5272866AB
- Item Weight: 19.40 Pounds
- Condition: New
- Fitment Type: Direct Replacement
- SKU: 4656750AG
- Warranty: This genuine part is guaranteed by Mopar's factory warranty.
2005 Dodge Neon Steering Gear Part Number: 5272500AG
Product Specifications- Other Name: Gear - Rack And Pinion; Rack and Pinion Assembly; Gear Assembly
- Replaces: 5272500AF, 5272500AE, 5272500AD
- Item Weight: 20.20 Pounds
- Condition: New
- Fitment Type: Direct Replacement
- SKU: 5272500AG
- Warranty: This genuine part is guaranteed by Mopar's factory warranty.

2005 Dodge Neon Steering Gear Part Number: 5290180AC
Product Specifications- Other Name: Gear - Power Steering; Rack and Pinion Assembly; Steering Gearbox; Gear Assembly
- Replaces: 5290180AB
- Item Weight: 19.30 Pounds
- Item Dimensions: 52.5 x 9.4 x 7.4 inches
- Condition: New
- Fitment Type: Direct Replacement
- SKU: 5290180AC
- Warranty: This genuine part is guaranteed by Mopar's factory warranty.
2005 Dodge Neon Steering Gear Part Number: 5105330AB
Product Specifications- Other Name: Gear - Rack And Pinion; Steering Gearbox; Gear Assembly
- Condition: New
- Fitment Type: Direct Replacement
- SKU: 5105330AB
- Warranty: This genuine part is guaranteed by Mopar's factory warranty.
2005 Dodge Neon Rack And Pinion Parts and Q&A
- Q: How to Remove and Reinstall a Rack and Pinion Steering System on 2005 Dodge Neon?A: Make sure the steering wheel is straight ahead and then secure it with a steering wheel holder to keep the Clock Spring unchanged. To separate the upper and lower steering column couplings inside the passenger compartment, remove the retainer pin first, unscrew the pinch bolt nut and take out the pinch bolt. Lift the vehicle and remove the tires and wheels from both the front axle. Set the spin of the stud to zero, then remove the nuts attaching the blade to the steering knuckle with an open-end wrench. To remove the outer tie rods, use Remover, Special Tool MB991113 and after that remove the tie rod heat shield. Unlock the locking tab on the wiring harness connector of the power steering fluid switch and unhook it. Free the tube nut from the pressure hose mounting point on the rack and pinion, loosen the clamp and remove the fluid hose from the rack and pinion. Take out the routing clips on the front of the rack and pinion and take away the power steering fluid pressure hose and right cooler tube from them. Unscrew the cooler from the suspension crossmember and let it hang. Carefully take off the drive-belt shield and remove the pencil strut in the right front corner of the crossmember and body. Untie the bolts joining the engine torque strut first and then trace the location of the front suspension crossmember on the vehicle body before you remove it. Put a transmission jack under the front suspension crossmember and lift it to back it up. Pull out the two bolts at the front of the crossmember which are holding it to the frame rails and pull the bolts at the back until they slide out from the body threads to keep the lower control arm attached. Adjust the front suspension crossmember down so you can pull the power steering rack and pinion from the rear. Pop out the roll pin that holds the steering column lower coupling to the power steering rack and pinion pinion shaft and slide the coupling off the shaft. Take out the pinion shaft dash cover seal from the housing of the power steering rack and pinion and remove it. Open the nuts that hold the power steering rack and pinion to the front suspension crossmember and then remove the bolts. To fit the rack and pinion, mount it to the front suspension crossmember and add the four bolts, tightening them to 61 Nm or 45 ft. lbs. Apply the dash cover seal for the pinion shaft onto the top of the steering shaft, then line up the holes with the tabs on the housing. Fit the flat side of the inner steering column steering rack and pinion coupling on the matching hole of the pinion shaft, slide the coupling on the shaft, put in the roll pin and secure it. Secure the power steering rack and pinion in the center of its movement range and then raise the front suspension crossmember and power steering rack and pinion so they touch their points of attachment. Put the mounting bolts for the rear crossmembers into the tapping plates and install the front mounting bolts, keeping all four bolts fastened firmly, but not too strongly, at about 2 Nm (20 inch lbs.). Square the front A-arm crossmember with the scribed marks and then fasten the rear bolts to 150 ft. lbs. and the front bolts to 105 ft. lbs. Attach the engine torque strut and its mounting bolts and then add a washer to the torque strut bolt. Tighten the nuts of the pencil strut, found at the right front corner, to a torque of 58 Nm (43 ft. lbs.). Place the drive-belt splash shield back and secure with its fasteners. Wipe the ends of the open power steering hose and then put a new O-ring on the pressure hose, lubricating it with power steering fluid. Screw the threads of the tube nut into the rack and pinion, but do not tighten it yet. If your cooler has a cooler line, reattach it, put the power steering fluid pressure hose into the routing clips and install the cooler securely. Secure the rack and pinion housing unit with a 34 Nm (25 ft. lbs.) turn on the tube nut, then install the screws to secure the cooler. Place the hose clamp correctly, then push the hoses on the steel fittings, making sure the clamps grab hold. Connect the power steering fluid pressure switch wiring harness and place the locking tab in the latched position. Each outer tie rod should be fitted with a heat shield, have the outer tie rod end installed on the steering knuckle, have a nut put over the stud and then tighten the nut to 55 Nm (40 ft. lbs.), with the stud held still. Place the tire and wheel set back on, tighten the nuts to 135 Nm (100 ft. lbs.) and then bring the vehicle down to the ground. Wrap the dash-to-lower coupling seal over the sex recess on the lower plastic coupling collar and apply grease on the seal lip before installing it. Within the passenger compartment, tilt the steering column all the way upward, insert the tilt lever, reattach the lower coupling to the upper coupling and tighten the bolt to 28 Nm (250 inch lbs.), making sure to insert the retainer pin after. Take out the steering wheel holder, make sure the lower coupling does not whisper while contacting the dash-to-coupling seal, carry out the power steering pump initial operation service, go over the vehicle for any leaks and readjust the steering alignment.
Related 2005 Dodge Neon Parts
 2005 Dodge Neon Power Steering Pump
 2005 Dodge Neon Steering Wheel
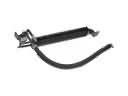 2005 Dodge Neon Power Steering Cooler
 2005 Dodge Neon Power Steering Hose
 2005 Dodge Neon Steering Column
 2005 Dodge Neon Steering Column Cover
 2005 Dodge Neon Steering Gear Box
 2005 Dodge Neon Tie Rod End