JeepParts
My Garage
My Account
Cart
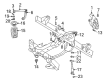
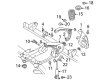
OEM 2005 Dodge Ram 1500 Coil Springs
Strut Spring- Select Vehicle by Model
- Select Vehicle by VIN
Select Vehicle by Model
orMake
Model
Year
Select Vehicle by VIN
For the most accurate results, select vehicle by your VIN (Vehicle Identification Number).
11 Coil Springs found


2005 Dodge Ram 1500 Spring, Front Part Number: 52106606AA
$8.76 MSRP: $11.10You Save: $2.34 (22%)Ships in 1-2 Business DaysProduct Specifications- Other Name: Spring - Front Coil; Coil Spring, Front; Coil Spring Kit Front; Coil Spring Set; Coil Springs; Spring Front Coil
- Position: Front
- Item Weight: 17.30 Pounds
- Condition: New
- Fitment Type: Direct Replacement
- SKU: 52106606AA
- Warranty: This genuine part is guaranteed by Mopar's factory warranty.


2005 Dodge Ram 1500 Spring, Front Part Number: 52106605AA
$152.53 MSRP: $193.36You Save: $40.83 (22%)Ships in 1-2 Business DaysProduct Specifications- Other Name: Spring - Front Coil; Coil Spring, Front; Coil Spring Set; Coil Springs; Spring Front Coil
- Position: Front
- Item Weight: 16.20 Pounds
- Condition: New
- Fitment Type: Direct Replacement
- SKU: 52106605AA
- Warranty: This genuine part is guaranteed by Mopar's factory warranty.


2005 Dodge Ram 1500 Spring, Front Part Number: 52106602AA
$52.99 MSRP: $67.18You Save: $14.19 (22%)Ships in 1-2 Business DaysProduct Specifications- Other Name: Spring - Front Coil; Coil Spring, Front; Coil Spring Kit Front; Coil Spring Set; Coil Springs; Spring Front Coil
- Position: Front
- Item Weight: 12.90 Pounds
- Condition: New
- Fitment Type: Direct Replacement
- SKU: 52106602AA
- Warranty: This genuine part is guaranteed by Mopar's factory warranty.

2005 Dodge Ram 1500 Spring, Front Part Number: 5290732AC
$67.42 MSRP: $111.00You Save: $43.58 (40%)Ships in 1-2 Business DaysProduct Specifications- Other Name: Spring - Front Coil; Coil Spring, Front; Coil Springs; Spring Front Coil
- Position: Front
- Replaces: 5290732AB
- Item Weight: 16.20 Pounds
- Condition: New
- Fitment Type: Direct Replacement
- SKU: 5290732AC
- Warranty: This genuine part is guaranteed by Mopar's factory warranty.

2005 Dodge Ram 1500 Spring, Front Part Number: 52106604AA
Product Specifications- Other Name: Spring - Front Coil; Coil Spring, Front; Coil Spring Set; Coil Springs; Spring Front Coil
- Position: Front
- Item Weight: 15.30 Pounds
- Condition: New
- Fitment Type: Direct Replacement
- SKU: 52106604AA
- Warranty: This genuine part is guaranteed by Mopar's factory warranty.

2005 Dodge Ram 1500 Coil Spring, Front Part Number: 52106600AA
Product Specifications- Other Name: Spring - Front Coil; Coil Spring, Front; Coil Springs; Spring; Spring Front Coil
- Position: Front
- Item Weight: 12.00 Pounds
- Item Dimensions: 18.4 x 12.6 x 8.4 inches
- Condition: New
- Fitment Type: Direct Replacement
- SKU: 52106600AA
- Warranty: This genuine part is guaranteed by Mopar's factory warranty.
2005 Dodge Ram 1500 Spring, Front Part Number: 5290605AB
Product Specifications- Other Name: Spring - Front Coil; Coil Spring, Front; Coil Springs; Spring Front Coil
- Position: Front
- Replaces: 5290605AA
- Item Weight: 2.10 Pounds
- Item Dimensions: 14.4 x 5.3 x 5.3 inches
- Condition: New
- Fitment Type: Direct Replacement
- SKU: 5290605AB
- Warranty: This genuine part is guaranteed by Mopar's factory warranty.
2005 Dodge Ram 1500 Spring, Front Part Number: 52106608AA
Product Specifications- Other Name: Spring - Front Coil; Coil Spring, Front; Coil Springs; Spring Front Coil
- Position: Front
- Item Weight: 19.10 Pounds
- Condition: New
- Fitment Type: Direct Replacement
- SKU: 52106608AA
- Warranty: This genuine part is guaranteed by Mopar's factory warranty.
2005 Dodge Ram 1500 Spring, Front Part Number: 52106607AA
Product Specifications- Other Name: Spring - Front Coil; Coil Spring, Front; Coil Springs; Spring Front Coil
- Position: Front
- Item Weight: 19.30 Pounds
- Condition: New
- Fitment Type: Direct Replacement
- SKU: 52106607AA
- Warranty: This genuine part is guaranteed by Mopar's factory warranty.
2005 Dodge Ram 1500 Spring, Front Part Number: 52106603AA
Product Specifications- Other Name: Spring - Front Coil; Coil Spring, Front; Coil Spring Set; Coil Springs; Spring Front Coil
- Position: Front
- Item Weight: 14.20 Pounds
- Item Dimensions: 15.7 x 5.5 x 5.5 inches
- Condition: New
- Fitment Type: Direct Replacement
- SKU: 52106603AA
- Warranty: This genuine part is guaranteed by Mopar's factory warranty.
2005 Dodge Ram 1500 Spring, Front Part Number: 52106601AA
Product Specifications- Other Name: Spring - Front Coil; Coil Spring, Front; Coil Springs; Spring Front Coil
- Position: Front
- Item Weight: 12.90 Pounds
- Condition: New
- Fitment Type: Direct Replacement
- SKU: 52106601AA
- Warranty: This genuine part is guaranteed by Mopar's factory warranty.
2005 Dodge Ram 1500 Coil Springs Parts and Q&A
- Q: How to Effectively Service and Repair Coil Springs on 2005 Dodge Ram 1500?A: When working on the coil springs, raise the vehicle and support it, then remove the front tire and wheel combo. Bear the vehicle's weight on the support under the outboard control arm and then remove the shock absorber. Have the DD-1278 pass through the lower arm, coil spring, and shock hole from the bottom and ensure the bell-shaped adapter sits against the lower arm, then fix the nut at the top of the tool in the shock hole. Fasten the spring compressor nut against the bell-shaped adapter just until it's tight, then ease it off just enough to keep the spring in place until you have disconnected the lower suspension arm from the steering knuckle. Take off the stabilizer link and the lower ball joint nut near the steering knuckle, use ball joint remover tool 8677 to pull out the ball joint and remember to support the upper control arm and steering knuckle as you do this to prevent unfortunate rebound. Position the upper control arm platform and steering knuckle aside and remove the bracket that supports the lower control arm. Tighten the spring compressor tool to provide room for removing the lower ball joint and if needed, unscrew the control arm pivot bolt to let the suspension arm come down. Slowly take off the pressure on the suspension if using the compressor which allows the lower engine and axle support to pivot lower. Then, use the spring compressor to remove the spring and isolator pad from the chassis. Tape the isolator pad above the spring, slip the entire assembly into the lower suspension arm and make sure it clicks in place. Carry the reinstalled Spring Compressor DD-1278 to the lower suspension arm, coil spring, and shock place in the frame and then tighten the tool nut to compress the coil spring. Take the support away from both upper and lower ball joints, place the lower ball joint inside the steering knuckle, join it with the retaining nut and tighten it to 52 Nm (38 ft. lbs.) for 1500 series and 135 Nm (100 ft. lbs.) for HD 4X2, turning it by another 90°. Afterwards, take the spring compressor tool off, hold the lower control arm at the outboard side, fit the shock absorber and the stabilizer link. Remove the small arm under the wheel, set the wheel and tire in place and then drive the car down to the ground. When the vehicle is on the floor and its weight is on the wheels, tighten the front and rear control arm pivot bolts to 150 ft. lbs. (for LD) or 210 ft. lbs. (for HD 4X2), then do a wheel alignment.
Related 2005 Dodge Ram 1500 Parts
 2005 Dodge Ram 1500 Wheel Bearing
 2005 Dodge Ram 1500 Steering Knuckle
 2005 Dodge Ram 1500 Leaf Spring Bushing
 2005 Dodge Ram 1500 Wheel Hub
 2005 Dodge Ram 1500 Axle Beam Mount
 2005 Dodge Ram 1500 Axle Support Bushings
 2005 Dodge Ram 1500 Ball Joint
 2005 Dodge Ram 1500 Bump Stop
 2005 Dodge Ram 1500 Coil Spring Insulator
 2005 Dodge Ram 1500 Control Arm
 2005 Dodge Ram 1500 Shock Absorber
 2005 Dodge Ram 1500 Sway Bar Bushing