JeepParts
My Garage
My Account
Cart
OEM 2005 Dodge Ram 2500 Camshaft
Cam- Select Vehicle by Model
- Select Vehicle by VIN
Select Vehicle by Model
orMake
Model
Year
Select Vehicle by VIN
For the most accurate results, select vehicle by your VIN (Vehicle Identification Number).
2 Camshafts found


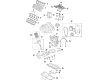
2005 Dodge Ram 2500 Camshaft Part Number: 53022064AA
$396.17 MSRP: $582.00You Save: $185.83 (32%)Product Specifications- Other Name: Camshaft - Engine; Camshaft Engine
- Replaces: 53021730BA, 53021730AC
- Item Weight: 13.80 Pounds
- Item Dimensions: 21.8 x 4.1 x 5.9 inches
- Condition: New
- Fitment Type: Direct Replacement
- SKU: 53022064AA
- Warranty: This genuine part is guaranteed by Mopar's factory warranty.

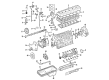
2005 Dodge Ram 2500 Camshaft Part Number: 5093139AB
Product Specifications- Other Name: Camshaft Includes Camshaft Gear; Camshaft Includes Camshaft Gear
- Item Weight: 27.00 Pounds
- Item Dimensions: 39.9 x 16.3 x 15.6 inches
- Condition: New
- Fitment Type: Direct Replacement
- SKU: 5093139AB
- Warranty: This genuine part is guaranteed by Mopar's factory warranty.
2005 Dodge Ram 2500 Camshaft Parts and Q&A
- Q: How to Remove and Replace the Camshaft in an Engine Block on 2005 Dodge Ram 2500?A: Before removing the camshaft and bearings, take the diameter of each bore; if the first or rear camshaft bore is beyond the limit, replace it with a service bushing and check the other bores for damage or too much wear and if they show signs of wear, remove the engine and have the bores machined and serviced. Start with disconnecting the negative battery cables and draining the car's air conditioning refrigerant if the car has one. Lift the car up using a hoist and drain the engine coolant into an appropriate tub. First, lower the vehicle, next, remove the upper radiator hose, viscous fan/drive/shroud assembly, coolant recovery bottle hose from the filler neck and finally, lower the radiator hose from its outlet. For automatic transmission cars, separate the coolant lines from the front of the radiator using Special Tool 6931, except if you have a finger-release design. Get rid of the radiator mounting screws and lift the radiator from under the hood and then remove the top radiator support panel. If your car has A/C, release the refrigerant from the A/C condenser and link the charge air cooler through the cooler inlet and outlet, then detach the two mounting bolts and remove both the charge air cooler and A/C condenser. Unbolt the accessory drive belt, loosen the accessory drive belt tensioner, remove the fan support/hub assembly, crankshaft damper and take out the speed indicator ring. Unfasten the rear bolts from the cover, very gently lift the cover away from the housing and pull out the dust seal attached to the cover. Apply Special Tool 7471-B Crankshaft Barring Tool to rotate the engine so that both timing marks are correctly aligned, before you remove the cylinder head cover. Take out the rocker arms, cross heads and push rods, be sure to mark every piece for its correct position later. On cylinders #5 and #6, once the rubber plugs are removed, use the assembly access holes in the cowl to lift the pushrods up. With the Iolo Miller Tool Kit 8502's rods, gently lift the tappets until you are sure they're sitting securely and won't move by using rubber bands. Match the timing marks on the camshaft to the crankshaft mark and then get rid of the bolts that hold the thrust plate and the engine mount in place. Support your engine with #8534 tool, then add #8534A bracket/wing nut and lift your engine high enough to allow the camshaft to be removed. Interchange the camshaft, gear and thrust plate. Look for cracks, pitting, scoring or deep wear on the valve lobes and bearing journals and if the camshaft has greater-than-permitted wear, replace it. When the lifter lobes are worn, also replace the tappets. Check the amount of wear on the camshaft bushing and bores, use a telescoping bore gauge and a micrometer and make sure the oil holes in the camshaft bushing align with those in the cylinder block. Check the camshaft gear for cracks and signs of chips or breaks and replace the whole assembly if it needs to be changed. See if the camshaft thrust plate has excess wear and ensure it is the right thickness as per the guidelines. Cover the rear of the new bushing with Loctite(R) 640 Adhesive, taking care not to block the oil hole and slide the front bushing into the proper position on the cylinder block using a regular bushing installation tool. Take measurements of the bushings fitted inside the front bore, checking that the inner and outer diameters stay between 54.083 and 54.147 mm. Afterwards, coat all surfaces of the camshaft, bores, bushings and thrust washer with plenty of fresh engine oil. Attach the camshaft and thrust plate, making sure the timing marks line up and tighten all their bolts to a torque of 24 Nm. Make sure the camshaft has proper back lash and note the end clearance, replace the wood dowel rods and rubber bands, rub engine oil on the push rods and fit them into their original places, making sure they rest properly on the tappets. Lubricate the ends of the valves, then crossheads, rocker arms and pedestals and make sure to tighten the bolts to 36 Nm. Adjust the valve lash, then mount the cylinder head cover and gasket for early builds, otherwise just use the cylinder head cover for late builds. Fix the housing cover for the gear cocket, the front crankshaft dust seal, the crankshaft damper and speed indicator ring, the fan support/hub assembly, the power steering pump and accessory drive belt tensioner, setting the bolt to 43 Nm. Set up the accessory drive belt, attach the air cooler with A/C condenser and auxiliary transmission oil cooler if necessary, tight it to 2 Nm and join and tighten the hoses coming from the air cooler to 11 Nm. Place the radiator's upper support panel, lock the petcock, drop the radiator into the front and tighten the hold-down bolts to 11 Nm. Jack up the car, put on the radiator lower hose and attach the clamp and if your vehicle has an auxiliary oil cooler, fit the lines. Next, lower your car, put the fan/drive/shroud assembly in place, connect the coolant recovery and windshield washer fluid reservoirs and fasten the recover hose to the radiator filler neck. Add coolant to your engine and refrigerant to the A/C system if the car has one, then attach the negative cables to the battery and start the motor to identify any leaks.
Related 2005 Dodge Ram 2500 Parts
 2005 Dodge Ram 2500 Oil Filter
 2005 Dodge Ram 2500 Transmission Mount
 2005 Dodge Ram 2500 Rod Bearing
 2005 Dodge Ram 2500 Camshaft Seal
 2005 Dodge Ram 2500 Crankshaft
 2005 Dodge Ram 2500 Crankshaft Seal
 2005 Dodge Ram 2500 Cylinder Head
 2005 Dodge Ram 2500 Intake Valve
 2005 Dodge Ram 2500 Lash Adjuster
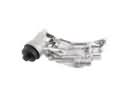 2005 Dodge Ram 2500 Oil Filter Housing
 2005 Dodge Ram 2500 Rocker Arm
 2005 Dodge Ram 2500 Timing Cover Gasket