JeepParts
My Garage
My Account
Cart
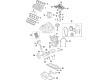
OEM 2005 Jeep Grand Cherokee Timing Cover
Engine Timing Cover- Select Vehicle by Model
- Select Vehicle by VIN
Select Vehicle by Model
orMake
Model
Year
Select Vehicle by VIN
For the most accurate results, select vehicle by your VIN (Vehicle Identification Number).
3 Timing Covers found


2005 Jeep Grand Cherokee Timing Cover Part Number: 5134142AA
Product Specifications- Other Name: Cover - Timing Belt; Engine Timing Cover; Front Cover; Cover Timing Belt
- Item Weight: 14.40 Pounds
- Item Dimensions: 24.6 x 22.4 x 7.3 inches
- Condition: New
- Fitment Type: Direct Replacement
- SKU: 5134142AA
- Warranty: This genuine part is guaranteed by Mopar's factory warranty.


2005 Jeep Grand Cherokee Timing Cover Part Number: 53021238AB
Product Specifications- Other Name: Cover - Chain Case; Engine Timing Cover; Front Cover; Cover Chain Case Includes Items 2, 3, 4, 5, 8, 11; See Notes.
- Item Weight: 16.70 Pounds
- Item Dimensions: 25.5 x 23.3 x 7.1 inches
- Condition: New
- Fitment Type: Direct Replacement
- SKU: 53021238AB
- Warranty: This genuine part is guaranteed by Mopar's factory warranty.

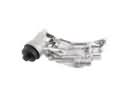
2005 Jeep Grand Cherokee Timing Cover Part Number: 4792795AC
Product Specifications- Other Name: Cover - Timing Case; Engine Timing Cover; Front Cover; Cover Timing Case See Note; Cover Timing Case
- Item Weight: 13.60 Pounds
- Item Dimensions: 19.7 x 19.2 x 8.5 inches
- Condition: New
- Fitment Type: Direct Replacement
- SKU: 4792795AC
- Warranty: This genuine part is guaranteed by Mopar's factory warranty.
2005 Jeep Grand Cherokee Timing Cover Parts and Q&A
- Q: How to Service the Timing Cover and Chain on 2005 Jeep Grand Cherokee?A: Before servicing the timing chain, you should remove the negative cable and get rid of the coolant. Take out the electric cooling fan and fan shroud first and then get rid of the radiator fan. Remove the heater hoses from the timing cover and also the lower radiator hose from the engine. After that, discard the accessory drive belt tensioner assembly (1), along with the damper, generator and A/C compressor. Note also that unlike other engines, the front cover on the 3.7L one is sealed with an anaerobic coating, making it necessary to use Mopar Grey Engine RTV sealant during service. It's possible to access the timing cover without having to take out the water pump. Remove the bolts connecting the timing cover to the engine block and then lift the cover from the engine block. When installing, wipe down the timing chain cover and engine block using rubbing alcohol and make sure you keep away from all products that are oil-based or abrasive to prevent accidental damage. Examine the water surging connection (2) for damage and exchange it as is required. Use the RTV sealer to cover the front cover in a layer 3 to 4mm thick, then attach the cover by tightening the fasteners in sequence to 58 Nm (43 ft. lbs.). Replace the crankshaft damper, A/C compressor, generator and accessory drive belt tensioner. Link the radiator upper and lower hoses, as well as both heater hoses and the radiator fan. At the end, put the refrigerant in the cooling system and connect the battery's negative cable.
Related 2005 Jeep Grand Cherokee Parts
 2005 Jeep Grand Cherokee Oil Filter Housing
 2005 Jeep Grand Cherokee Oil Pan Gasket
 2005 Jeep Grand Cherokee Valve Cover Gasket
 2005 Jeep Grand Cherokee Cylinder Head
 2005 Jeep Grand Cherokee Dipstick
 2005 Jeep Grand Cherokee Harmonic Balancer
 2005 Jeep Grand Cherokee Cam Gear
 2005 Jeep Grand Cherokee Engine Mount Bracket
 2005 Jeep Grand Cherokee Exhaust Valve
 2005 Jeep Grand Cherokee Intake Valve
 2005 Jeep Grand Cherokee Oil Filler Cap
 2005 Jeep Grand Cherokee Rod Bearing