JeepParts
My Garage
My Account
Cart
OEM 2006 Chrysler Pacifica Sway Bar Kit
Stabilizer Sway Bar Set- Select Vehicle by Model
- Select Vehicle by VIN
Select Vehicle by Model
orMake
Model
Year
Select Vehicle by VIN
For the most accurate results, select vehicle by your VIN (Vehicle Identification Number).
2 Sway Bar Kits found


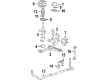
2006 Chrysler Pacifica Stabilizer Bar, Front Part Number: 4743162AA
Product Specifications- Other Name: Bar - Front; Suspension Stabilizer Bar, Front; Sway Bar; Stabilizer Bar Front; Bar Front Sway
- Position: Front
- Item Weight: 15.70 Pounds
- Item Dimensions: 49.1 x 10.8 x 4.4 inches
- Condition: New
- Fitment Type: Direct Replacement
- SKU: 4743162AA
- Warranty: This genuine part is guaranteed by Mopar's factory warranty.

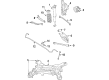
2006 Chrysler Pacifica Stabilizer Bar, Rear Part Number: 4766864AD
Product Specifications- Other Name: Shaft - Rear Suspension; Suspension Stabilizer Bar, Rear; Sway Bar; Stabilizer Bar Rear Suspension
- Position: Rear
- Replaces: 4766864AC
- Item Weight: 6.80 Pounds
- Item Dimensions: 59.8 x 11.0 x 4.4 inches
- Condition: New
- Fitment Type: Direct Replacement
- SKU: 4766864AD
- Warranty: This genuine part is guaranteed by Mopar's factory warranty.
2006 Chrysler Pacifica Sway Bar Kit Parts and Q&A
- Q: How to Service and Repair a Sway Bar Kit in the Rear Suspension on 2006 Chrysler Pacifica?A: You should remove the negative battery cable first and only take away the spare tire if AWD isn't included in your car. Make sure the automatic adjuster on the parking brake lever is disabled, then support the vehicle upward and under the front end of the engine cradle by using extra jack stands. Take out the rear wheel and tire units, then the second half of the exhaust system. In order to remove cable buttons from their connectors, sometimes the parking brake shoe needs to be adjusted. Move the bracket the left rear parking brake cable is in toward the brake and, while securing the front cable with pliers, insert the right rear cable toward the bracket to separate it from the cable connector. Unplug the screws joining the left and right rear brake hose routing brackets onto the front of the rear crossmember. If you only remove the bolts around the flange, without uninstalling the shaft itself, you're ready for the next step after marking it. Mark the rear crossmember locations on the body from all four mounts, then put a jack under the center of the rear suspension crossmember or rear driveline module and raise it into place. Take away the bolt and nut under the lower mount of one of the shocks, then remove the left front and rear crossmember bolts. Slowly let the jack down to allow the left side of the crossmember to drop, then remove the coil spring and isolator. Reverse the lowering of the left side of the crossmember and install those bolts finger-tight only. Proceed to the right side as well, adjust the jack so you can remove the spring, add the spring and isolator back onto the spring seat. Put the crossmember's right side into place and then tighten the bolts securely. After removing the lower crossmember bolts, lower the jack for easy spring installation and then attach the coil spring and its isolator. Take the left side of the crossmember and put it back into place, then set in the previously removed bolts, ensuring the crossmember is correctly aligned at the marked places. Tighten all four of the crossmember mounting bolts to about 120 foot pounds and after that, take away the jack. When the axles have AWD, line up the reference marks and secure the mounting bolts between the propeller shaft and rear driveline module, make sure you tighten them to 54 Nm (40 ft. lbs). Hook each wheel speed sensor wire to the spare tire mounting support and attach the harness wires to each of the connectors by the sensors. Installing the rear caliper, make certain that abutment shims are underneath and retract the bullet pins to avoid them covering the bosses on the frame. Put the caliper and brake shoes into position, so that the upper edge of the outboard shoe touches the caliper abutment and tighten the caliper guide pin bolts to 23 Nm (200 inch lbs.) torque. After that, attach the right and left rear brake hose routing brackets and secure the parking brake cable buttons into the proper connectors. Slot in the rear bumper mounting cover. Get the exhaust system and wheel and tire assembly back in place and tighten the nuts to stated torque. Move the vehicle down, push the unlock button on the parking brake lever and hook up the negative cable to the battery. If your vehicle does not have AWD, fit the spare tire on the rim and in the same position it was removed from. Get the vehicle in place on an alignment rack, raise it when needed, check the marks on the shock absorber and sway bar kit bolts, tighten the marks on the shock absorber looser bolts to 102 Nm (75 ft. lbs.), check the marks on the sway bar kit connectors, tighten, then perform the wheel alignment.
Related 2006 Chrysler Pacifica Parts
 2006 Chrysler Pacifica Wheel Hub
 2006 Chrysler Pacifica Shock Absorber
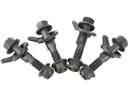 2006 Chrysler Pacifica Alignment Bolt
 2006 Chrysler Pacifica Axle Beam Mount
 2006 Chrysler Pacifica Coil Spring Insulator
 2006 Chrysler Pacifica Coil Springs
 2006 Chrysler Pacifica Crossmember Bushing
 2006 Chrysler Pacifica Lateral Link
 2006 Chrysler Pacifica Steering Knuckle
 2006 Chrysler Pacifica Sway Bar Bracket
 2006 Chrysler Pacifica Sway Bar Bushing
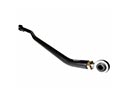 2006 Chrysler Pacifica Track Bar