JeepParts
My Garage
My Account
Cart
OEM 2007 Chrysler Pacifica Sway Bar Kit
Stabilizer Sway Bar Set- Select Vehicle by Model
- Select Vehicle by VIN
Select Vehicle by Model
orMake
Model
Year
Select Vehicle by VIN
For the most accurate results, select vehicle by your VIN (Vehicle Identification Number).
2 Sway Bar Kits found


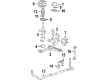
2007 Chrysler Pacifica Stabilizer Bar, Front Part Number: 4743162AA
Product Specifications- Other Name: Bar - Front; Suspension Stabilizer Bar, Front; Sway Bar; Stabilizer Bar Front; Bar Front Sway
- Position: Front
- Item Weight: 15.70 Pounds
- Item Dimensions: 49.1 x 10.8 x 4.4 inches
- Condition: New
- Fitment Type: Direct Replacement
- SKU: 4743162AA
- Warranty: This genuine part is guaranteed by Mopar's factory warranty.

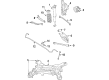
2007 Chrysler Pacifica Stabilizer Bar, Rear Part Number: 4766864AD
Product Specifications- Other Name: Shaft - Rear Suspension; Suspension Stabilizer Bar, Rear; Sway Bar; Stabilizer Bar Rear Suspension
- Position: Rear
- Replaces: 4766864AC
- Item Weight: 6.80 Pounds
- Item Dimensions: 59.8 x 11.0 x 4.4 inches
- Condition: New
- Fitment Type: Direct Replacement
- SKU: 4766864AD
- Warranty: This genuine part is guaranteed by Mopar's factory warranty.
2007 Chrysler Pacifica Sway Bar Kit Parts and Q&A
- Q: How to Install a Sway Bar Kit on 2007 Chrysler Pacifica?A: First, carefully place cushions on the sway bar kit, so the slits in the bushings are up front and the flat side is by the crossmember. Then, secure retainers onto the cushions and fit the cushions and retainers to the sway bar kit onto the crossmember. Fit the cushion retainer mounting bolts into the subframe, without tightening first. Then, fit the bolt and nut to link the sway bar kit to each sway bar link. Fasten the retainer mounting bolts to 61 Nm (45 ft. lbs.) of torque. Raise the crossmember to the body mounting points, fit the propeller shaft onto the alignment pin and make sure the shocks are in the appropriate holes in the spring links. Lift the crossmember further so that the left side can have its mounting bolts installed, while leaving the right side bolts loosened and lying on the frame. Carefully lower the jack up to the point where the right crossmember is only low enough to let the drop spring be pulled through the suspension strut. Lift the jack to bring the coil spring and bottom of the right shock absorber into place and put in the lower mounting bolt and nut, making sure not to tighten the nut yet. Lift the right arm rest and get the right side bolts tight, though not at their full tightness. Unscrew the bolts that join the front and rear crossmember to the frame at the left side and lower the jack so that the crossmember hangs, with the left side dropping for the coil spring installation. Bring up the jack to lift the left coil spring and shock, slot the shock absorber into the mount and fasten the lower bolt and nut loosely. Lift the left part of the crossmember and fit the removed mounting bolts until they are snug, but don't fully tighten them yet. Get the mounts aligned with the marks drawn on your crossmember and secure all four bolts tightly at 163 Nm (120 ft. lbs.) after positioning. Get the jack out and align the location reference marks; then set the propeller shaft on the driveline crossmember and tighten the bolts to 54 Nm (40 ft. lbs.). Hook the wheel speed sensor connector on the spare tire mounting support and then plug the vehicle wiring harness connector into every wheel speed sensor connector. Mount both rear brake calipers, ensuring that abutment shims are there, pulling the caliper pins back and gently positioning the caliper just above the rotor without twisting the guide pin bolts which need to be tightened to 17 ft. lbs. (23 Nm). Hold the brackets for the left and right rear brake hoses to the crossmember's front edge, then secure the rear parking brake cables into their connectors using your hands, if required, to press the end of the buttons. Hook up the rear part of the exhaust and next tighten the wheel and tire nuts to 135 Nm (100 ft. lbs.). Extend the vehicle and pull back on the parking brake lever's automatic adjuster. If you don't have AWD, have a spare tire installed on your vehicle. After putting the vehicle into position on an alignment rack with its wheels raised, check and tighten the fasteners connecting the shock and sway bar link arms to the frame and finally perform a wheel alignment.
Related 2007 Chrysler Pacifica Parts
 2007 Chrysler Pacifica Wheel Hub
 2007 Chrysler Pacifica Shock Absorber
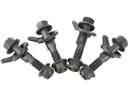 2007 Chrysler Pacifica Alignment Bolt
 2007 Chrysler Pacifica Axle Beam Mount
 2007 Chrysler Pacifica Coil Spring Insulator
 2007 Chrysler Pacifica Coil Springs
 2007 Chrysler Pacifica Crossmember Bushing
 2007 Chrysler Pacifica Lateral Link
 2007 Chrysler Pacifica Steering Knuckle
 2007 Chrysler Pacifica Sway Bar Bracket
 2007 Chrysler Pacifica Sway Bar Bushing
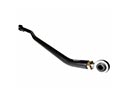 2007 Chrysler Pacifica Track Bar