JeepParts
My Garage
My Account
Cart
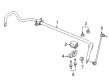
OEM Chrysler Pacifica Sway Bar Kit
Stabilizer Sway Bar Set- Select Vehicle by Model
- Select Vehicle by VIN
Select Vehicle by Model
orMake
Model
Year
Select Vehicle by VIN
For the most accurate results, select vehicle by your VIN (Vehicle Identification Number).
7 Sway Bar Kits found


Chrysler Pacifica Bar - Rear Suspension Part Number: 68319497AC
$150.53 MSRP: $229.00You Save: $78.47 (35%)Ships in 1-2 Business Days
Chrysler Pacifica Stabilizer Bar, Front Part Number: 68319333AC
$351.39 MSRP: $536.00You Save: $184.61 (35%)Ships in 1-2 Business Days
Chrysler Pacifica Stabilizer Bar, Front Part Number: 68230234AD
$179.01 MSRP: $264.00You Save: $84.99 (33%)Ships in 1-3 Business DaysChrysler Pacifica Stabilizer Bar, Front Part Number: 68238126AC
$210.74 MSRP: $319.00You Save: $108.26 (34%)Ships in 1-2 Business DaysChrysler Pacifica Stabilizer Bar, Front Part Number: 68218102AC
$226.50 MSRP: $315.00You Save: $88.50 (29%)Ships in 1-2 Business Days


Chrysler Pacifica Stabilizer Bar, Front Part Number: 4743162AA

Chrysler Pacifica Stabilizer Bar, Rear Part Number: 4766864AD
Chrysler Pacifica Sway Bar Kit
Choose OEM Sway Bar Kit that meet Chrysler factory standards. Chrysler designs and tests every component for precision and durability. Each Sway Bar Kit follows strict manufacturing steps to lock in quality and fit. If your Chrysler Pacifica matters to you, OEM parts make the smart choice. You'll get the exact look, feel, and performance you expect. Shop genuine Pacifica parts at the highly competitive prices online. Enjoy a manufacturer's warranty, a hassle-free return policy, and rapid delivery. No more guesswork with off brands. Get genuine parts with exact fit and true factory performance. Shop with confidence today at JeepPartsDeal.com.
This is the Chrysler Pacifica Sway Bar Kit that is valuable addition to Chrysler Pacifica lineup which is known for its quality and stability. This Sway Bar Kit has the responsibility of enhancing the steadiness as well as handling of a vehicle through reducing body sway when cornering and overcome rough terrains. The Sway Bar Kit joins the opposing wheels using a torsion spring in order to enhance the roll stiffness not affecting the height of the wheels of the Chrysler Pacifica to ensure that it has a good grip of the road. This Sway Bar Kit can fit most Pacifica models, and is highly recommended by many as boosting up the efficiency and safety of the car. The adjustments in the Sway Bar Kit include adjustable and active kits that enable the modification of stiffness of the handling characteristics and the ride quality. As opposed to the older models of Sway Bars where the vibrations may pass between the wheels, the current Chrysler Pacifica Sway Bar Kit may contain provisions for sensors and hydraulics to make real-time adjustments which improves the stability of the car much more. It is this new approach that provides a better drive while at the same time enhancing the safety of the Chrysler Pacifica. The Chrysler Pacifica Sway Bar Kit is one more product that can be considered a marvel of automotive engineering as being proven by its impressive market reputation coupled by the numerous positive comments of its users, the Chrysler Pacifica Sway Bar Kit is still a very useful add-on in that it can significantly enhance the ride experience, as well as the performance, of a Chrysler Pacifica.
Chrysler Pacifica Sway Bar Kit Parts and Q&A
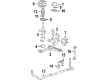
- Q: How to Remove a Sway Bar Kit from the Rear on Chrysler Pacifica?A:Before taking out the rear sway bar kit (only if your vehicle isn't AWD and has a spare tire), remove the spare tire. Make sure the automatic adjuster in the parking brake lever is turned off. First put the vehicle up on jacks, then put a pair of jack stands under the engine cradle's front to maintain stability as you remove and place the back suspension. Eliminate the wheel mounting nuts and the tire and wheel set from either side. After that, take out the rear half of the exhaust and if you need to, ease off the parking brake shoe adjustment so the cable buttons come away from the connectors. Slide the left side of the rear parking brake cable away and secure the connector with pliers before you remove the cable button. After that, take off the right side cable button. First, remove the screw that holds the left rear brake hose routing bracket to the front of the Rear Crossmember and remove the other screw on the right rear bracket routing bracket. If needed, press down the caliper piston only a bit to let the caliper be removed easily. Open the two guide pin bolts on every side, then spin the mounting bolt away from the disc and carefully lift out the caliper assembly. Secure the Brake Caliper lengthwise to the vehicle using rope or cord so it can't wobble and damage the brake hose. Remove the vehicle wiring harness connector from every rear wheel speed sensor and unclip them from the spare tire support. On an AWD car, mark the link between the propeller shaft and the rear driveline module input and then remove its three bolts without trying to take the shaft out of the module. Rub a marker or crayon at each of the rear crossmember's mount points on the body. Place a jack securely under the rear suspension crossmember or driveline module, lift until it is in contact with it and hold it in place with the jack's stand. Undo the lower mounting bolt and nut at every rear Shock Absorber, then remove both crossmember bolts from the left front and rear. With the jack safely lowered, let the crossmember's left half come free just enough to pull out the pair of coil spring and isolator. Reach under the vehicle and position the crossmember's left side up. After that, secure the removed mounting bolts, but do not tighten them yet. Once again, do this for the right side by undoing both crossmember mounting bolts, lowering the jack, taking off the coil spring and putting the right side back up without installing the bolts yet. Take out the previously loosened crossmember mounting bolts on the left side, lower the jack and remove the propeller shaft from the alignment pin by holding it with a bungee or cord. Keep lowering the jack until the crossmember is convenient to fix the sway bar kit bolts. Unscrew the nut and bolt that keep the sway bar kit attached to the sway bar link and unscrew all the bolts that anchor the bar cushion retainers to the crossmember. Lastly, get rid of the sway bar kit with both cushions and retainers. Then, remove the retainers from the cushions and the cushions from the sway bar kit by taking advantage of the slits in the bushings.
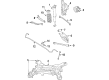
- Q: What Are the Benefits of Using a Sway Bar Kit on Chrysler Pacifica?A:Raise the vehicle and place it on support stands, then take out the tires and front wheels on both sides for sway bar kit service. Loosen the outer tie rod nut from the Steering Knuckle using a wrench, while you station the rod end stud. To remove the Tie Rod End, use Remover, Special Tool C-3894-A. Stop the stud from rotating when you remove the nut by setting a wrench on the flat machined into it. Take away the links from the sway bar by holding the wrench in place when you are unthreading the nut. Relax the front bolts in the sway bar supports, but don't remove them; remove the rear bolts and pull the entire sway bar backwards to detach both supports and cushions. Turn the sway bar clockwise and counterclockwise a few times to get it through the wheel well hole on the driver's side. Examine for any bushing, bush retainer, sway bar link or rivet damage, plus check if the retainers are missing any heat shield parts. To fit the sway bar, pass it downward through the right front wheel opening with the cradle, tilt it up so it is away from the brake tubes. Slide the cushions onto the sway bar so the open side is toward the cradle and then fit the shield-covered retainers on top, placing the shield side facing forward on the right cushion. Forward the sway bar so the slotted holes in the retainers connect with the retainer mounting bolts in the cradle, insert the rear retainer bolts and tighten all four bolts to 54 Nm (40 ft. lbs.). Set the stud through the hole in the first end of the bar. Hold it still with a wrench while you put a nut on the other end and turn it by tightening the nut to 88 Nm (65 ft. lbs.). Take the outer tie rods and fasten them to the steering knuckles on each stud, easing off the first nut and replacing it with a new nut and tighten that to 47 Nm (35 ft. lbs.) torque, completing it with an extra 1/2 (180°) turn. After that, slide the tire-wheel assembly into position, tighten the wheel mounting nuts to 135 Nm (100 ft. lbs.) and lower the car.


Related Chrysler Pacifica Parts
 Chrysler Pacifica Wheel Hub
 Chrysler Pacifica Shock Absorber
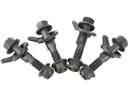 Chrysler Pacifica Alignment Bolt
 Chrysler Pacifica Axle Beam Mount
 Chrysler Pacifica Axle Pivot Bushing
 Chrysler Pacifica Coil Spring Insulator
 Chrysler Pacifica Coil Springs
 Chrysler Pacifica Crossmember Bushing
 Chrysler Pacifica Lateral Link
 Chrysler Pacifica Steering Knuckle
 Chrysler Pacifica Sway Bar Bracket
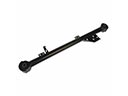 Chrysler Pacifica Trailing Arm