JeepParts
My Garage
My Account
Cart
OEM 2006 Dodge Caravan Rack And Pinion
Steering Rack And Pinion- Select Vehicle by Model
- Select Vehicle by VIN
Select Vehicle by Model
orMake
Model
Year
Select Vehicle by VIN
For the most accurate results, select vehicle by your VIN (Vehicle Identification Number).
1 Rack And Pinion found


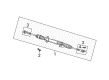
2006 Dodge Caravan Steering Gear Part Number: R8072216AC
$746.97 MSRP: $869.00You Save: $122.03 (15%)Product Specifications- Other Name: Gear - Rack And Pinion; Rack and Pinion Assembly; Steering Gearbox; Gear Assembly; Gear Rack And Pinion With Tie Rod Ends; Gear Rack And Pinion
- Replaces: 68072216AC, 68072216AA, 4766250AF, 4766260AK, 4766250AG, 4766250AN, 4766260AL, 4766270AC, 4766250AL, 4766260AJ, 4766250AM, 4766260AG, 4766250AK, 68072216AB, 4766260AF, 4766260AM, R0400272
- Item Weight: 19.90 Pounds
- Item Dimensions: 61.8 x 11.6 x 6.4 inches
- Condition: New
- Fitment Type: Direct Replacement
- SKU: R8072216AC
- Warranty: This genuine part is guaranteed by Mopar's factory warranty.
2006 Dodge Caravan Rack And Pinion Parts and Q&A
- Q: How to Service and Repair Rack and Pinion Steering Gear with LHD on 2006 Dodge Caravan?A: With an LHD vehicle, start the servicing by taking off the cap of the power steering fluid reservoir and using a siphon pump to remove as much liquid as you can without weakening the mesh in the filter. You should lock the steering column in the central/neutral position to make certain the Clock Spring does not become damaged when you separate the steering column from the intermediate steering coupler. Place the steering wheel forward and hold it in place with a special steering wheel holding tool. Detach the carpet by the steering column dash seal and loosen the bolts keeping the cover attached so you can remove it. Loosen the roll pin with Remover/Installer, Special Tool 6831A and pull the intermediate shaft coupler off the rack and pinion shaft after that. Lift the car and remove both of its front wheel and tire assemblies, plus the jam nuts from the ends of the tie rods. Pull off the outer tie rod ends from the steering knuckle with the Puller, followed by removing them with Special Tool C-3894-A. Simply pull toward yourself on the right side of the car or push the left side toward the center until you feel it stop. Pull out the NVLD assembly and vapor canister from emissions and then break loose a hose at the power steering cooler to let fluid drain out. Use a socket to remove the bolts holding the cooler to the crossmember reinforcement and remove the screws located at the back of the crossmember for the hoses. Take out the tube nuts that keep the hoses on the rack and pinion and remove the three bolts and nuts holding the rack and pinion to the cradle crossmember. Pull the rack and pinion down until the pinion shaft is free from the crossmember and afterwards move it over to the passenger side so the left outer tie rod end fits through the hole in the cradle reinforcement. Bring the rack and pinion down through the hole to get rid of it. If you have to, pull off the outer tie rod ends from the inner tie rod threads, noting how many times you turn them during installation. For installation, add the outer tie rod ends onto the inner rod threads in the same way as before and turn them the same number of times. Hold the tie rod in place and just partially screw the jam nuts until secure. To release the right side tie rod, pull it from the top of the right tie rod end; for the left side, push it inward until you hear a click and then move the left tie rod up through the center in the cradle crossmember reinforcement and out the opening under the passenger side. Through the opening, lift the left side tie rods up, push the rack and pinion left until it's centered and use the specified torque to secure the three bolts and nuts. Stop the steering wheel in the center, after which you should attach the power steering pressure and return hoses to the proper ports on the rack and pinion, tightening the hose tube nuts to 31 Nm. Tighten the pressure and return hoses to the rear of the cradle crossmember with 23 Nm force, then install the power steering fluid cooler on the cradle crossmember reinforcement and ensure the mounting bolts are set to 11 Nm. Rearrange the disassembled parts so the hose from the power steering goes to the cooler again and then clip the hose in place with a new clamp. On each side, mount the outer tie rod onto the steering knuckle, put in a new nut and tighten it until you reach 75 Nm. Attach the front wheel and tire and torque the nuts only to half specification, then torque them further to the required 135 Nm. Make certain both front wheels face straight, lower the vehicle and carefully slide the coupler down the rack and pinion shaft. Make sure the roll pin joining the middle shaft to the rack and pinion is secured with the Remover/Installer Special Tool 6831A and that it doesn't extend past the center of the coupler on both sides. Fix the dash seal in place, cover it with screws and then replace the carpet around that area. Once the steering wheel tool is removed, fill the power steering and bleed its system, inspect for any leaks and make sure the front toe is set to spec.
Related 2006 Dodge Caravan Parts
 2006 Dodge Caravan Power Steering Pump
 2006 Dodge Caravan Steering Wheel
 2006 Dodge Caravan Power Steering Hose
 2006 Dodge Caravan Power Steering Reservoir
 2006 Dodge Caravan Steering Column
 2006 Dodge Caravan Steering Column Cover
 2006 Dodge Caravan Steering Gear Box
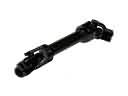 2006 Dodge Caravan Steering Shaft
 2006 Dodge Caravan Tie Rod End