JeepParts
My Garage
My Account
Cart
OEM 2006 Dodge Caravan Tie Rod End
Steering Rod End- Select Vehicle by Model
- Select Vehicle by VIN
Select Vehicle by Model
orMake
Model
Year
Select Vehicle by VIN
For the most accurate results, select vehicle by your VIN (Vehicle Identification Number).
1 Tie Rod End found


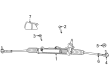
2006 Dodge Caravan Outer Tie Rod Part Number: 5183761AD
$67.98 MSRP: $100.00You Save: $32.02 (33%)Product Specifications- Other Name: Tie Rod - Outer; Steering Tie Rod End, Outer; Drag Link Repair Kit; Outer Tie Rod End; Tie Rod End Outer; Tie Rod End
- Position: Outer
- Replaces: 5183761AC, 5183761AB, 68014944AA, 5183761AA, 68141058AA, 5103320AB, 5103320AA, 68033477AA
- Item Weight: 1.60 Pounds
- Item Dimensions: 2.5 x 7.9 x 10.5 inches
- Condition: New
- Fitment Type: Direct Replacement
- SKU: 5183761AD
- Warranty: This genuine part is guaranteed by Mopar's factory warranty.
2006 Dodge Caravan Tie Rod End Parts and Q&A
- Q: How to Service and Repair a Tie Rod End for Outer/Inner on 2006 Dodge Caravan?A: First, get the vehicle into the air and secure it, remove the front wheel and tire and then service the tie rod ends. Without holding the steering knuckle, pull the tie rod out with the wheel until it's completely wound and remove the jam nut on the opposite end and then remove the nut on the stud behind the outer end attachment. Take out the steering knuckle arm stud with Remover, C-3894-A, then remove the outer tie rod by turning it as many times as you did when you installed it. After you unbolt the outer tie rod, remove the nut on the inner tie rod, unscrew the clamp attaching the bellows to the inner tie rod and take off the bellows from the steering gear body and transfer tube. Take the travel restrictor out from the inner tie rod and install the correct inner tie rod tool, all the while securing the rack gear against damage with a wrench. If you cannot remove the inner tie rod with the correct tools, don't try to loosen it with a hammer or heat, because it might harm the steering gear. As soon as you remove the inner tie rod, stick the travel restrictor in position with the flat side of its teeth facing in at the inner side of the ball joint and use Mopar to install. Apply Lock & Seal Adhesive to the threads of the inboard end, insert the inner tie rod into the gear with the matching tool and hold the rack gear while tightening it to 78 N.m (58 ft. lbs.). Add a little Mopar to the paint. Insert the new lubriplate in the tie rod shaft, set the transfer tube clamp onto the transfer tube and just tighten the clamp on the large bellows end. Slide the new bellows onto the inner tie rod and gear body with the small end going into the groove in the rod. Then, tighten the clamp screw to secure the bellows to the transfer tube and squash the bellows clamp at the gear body. Place the clamp at the small end of the bellows, put the leak detection pump on its left and fasten the mounted screws. Put the tie rod jam nut inside the inner rod till it's ready for the outer tie rod and tighten the outer rod exactly the same as it was before removal. Place the outer tie rod end into the steering knuckle and screw on the nut until you feel 75 N.m (55 ft. lbs.) to hold the stud in place. Tighten the tie rod jam nut only after the toe has been set. Afterward, place the front wheel and tire in place, drive the car down to the ground and check and tighten the front toe, following a 75 N.m (55 ft. lbs.) tightening of the tie rod jam nut.
Related 2006 Dodge Caravan Parts
 2006 Dodge Caravan Power Steering Pump
 2006 Dodge Caravan Steering Wheel
 2006 Dodge Caravan Power Steering Hose
 2006 Dodge Caravan Power Steering Reservoir
 2006 Dodge Caravan Rack And Pinion
 2006 Dodge Caravan Steering Column
 2006 Dodge Caravan Steering Column Cover
 2006 Dodge Caravan Steering Gear Box
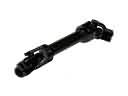 2006 Dodge Caravan Steering Shaft