JeepParts
My Garage
My Account
Cart
OEM 2006 Jeep Wrangler Grille
Front Grille- Select Vehicle by Model
- Select Vehicle by VIN
Select Vehicle by Model
orMake
Model
Year
Select Vehicle by VIN
For the most accurate results, select vehicle by your VIN (Vehicle Identification Number).
1 Grille found

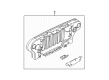
2006 Jeep Wrangler Grille, Front Part Number: 55174594AG
$725.93 MSRP: $1065.00You Save: $339.07 (32%)Product Specifications- Other Name: Panel - Radiator Closure; Grille, Front
- Position: Front
- Replaces: 55174594AD, 55174594AF, 55174594AE
- Item Weight: 27.70 Pounds
- Item Dimensions: 57.2 x 28.6 x 8.4 inches
- Condition: New
- Fitment Type: Direct Replacement
- SKU: 55174594AG
- Warranty: This genuine part is guaranteed by Mopar's factory warranty.
2006 Jeep Wrangler Grille Parts and Q&A
- Q: How to Remove and Install the Grille Panel on 2006 Jeep Wrangler?A: Remove the radiator grille by detaching the front crossmember cover, the crossmember valence cover and finally the radiator overflow bottle. After that, remove the bolts that link the radiator and shroud to the grille panel. If a vehicle has air conditioning, drain the system, release tension from the high and low pressure lines at the quick connectors and plug them both to avoid getting dirty air in the A/C channels. Break the connection between the grille panel and the radiator support rods by removing the bolts. This also means parting from the head lamp, turn signal, marker lamp and horn harness connectors. After that, detach the bolt holding the grille to the frame and pull the grille off your vehicle. Installation requires transferring all the needed components and then positioning the grille panel on the vehicle, so the rubber support bumpers are aligned. Put in the bolt that holds the grille to the frame mount and then screw on the bolts that attach the fenders to the grille panel. Replace all the head lamp, turn signal, marker lamp and horn wire harness connectors, then insert the nuts that attach the grille panel radiator support rods. If A/C is installed, position the high and low pressure hoses into the quick disconnect couplings and vacuum them, as well as charge them as needed. Fit the radiator and shroud to the grille panel, next attach the radiator overflow bottle and then place the crossmember valence cover and front crossmember cover.
Related 2006 Jeep Wrangler Parts
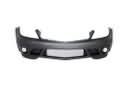 2006 Jeep Wrangler Bumper
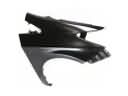 2006 Jeep Wrangler Fender
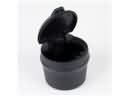 2006 Jeep Wrangler Ashtray
 2006 Jeep Wrangler Cigarette Lighter
 2006 Jeep Wrangler Door Lock Actuator
 2006 Jeep Wrangler Seat Cushion
 2006 Jeep Wrangler Wiper Blade
 2006 Jeep Wrangler Exhaust Nut
 2006 Jeep Wrangler Lift Support
 2006 Jeep Wrangler Liftgate Hinge
 2006 Jeep Wrangler Rear Door Striker
 2006 Jeep Wrangler Window Crank Handles