JeepParts
My Garage
My Account
Cart
OEM 2008 Chrysler Pacifica Front Cross-Member
Front Engine Cross Member- Select Vehicle by Model
- Select Vehicle by VIN
Select Vehicle by Model
orMake
Model
Year
Select Vehicle by VIN
For the most accurate results, select vehicle by your VIN (Vehicle Identification Number).
2 Front Cross-Members found

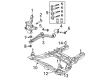
2008 Chrysler Pacifica Engine Cradle, Front Part Number: 4743689AH
Product Specifications- Other Name: Crossmember - Front Suspension; Engine Cradle, Front; Cradle Front Suspension
- Position: Front
- Item Weight: 88.00 Pounds
- Item Dimensions: 52.5 x 47.9 x 15.7 inches
- Condition: New
- Fitment Type: Direct Replacement
- SKU: 4743689AH
- Warranty: This genuine part is guaranteed by Mopar's factory warranty.

2008 Chrysler Pacifica Floor Crossmember Part Number: 5054618AA
Product Specifications- Other Name: Crossmember - Front Floor; Floor Pan Crossmember, Rear; Crossmember Front Floor
- Item Weight: 19.60 Pounds
- Item Dimensions: 56.1 x 14.6 x 7.4 inches
- Condition: New
- Fitment Type: Direct Replacement
- SKU: 5054618AA
- Warranty: This genuine part is guaranteed by Mopar's factory warranty.
2008 Chrysler Pacifica Front Cross-Member Parts and Q&A
- Q: How to Service and Repair a Front Cross-Member on 2008 Chrysler Pacifica?A: The first step to servicing and repairing the front cross-member is to disconnect the negative battery cable. Secure the overhead powertrain support bracket in position using Tool 8534B, along with adapter kit 8534-12. Once the engine oil dipstick tube-to-cylinder head fastener has been removed, wedge in lift/support bracket 8534-8 and use the dipstick tube bolt to lock it in place. Unplug the coolant temperature sensor at the thermostat housing and lift the bolt holding the engine harness to the cylinder head out of the way. Place and mount the lift/support bracket, then bolt it in with 8534-7. Connect one or more of the mounting bracket/sleeve assemblies 8534-2 to support tube 8534-1 and have them sit directly on the inner edges of the fenders. Slide cross-bar 8534-3, clamp 8534-5 and support leg 8534-4 into place on the support tube so that the support leg sits on the upper support of the radiator. Firmly lock the cross-bar to the support tube using 8534-5. After that, use a thumb screw and hex nut to attach mounting bracket/sleeve 8534-2. Hook on the lift bracket and hook assemblies, then tighten the T-handles gently to ensure the fixture is held by the drivetrain. Lift the car on a hoist and get rid of the assemblies that include the front tires and wheels. If the harness is too tight, unplug it from the support brackets for a little looseness. Start by getting sway bar links off the struts, then take out the lower control arm bolts connecting to the engine cradle and move the control arms out of the way. Take out the fascia, the nuts that attach the engine to the cradle at the front and rear and disconnect the brake hydraulic line and brackets from the frame rails. After removing the bolts connecting the brake line support bracket to the cradle, also unscrew the right side power steering hydraulic hose brackets from the cradle with a screwdriver. Untie the clip holding the power steering hydraulic pressure line to the cradle, then remove the screw securing the power steering hydraulic return hose clamp to the loop around the engine cradle at the cooling bay. Take out the screw connecting the power steering hydraulic return hose clamp to the left side of the engine cradle. First, remove the power steering rack and pinion bolts and place Dick's Driveline Support Table 8874 under the vehicle. Gradually lower the car so the cradle and fixture touch and next, take out the four bolts that secure the cradle to the body with a wrench. Raise the vehicle onto the hoist to separate the cradle, with the overhead fixture held safe to the inner fenders and upper radiator support by a helper, as the brake and power steering lines will stay connected to the cradle. After that, take out the stabilizer bar and, if your car has a 3.8L engine, also remove both tuned mass dampers as needed.
Related 2008 Chrysler Pacifica Parts
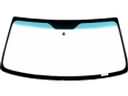 2008 Chrysler Pacifica Windshield
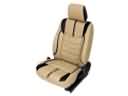 2008 Chrysler Pacifica Seat Cover
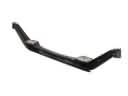 2008 Chrysler Pacifica Axle Beam
 2008 Chrysler Pacifica Dash Panels
 2008 Chrysler Pacifica Floor Pan
 2008 Chrysler Pacifica Hood Hinge
 2008 Chrysler Pacifica Lift Support
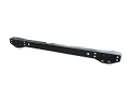 2008 Chrysler Pacifica Rear Crossmember
 2008 Chrysler Pacifica Rear Door Striker
 2008 Chrysler Pacifica Shift Indicator
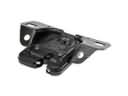 2008 Chrysler Pacifica Trunk Lid Latch
 2008 Chrysler Pacifica Windshield Wiper