JeepParts
My Garage
My Account
Cart
OEM Chrysler Pacifica Front Cross-Member
Front Engine Cross Member- Select Vehicle by Model
- Select Vehicle by VIN
Select Vehicle by Model
orMake
Model
Year
Select Vehicle by VIN
For the most accurate results, select vehicle by your VIN (Vehicle Identification Number).
10 Front Cross-Members found


Chrysler Pacifica Suspension Crossmember, Front Part Number: 68188235AF
$768.30 MSRP: $1130.00You Save: $361.70 (33%)Ships in 1-3 Business Days
Chrysler Pacifica Crossmember, Front Part Number: 68232996AD
$97.04 MSRP: $143.00You Save: $45.96 (33%)Ships in 1-3 Business Days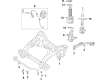
Chrysler Pacifica Crossmember, Front Part Number: 68236976AG
$330.84 MSRP: $487.00You Save: $156.16 (33%)Ships in 1-3 Business DaysChrysler Pacifica Suspension Crossmember, Front Part Number: 68441176AD
$921.73 MSRP: $1345.00You Save: $423.27 (32%)Ships in 1-3 Business Days
Chrysler Pacifica Crossmember Part Number: 68232827AB
$47.79 MSRP: $68.70You Save: $20.91 (31%)Ships in 1-3 Business DaysChrysler Pacifica Suspension Crossmember, Front Part Number: 68236976AF
$583.95 MSRP: $852.00You Save: $268.05 (32%)Chrysler Pacifica Crossmember, Front Part Number: 68223606AC
$155.22 MSRP: $229.00You Save: $73.78 (33%)
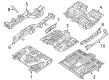
Chrysler Pacifica Floor Crossmember Part Number: 5054618AA

Chrysler Pacifica Engine Cradle, Front Part Number: 4743689AH
Chrysler Pacifica Engine Cradle, Front Part Number: 4743166AH
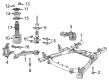
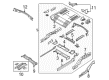
Chrysler Pacifica Front Cross-Member
Choose OEM Front Cross-Member that meet Chrysler factory standards. Chrysler designs and tests every component for precision and durability. Each Front Cross-Member follows strict manufacturing steps to lock in quality and fit. If your Chrysler Pacifica matters to you, OEM parts make the smart choice. You'll get the exact look, feel, and performance you expect. Shop genuine Pacifica parts at the highly competitive prices online. Enjoy a manufacturer's warranty, a hassle-free return policy, and rapid delivery. No more guesswork with off brands. Get genuine parts with exact fit and true factory performance. Shop with confidence today at JeepPartsDeal.com.
The Chrysler Pacifica Front Cross-Member forms an essential vehicle component which creates significant improvements in Chrysler Pacifica reliability and vehicle performance. The Front Cross-Member exhibits robust characteristics since it uses steel for its construction to support the engine and transmission function and stabilize vehicle positions. The K-frame component serves as a key element to handle all Pacifica vehicles including fuel and hybrid models by supporting their overall driving performance. The Front Cross-Member implements a shape as part of its design. The shaped section delivers outstanding strength to defend against turning and bending forces thus improving security alongside productivity while in operation. The Chrysler Pacifica received dual recognition at the optimal Minivan of 2016 and 2020 optimal Family Car awards that strengthen its position as a respected automotive product. Different Pacifica models utilize the Front Cross-Member because its advanced engineering benefits drivers through enhanced handling capabilities while delivering smoother rides. Body panel alignment performed by the Front Cross-Member ensures both visual appeal as well as physical durability. The innovative design along with superior performance and dependable operation of the Chrysler car Front Cross-Member showcases itself as a standout characteristic that makes the Chrysler model an excellent family-choice.
Chrysler Pacifica Front Cross-Member Parts and Q&A
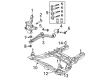
- Q: How to Service and Repair a Front Cross-Member on Chrysler Pacifica?A:It's important to start front cross-member service by removing and isolating the negative Battery Cable. To install the overhead powertrain support fixture, grab Tool 8534B and adapter kit 8534-12. Take off the engine oil dipstick tube-to-cylinder head fastener, attach lift/support bracket 8534-8 to the engine and fasten it by putting in the dipstick tube bolt. Remove the Coolant Temperature Sensor from the thermostat housing and then release the harness-to-cylinder head bolt. Move the harness away from the engine. Attach and fasten lift/support bracket and bolt 8534-7. Install mounting bracket/sleeve assemblies 8534-2 to secure tube 8534-1 onto the vehicle, so that the brackets come to rest on the fender inner ledges. Attach cross-bar 8534-3 to the support tube and then clamp clamp 8534-5 onto it. Support leg 8534-4 is secured to this assembly over the radiator upper support. Attach the cross-bar-to-support tube clamp 8534-5 and connect the mounting bracket/sleeve 8534-2 with the thumb screw and hex nut. Attach the lift bracket and the hook assemblies and use the T-handles to apply just enough tension to link the fixture to your drivetrain. Lift the car on a hoist and detach the complete front tire/wheel sets. If there isn't enough room around the engine to remove the wheel speed sensor, disconnect it from the support brackets to give the sensor some slack. On each side of the vehicle, remove the sway bar links from the struts, disconnect the lower control arm bolts to the engine cradle and swing the control arms aside. Take out the nuts that secure the engine front and rear to the fascia. Free the brake hydraulic line and its brackets from the frame rails, unbolt the bracket from the cradle and pull them out. Take out the mounting screws for the Power Steering Hose clamps on the cradle (right side), the screw holding the pressure hose to the engine cradle and the screw securing the return hose to the cradle at the cooling loop. Take out the screw holding the power steering hydraulic return hose clamp to the left side of the engine cradle. After you have removed the power steering rack and pinion bolts, insert Tool 8874 (the Driveline Support Table) beneath the vehicle. Bring the load to the ground until the cradle and support meet. As soon as the four cradle bolts are in the body, unfasten them. Raise the hoist gradually so the cradle comes off the vehicle, carefully ensuring the overhead fixture stays secure to the inner fenders and radiator upper support. Meanwhile, ask a helper to steady the brake and power steering hydraulic lines as they remain connected to the cradle. Finally, take out the stabilizer bar and remove each tuned mass damper if you have the 3.8L engine.
- Q: How to Install a Front Cross-Member with a 3.8L Engine on Chrysler Pacifica?A:The first step to fitting the front cross-member is by securing the tuned mass dampers-only for models with a 3.8L engine-with 68 Nm (50 ft. lbs.). After that, put the stabilizer bar in place on the engine cradle. Ensure the cradle is in position and that the fixture is within reach, then slowly organize the vehicle so the engine front and rear studs fit into the through holes on the cradle. Following the work done during disassembly, position the cradle and use the index/scribe mark to tighten the cradle-to-body bolts to 163 Nm (120 ft. lbs.). Remove the overhead powertrain support fixture from the engine compartment by taking off the rear bracket first, connecting the Coolant Temperature Sensor, removing the front bracket and installing the engine oil dipstick fastener. Hoist the vehicle up and take out the driveline support table. Loose-fit and then tighten the engine front and rear mount to cradle nuts to a torque of 54 Nm (40 ft. lbs.) and then add the power steering rack and pinion bolts. Set up the left side hydraulic return hose clamp at bolt (2) on the engine cradle and install the clamp bolt for the hydraulic hose at cooling loop (3). Join the power steering hydraulic hose to the engine cradle using the tie-strap clip (1), overlap and install the pair of hydraulic hose clamps (1 and 3) and fasten one of the hydraulic hoses with the cradle mounting screw (4). Set the Brake Line support brackets onto the cradle, tighten the bolts in place and run the brake lines through the plastic brackets and secure them. Having fitted the fascia, next you place the lower Control Arms, followed by installing the cradle bolts for the control arms. Secure 3 sway bar links (3) to the strut attaching points and tighten them by turning the link-to-strut nuts until they reach 88 Nm (65 ft. lbs.). If there is a problem, shift the wheel speed sensor harness to the support bracket and fit both of the front tires or wheels back in place. Screw in the connector for the solenoid or pressure switch (1) to a torque of 4 Nm (35 in. lbs.), then attach the negative Battery Cable. In the end, make sure the front end is perfectly aligned.


Related Chrysler Pacifica Parts
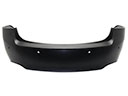 Chrysler Pacifica Bumper Cover
 Chrysler Pacifica Axle Beam
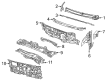
 Chrysler Pacifica Dash Panel
 Chrysler Pacifica Door Latch Assembly
 Chrysler Pacifica Door Latch Cable
 Chrysler Pacifica Floor Pan
 Chrysler Pacifica Fuel Filler Housing
 Chrysler Pacifica Liftgate Lift Support
 Chrysler Pacifica Rear Crossmember
 Chrysler Pacifica Tailgate Handle
 Chrysler Pacifica Windshield Wiper
 Chrysler Pacifica Wiper Arm