JeepParts
My Garage
My Account
Cart
OEM 2008 Chrysler Sebring Shock Absorber
Suspension Shock Absorber- Select Vehicle by Model
- Select Vehicle by VIN
Select Vehicle by Model
orMake
Model
Year
Select Vehicle by VIN
For the most accurate results, select vehicle by your VIN (Vehicle Identification Number).
8 Shock Absorbers found


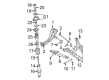
2008 Chrysler Sebring Isolator Plate, Rear Part Number: 5085534AA
$7.13 MSRP: $10.35You Save: $3.22 (32%)Ships in 1-2 Business DaysProduct Specifications- Other Name: Plate - Shock Absorber; Rear Suspension Strut Mount Reinforcement; Strut Mount Washers.; Plate; Plate Shock Absorber; Mount Shock Upper; Shock Mount
- Position: Rear
- Item Weight: 0.50 Pounds
- Item Dimensions: 2.2 x 2.2 x 0.1 inches
- Condition: New
- Fitment Type: Direct Replacement
- SKU: 5085534AA
- Warranty: This genuine part is guaranteed by Mopar's factory warranty.


2008 Chrysler Sebring Insulator Washer, Rear Part Number: 5085529AA
$5.28 MSRP: $7.80You Save: $2.52 (33%)Ships in 1-2 Business DaysProduct Specifications- Other Name: Washer - Shock Absorber; Suspension Strut Mount Washer, Rear; Shock Mount Washer; Upper Bushing Washer; Washer; Retainer Shock Absorber; Washer Shock Absorber
- Position: Rear
- Item Weight: 0.50 Pounds
- Item Dimensions: 1.8 x 1.8 x 0.3 inches
- Condition: New
- Fitment Type: Direct Replacement
- SKU: 5085529AA
- Warranty: This genuine part is guaranteed by Mopar's factory warranty.


2008 Chrysler Sebring Shock Absorber, Rear Part Number: 5272677AH
$337.11 MSRP: $371.00You Save: $33.89 (10%)Ships in 1-2 Business DaysProduct Specifications- Other Name: Absorber - Suspension; Suspension Strut, Rear; Shock
- Position: Rear
- Replaces: 5272677AE, 5272677AF, 5272677AG
- Item Weight: 4.20 Pounds
- Item Dimensions: 27.0 x 4.5 x 4.5 inches
- Condition: New
- Fitment Type: Direct Replacement
- SKU: 5272677AH
- Warranty: This genuine part is guaranteed by Mopar's factory warranty.

2008 Chrysler Sebring Shock Absorber, Rear Part Number: 4766053AF
$239.79 MSRP: $365.00You Save: $125.21 (35%)Ships in 1-2 Business DaysProduct Specifications- Other Name: Absorber - Suspension; Suspension Strut, Rear; Shock
- Position: Rear
- Replaces: 4766053AE, 4766053AD, 4766053AC
- Item Weight: 4.10 Pounds
- Item Dimensions: 26.8 x 4.0 x 4.2 inches
- Condition: New
- Fitment Type: Direct Replacement
- SKU: 4766053AF
- Warranty: This genuine part is guaranteed by Mopar's factory warranty.
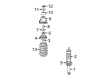
2008 Chrysler Sebring Shock, Rear Part Number: 5105790AG
$113.48 MSRP: $149.00You Save: $35.52 (24%)Ships in 1-2 Business DaysProduct Specifications- Other Name: Absorber - Suspension; Suspension Strut, Rear; Shock Absorber
- Position: Rear
- Replaces: 5105790AD, 5105790AF, 5105790AE
- Item Weight: 4.10 Pounds
- Item Dimensions: 26.0 x 4.2 x 4.4 inches
- Condition: New
- Fitment Type: Direct Replacement
- SKU: 5105790AG
- Warranty: This genuine part is guaranteed by Mopar's factory warranty.

2008 Chrysler Sebring Shock Absorber, Rear Part Number: 5272613AL
$163.15 MSRP: $240.00You Save: $76.85 (33%)Ships in 1-2 Business DaysProduct Specifications- Other Name: Absorber - Suspension; Rear Strut Assembly; Strut and Coil Spring Kit; Complete Strut Kit.; Shock; Shock Absorber Suspension
- Position: Rear
- Replaces: 5272613AJ, 5272613AD, 5272613AH, 5272613AI, 5272613AE, 5272613AK, 5272613AG, 5272613AF
- Item Weight: 4.10 Pounds
- Item Dimensions: 4.4 x 4.6 x 26.6 inches
- Condition: New
- Fitment Type: Direct Replacement
- SKU: 5272613AL
- Warranty: This genuine part is guaranteed by Mopar's factory warranty.

2008 Chrysler Sebring Strut Mount, Rear Part Number: 5085495AC
$43.37 MSRP: $64.55You Save: $21.18 (33%)Ships in 1-2 Business DaysProduct Specifications- Other Name: Bracket - Shock Absorber; Suspension Strut Mount, Rear; Strut Mount Rear; Shock Bracket; Shock Mount; Mount Bracket; Bracket; Bracket Shock Absorber
- Position: Rear
- Replaces: 5085495AA, 5085495AB
- Item Weight: 1.50 Pounds
- Item Dimensions: 4.7 x 5.0 x 5.8 inches
- Condition: New
- Fitment Type: Direct Replacement
- SKU: 5085495AC
- Warranty: This genuine part is guaranteed by Mopar's factory warranty.


2008 Chrysler Sebring Lower Bushing, Rear Upper Part Number: 5105879AA
$2.38 MSRP: $3.55You Save: $1.17 (33%)Product Specifications- Other Name: Bushing - Shock Absorber; Rear Lower/Upper Suspension Shock & Strut Mount Bushings; Rear Lower Shock Mount Insulator.; Bushing Shock Absorber Lower; Bushing Shock Absorber
- Position: Rear Upper
- Replaces: 5085521AA
- Item Weight: 0.50 Pounds
- Item Dimensions: 2.1 x 2.1 x 1.1 inches
- Condition: New
- Fitment Type: Direct Replacement
- SKU: 5105879AA
- Warranty: This genuine part is guaranteed by Mopar's factory warranty.
2008 Chrysler Sebring Shock Absorber Parts and Q&A
- Q: How to Remove a Shock Absorber on 2008 Chrysler Sebring?A: It is necessary to take the shock assembly out of the vehicle before disassembling it. Use either a Strut Spring Compressor, teamPSE tool 223-7400 or a similar tool and check the manufacturer's instructions to compress the coil spring. First, press the coil spring gently to discharge tension in the upper mounting bracket, then remove the nut holding the shock rod. Just as you service each shock, place a mark on the coil spring and shock assembly to show which side they go back on. Put the shock assembly into the strut spring compressor and insert the lower and upper hooks onto the coil spring. Crank the compressor until no tension is left in the upper mounting bracket and bushings. Keep at high-intensity tools away from the shock to keep its internal bearings safe. Screw a Snap-On(R) Shock Absorber Socket A139 or equivalent onto the shock rod, secure the rod so it can't turn and take off the nut and the washer below using a wrench. Take the shock absorber from under the coil spring and doing so will free the washer, jounce bumper, dust shield and lower spring isolator. Loosen and slide out the washer, jounce bumper and dust shield from the shock rod and detach the lower spring isolator from its place on the shock spring seat. Lift off the upper mounting bracket with its bushings, sleeve and upper spring isolator fixed above and remove these parts from the upper mounting bracket too. When the coil spring calls for maintenance, release all the spring tension by pulling the compressor drive back, pushing the compressor hooks out and taking out the coil spring. Check the working parts of the shock assembly for any trouble with the shock shaft, cracks or damage to the jounce bumper, dust shield and upper bracket and any defects in the retaining studs. See if the upper and lower bushings are damaged, look for wear on the sleeve and inspect the upper and lower spring isolators for signs of decay. You should look for any damage on the coating of the coil spring.
Related 2008 Chrysler Sebring Parts
 2008 Chrysler Sebring Ball Joint
 2008 Chrysler Sebring Wheel Bearing
 2008 Chrysler Sebring Wheel Hub
 2008 Chrysler Sebring Axle Beam Mount
 2008 Chrysler Sebring Axle Support Bushings
 2008 Chrysler Sebring Bump Stop
 2008 Chrysler Sebring Crossmember Bushing
 2008 Chrysler Sebring Lateral Link
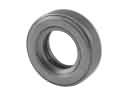 2008 Chrysler Sebring Strut Bearing
 2008 Chrysler Sebring Sway Bar Kit
 2008 Chrysler Sebring Sway Bar Link
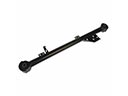 2008 Chrysler Sebring Trailing Arm