JeepParts
My Garage
My Account
Cart
OEM 2008 Chrysler Town & Country Parking Brake Cable
Emergency Parking Brake Release Cable- Select Vehicle by Model
- Select Vehicle by VIN
Select Vehicle by Model
orMake
Model
Year
Select Vehicle by VIN
For the most accurate results, select vehicle by your VIN (Vehicle Identification Number).
3 Parking Brake Cables found


2008 Chrysler Town & Country Front Cable Part Number: 4721495AC
$97.01 MSRP: $145.00You Save: $47.99 (34%)Product Specifications- Other Name: Cable - Parking Brake; Brake Cable; Cable Parking Brake
- Item Weight: 1.80 Pounds
- Item Dimensions: 1.9 x 12.9 x 35.6 inches
- Condition: New
- Fitment Type: Direct Replacement
- SKU: 4721495AC
- Warranty: This genuine part is guaranteed by Mopar's factory warranty.

2008 Chrysler Town & Country Rear Cable Part Number: 4779807AB
$42.92 MSRP: $61.70You Save: $18.78 (31%)Product Specifications- Other Name: Cable - Parking Brake; Brake Cable
- Replaces: 4721494AF, 4721494AE, 4721494AD, 4779807AA, 4721494AG
- Item Weight: 2.40 Pounds
- Item Dimensions: 14.6 x 14.1 x 2.0 inches
- Condition: New
- Fitment Type: Direct Replacement
- SKU: 4779807AB
- Warranty: This genuine part is guaranteed by Mopar's factory warranty.

2008 Chrysler Town & Country Rear Cable Part Number: 4779806AB
$31.90 MSRP: $45.85You Save: $13.95 (31%)Product Specifications- Other Name: Cable - Parking Brake; Brake Cable
- Replaces: 4721493AD, 4721493AE, 4721493AH, 4721493AI, 4779806AA, 4721493AG, 4721493AF
- Item Weight: 2.10 Pounds
- Item Dimensions: 14.7 x 14.7 x 2.0 inches
- Condition: New
- Fitment Type: Direct Replacement
- SKU: 4779806AB
- Warranty: This genuine part is guaranteed by Mopar's factory warranty.
2008 Chrysler Town & Country Parking Brake Cable Parts and Q&A
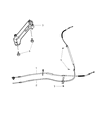
- Q: How to Service and Repair a Front Parking Brake Cable on 2008 Chrysler Town & Country?A: First, pull most of the front parking brake cable down through the hole at the floor pan from the inside the vehicle. Through the parking brake lever's mounting hole, attach the lever end of the front parking brake cable and make sure the retainer fingers on the end hold so the cable cannot be removed by hand from the bracket. Pull the button out of its housing, lead it up through the lever and without stretching it, connect the front button to the back side of the lever, pushing any extra cable back into the housing. Put the lever (1) over the studs at the left lower cowl (3) and insert the three nuts (2). Tighten the nuts to 28 Nm (21 ft. lbs.). Put the front parking brake cable (5) floor pan seal into the floor pan hole (4) and join the P-clip on the end of the cable to the welded stud. Place the carpeting where it belongs, join wiring connector (2) at the parking brake indicator lamp switch and link interface connector (3) to the parking brake lever (1). Fix the lower cowl trim to the front and insert the left front door opening sill scuff plate. Hold up the vehicle, then guide the end of the front cable through the hole in the back end of the intermediate bracket, pushing the cable housing retainer inside until the fingers grab it and lock it in there. Link the front cable to the routing clips located near the bottom of the vehicle, then secure the equalizer to all three parking brake cables and tighten all tension on the cables. With the vehicle lowered, press and release the park brake pedal once which seats the parking brake cables and allows the automatic adjuster in the lever mechanism to tighten them.
Related 2008 Chrysler Town & Country Parts
 2008 Chrysler Town & Country Brake Booster
 2008 Chrysler Town & Country Brake Caliper
 2008 Chrysler Town & Country Brake Caliper Bracket
 2008 Chrysler Town & Country Brake Caliper Piston
 2008 Chrysler Town & Country Brake Disc
 2008 Chrysler Town & Country Brake Dust Shield
 2008 Chrysler Town & Country Brake Line
 2008 Chrysler Town & Country Brake Pad
 2008 Chrysler Town & Country Hydraulic Hose
 2008 Chrysler Town & Country Speed Sensor
 2008 Chrysler Town & Country Wheel Stud
 2008 Chrysler Town & Country Yaw Sensor