JeepParts
My Garage
My Account
Cart
OEM 2008 Dodge Avenger Rack And Pinion
Steering Rack And Pinion- Select Vehicle by Model
- Select Vehicle by VIN
Select Vehicle by Model
orMake
Model
Year
Select Vehicle by VIN
For the most accurate results, select vehicle by your VIN (Vehicle Identification Number).
4 Rack And Pinions found

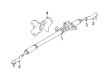
2008 Dodge Avenger Gear Assembly Part Number: 4743873AK
$439.17 MSRP: $557.00You Save: $117.83 (22%)Ships in 1-2 Business DaysProduct Specifications- Other Name: Gear - Rack And Pinion; Rack and Pinion Assembly; Steering Gearbox
- Replaces: 4743873AD, 4743873AJ, 4743873AE, 4743873AG, 4743873AI, 4743873AF
- Item Weight: 21.60 Pounds
- Item Dimensions: 61.8 x 13.0 x 6.6 inches
- Condition: New
- Fitment Type: Direct Replacement
- SKU: 4743873AK
- Warranty: This genuine part is guaranteed by Mopar's factory warranty.

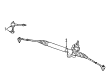
2008 Dodge Avenger Steering Gear Part Number: 5272824AL
Product Specifications- Other Name: Gear - Rack And Pinion; Rack and Pinion Assembly; Steering Gearbox; Gear Assembly
- Replaces: 5272824AG, 4743876AD, 4743876AE, 5272824AF, 5272824AK, 5272824AJ, 5272824AH
- Item Weight: 26.00 Pounds
- Item Dimensions: 60.6 x 12.9 x 7.1 inches
- Condition: New
- Fitment Type: Direct Replacement
- SKU: 5272824AL
- Warranty: This genuine part is guaranteed by Mopar's factory warranty.
2008 Dodge Avenger Steering Gear Part Number: 68093008AC
Product Specifications- Other Name: Gear - Rack And Pinion; Rack and Pinion Assembly; Steering Gearbox; Gear Assembly
- Replaces: 4743878AH, 68093008AB, 4743878AF, 68093008AA, 4743878AG
- Item Weight: 24.60 Pounds
- Item Dimensions: 61.4 x 10.2 x 6.9 inches
- Condition: New
- Fitment Type: Direct Replacement
- SKU: 68093008AC
- Warranty: This genuine part is guaranteed by Mopar's factory warranty.
2008 Dodge Avenger Steering Gear Part Number: 4743879AL
Product Specifications- Other Name: Gear - Rack And Pinion; Rack and Pinion Assembly; Steering Gearbox; Gear Assembly
- Replaces: 4743879AE, 4743879AH, 4743879AG, 4743879AK, 4743879AJ, 4743879AF
- Item Weight: 20.70 Pounds
- Item Dimensions: 63.0 x 12.2 x 7.2 inches
- Condition: New
- Fitment Type: Direct Replacement
- SKU: 4743879AL
- Warranty: This genuine part is guaranteed by Mopar's factory warranty.
2008 Dodge Avenger Rack And Pinion Parts and Q&A
- Q: How to Service and Repair a Rack and Pinion Steering Gear on 2008 Dodge Avenger?A: As a first step for servicing or fixing the rack and pinion, remove much of the power steering fluid from its reservoir. Redo the floor covering to reveal the shaft coupling at the bottom of the column. Make certain the front wheels point straight ahead, then move the steering wheel to the right to begin removing bolt (3) from the bottom of the column covering. Set both wheels in straight position and secure the steering wheel using an adapter to better hold the Clock Spring in place. Jack up your vehicle and remove the mounting nuts for the wheel (3) and take off the tire and wheel. At the knuckle (2) on each side, use Remover (2), Special Tool 9360 to separate the outer tie rod end (1) from the wheel side, then remove the nut (3) from the outer tie rod end (6). If fitted, remove the belly pan on the engine after that, then the rear engine mount. Take out the front engine mount through-bolt and the two bolts (5) which attach the fore/aft crossmember (4) to the lower radiator support (3). Take off the four bolts (1) that fix the fore/aft crossmember to the front crossmember and remove that piece. Release the "1" screws holding the bracket for the power steering hose (2) to the crossmember and open the "2" nut and remove the "1" return hose. Unscrew the tube nut, then take out the pressure hose at the rack and pinion. Pull out the screws and press the push-pins to remove the shield (1) from above the right side of the rack and pinion (2). Place a mark on the body at each location where a bolt for the front crossmember (9) will be attached. Secure a transmission jack on crossmember (9), then take out the four bolts holding it to the body. Pull out the screws (8) holding the front crossmember reinforcement brackets (7) in place under the body (1) and remove the brackets. For convertibles, take out the screws securing the crossbrace or reinforcement bracket (2) to the body (1) and then remove the bracket itself. Remove the intermediate shaft coupling by holding the rack and pinion pinion shaft with a crossmember and experiencing external pressure support. Remove the seals from the bolts located at both sides of the rack and pinion, after which unbolt the rack and pinion (2) from the crossmember by removing the two bolts (1).
Related 2008 Dodge Avenger Parts
 2008 Dodge Avenger Steering Wheel
 2008 Dodge Avenger Power Steering Hose
 2008 Dodge Avenger Power Steering Pump
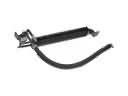 2008 Dodge Avenger Power Steering Cooler
 2008 Dodge Avenger Power Steering Reservoir
 2008 Dodge Avenger Steering Column
 2008 Dodge Avenger Steering Column Cover
 2008 Dodge Avenger Steering Gear Box
 2008 Dodge Avenger Tie Rod End