JeepParts
My Garage
My Account
Cart
OEM 2008 Dodge Challenger Crossmember Bushing
Crossmember Mount- Select Vehicle by Model
- Select Vehicle by VIN
Select Vehicle by Model
orMake
Model
Year
Select Vehicle by VIN
For the most accurate results, select vehicle by your VIN (Vehicle Identification Number).
3 Crossmember Bushings found


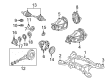
2008 Dodge Challenger Isolator, Front Driver Side Part Number: 4895489AD
$49.82 MSRP: $72.90You Save: $23.08 (32%)Ships in 1-2 Business DaysProduct Specifications- Other Name: Isolator - Crossmember; Suspension Crossmember Insulator, Front Left; Isolator Crossmember Front
- Position: Front Driver Side
- Replaces: 4895489AA, 4895489AB, 4895489AC
- Item Weight: 2.20 Pounds
- Item Dimensions: 4.4 x 4.0 x 3.4 inches
- Condition: New
- Fitment Type: Direct Replacement
- SKU: 4895489AD
- Warranty: This genuine part is guaranteed by Mopar's factory warranty.


2008 Dodge Challenger Isolator, Front Passenger Side Part Number: 4895488AD
$49.82 MSRP: $72.90You Save: $23.08 (32%)Ships in 1-2 Business DaysProduct Specifications- Other Name: Isolator - Crossmember; Suspension Crossmember Insulator, Front Right; Isolator Crossmember Front
- Position: Front Passenger Side
- Replaces: 4895488AC, 4895488AA, 4895488AB
- Item Weight: 2.20 Pounds
- Item Dimensions: 4.4 x 3.8 x 3.3 inches
- Condition: New
- Fitment Type: Direct Replacement
- SKU: 4895488AD
- Warranty: This genuine part is guaranteed by Mopar's factory warranty.


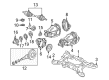
2008 Dodge Challenger Crossmember Bushing, Rear Part Number: 4782861AA
$9.11 MSRP: $13.10You Save: $3.99 (31%)Ships in 1-2 Business DaysProduct Specifications- Other Name: Isolator - Crossmember; Suspension Crossmember Insulator, Rear; Axle Pivot Bushing; Suspension Crossmember Rear Bushing; Isolator; Isolator Crossmember Rear
- Position: Rear
- Item Weight: 3.40 Pounds
- Item Dimensions: 4.7 x 4.1 x 3.3 inches
- Condition: New
- Fitment Type: Direct Replacement
- SKU: 4782861AA
- Warranty: This genuine part is guaranteed by Mopar's factory warranty.
2008 Dodge Challenger Crossmember Bushing Parts and Q&A
- Q: How to Properly Install a Rear Crossmember Bushing on 2008 Dodge Challenger?A: Start the rear cross-member bushing service by aligning and tapping the new bushing onto the forward part of the bore on the crossmember bushing. Take Bolt 1, Disc 9520-1, Bushing 3, Nut 4, Washer 5, Installer 9520-2 and Thrust Bearing 7 and slide them through the crossmember and into the bushing. Fit the bushing with Installer 9520-2 into the end of the bushing and Disc 9520-1 into the other end of the crossmember bushing bore. When the nut prevents the Nut 4 from turning, use your hands to tighten Bolt 1 until the Installer 9520-2 touches the bushing bore. Then, remove the tool you're using. Reach the point where, before fitting the crossmember, you have bolted the differential mount through the bushings. Attach differential mounting bolt 1 into the rear, advance the crossmember to its points on the body and fit the shocks into the spring links without attaching any bolts. Remember, the bolts in the rear are longer and must not be replaced with the shorter front bolts. Lower the crossmember onto the rack until the bolts on the left side are in position, but do not fasten them yet. Be sure to lower the jack slowly, so the right crossmember drops only enough to insert the coil spring, with all isolators set in place. After that, place coil spring 2 with isolators into the spring pocket, making sure the upper end of the spring matches the body mount. Jack the car up carefully, positioning lower shock absorber 1 and its coil spring properly in place and bolt it down loosely with nut 4 and bolt 2. If your vehicle has AWD, put spacers into the top of the right crossmember mount bushings before you raise the crossmember. Lift the right side of the crossmember into its spot and bolt it in loosely, but not too tightly. Pull out both of the left crossmember bolts and lower the car down gradually so the left half from the crossmember lowers until it is level and while it is lowered, put in the isolators correctly. Set coil spring 2 with its isolators into the spring pocket, fixing the top to the body mount, after which lift the jack and watch as coil spring 2 and the lower end of shock absorber 1 are aligned into the lower mounting hole of the spring link. Do not tighten the lower shock mounting bolt 2 and nut 4 yet. If AWD features are built into your car, stick spacers on the left mounts before you begin to raise the crossmember. Install the left part of the crossmember and attach the bolts, but don't tighten them completely yet. Adjust the crossmember until the mounts align with the body's location marks and then measure the gap between the tension link and the weld flange on the body to confirm it is 12 mm or more for adequate suspension movement. If the distance is less than 12 mm, slide the crossmember a bit farther back until it is long enough, then tighten all four restraint bolts to 180 Nm. Pull out the jack from the rear crossmember, add fuel filler tube, snap the left rear wheel speed sensor cable underneath its clip and link the left rear wheel speed connector to the right cable. Attach the connectors from the speed sensor to the wiring connector on the floor of the luggage compartment; make sure the retaining clip is in place. On these types of vehicles, first, insert the guide pins into the caliper adapter, then slide the caliper and brake hose onto the back suspension, over the caliper brakes, so the holes in both align with the guide pins, taking care to slide the caliper onto the caliper adapter before fastening the assembled guide pin bolts to 31 Nm of torque. If your car has SRT8 disc brakes, lift the vehicle using a jack, move the caliper with pads over the rotor and insert and tighten the bolts to 130 Nm. Place the parking brake cable above the rear crossmember, join the front parking brake cable at the connector to the right rear brake cable and set up its routing bracket to the crossmember. Go to each wheel area and slide the axle half shaft into the hub and bearing, press on a new hub nut but don't tighten it yet and then replace the rear axle differential. While braking allows the hub to rotate freely, tighten the hub nut to 213 Nm. Add on the rear exhaust system and the tire and wheel assemblies and tighten the wheel mounting nuts to 150 Nm. Adjust the vehicle so it is close to the ground, complete attaching the battery negative cable, pedal the brake many times to ensure it feels firm, place it on the alignment rack and finish by tightening the shock absorber lower mounting bolt nuts to 72 Nm. Finish by aligning the wheels, giving extra care to the thrust angle and straightening the rear crossmember so that tension links will not rub.
Related 2008 Dodge Challenger Parts
 2008 Dodge Challenger Control Arm
 2008 Dodge Challenger Ball Joint
 2008 Dodge Challenger Wheel Bearing
 2008 Dodge Challenger Bump Stop
 2008 Dodge Challenger Coil Springs
 2008 Dodge Challenger Control Arm Bolt
 2008 Dodge Challenger Lateral Link
 2008 Dodge Challenger Leaf Spring Bushing
 2008 Dodge Challenger Steering Knuckle
 2008 Dodge Challenger Sway Bar Bracket
 2008 Dodge Challenger Sway Bar Kit
 2008 Dodge Challenger Wheel Hub