JeepParts
My Garage
My Account
Cart
OEM 2009 Dodge Challenger Crossmember Bushing
Crossmember Mount- Select Vehicle by Model
- Select Vehicle by VIN
Select Vehicle by Model
orMake
Model
Year
Select Vehicle by VIN
For the most accurate results, select vehicle by your VIN (Vehicle Identification Number).
5 Crossmember Bushings found


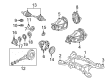
2009 Dodge Challenger Isolator, Front Driver Side Part Number: 4895489AD
$49.82 MSRP: $72.90You Save: $23.08 (32%)Ships in 1-2 Business DaysProduct Specifications- Other Name: Isolator - Crossmember; Suspension Crossmember Insulator, Front Left; Isolator Crossmember Front
- Position: Front Driver Side
- Replaces: 4895489AA, 4895489AB, 4895489AC
- Item Weight: 2.20 Pounds
- Item Dimensions: 4.4 x 4.0 x 3.4 inches
- Condition: New
- Fitment Type: Direct Replacement
- SKU: 4895489AD
- Warranty: This genuine part is guaranteed by Mopar's factory warranty.


2009 Dodge Challenger Isolator, Front Passenger Side Part Number: 4895488AD
$49.82 MSRP: $72.90You Save: $23.08 (32%)Ships in 1-2 Business DaysProduct Specifications- Other Name: Isolator - Crossmember; Suspension Crossmember Insulator, Front Right; Isolator Crossmember Front
- Position: Front Passenger Side
- Replaces: 4895488AC, 4895488AA, 4895488AB
- Item Weight: 2.20 Pounds
- Item Dimensions: 4.4 x 3.8 x 3.3 inches
- Condition: New
- Fitment Type: Direct Replacement
- SKU: 4895488AD
- Warranty: This genuine part is guaranteed by Mopar's factory warranty.


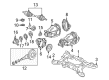
2009 Dodge Challenger Crossmember Bushing, Front Passenger Side Part Number: 4895390AD
$92.37 MSRP: $138.00You Save: $45.63 (34%)Ships in 1-3 Business DaysProduct Specifications- Other Name: Isolator - Crossmember; Suspension Crossmember Insulator, Front Right; Axle Pivot Bushing; Suspension Crossmember Front Bushing; Isolator; Isolator Crossmember Front
- Position: Front Passenger Side
- Replaces: 4895390AC, 4895390AB, 4895390AA
- Item Weight: 2.10 Pounds
- Item Dimensions: 4.3 x 3.9 x 3.3 inches
- Condition: New
- Fitment Type: Direct Replacement
- SKU: 4895390AD
- Warranty: This genuine part is guaranteed by Mopar's factory warranty.


2009 Dodge Challenger Crossmember Bushing, Front Driver Side Part Number: 4895391AD
$92.37 MSRP: $138.00You Save: $45.63 (34%)Ships in 1-3 Business DaysProduct Specifications- Other Name: Isolator - Crossmember; Suspension Crossmember Insulator, Front Left; Axle Pivot Bushing; Suspension Crossmember Front Bushing; Isolator; Isolator Crossmember Front
- Position: Front Driver Side
- Replaces: 4895391AC, 4895391AA, 4895391AB
- Item Weight: 2.00 Pounds
- Item Dimensions: 4.3 x 3.7 x 3.3 inches
- Condition: New
- Fitment Type: Direct Replacement
- SKU: 4895391AD
- Warranty: This genuine part is guaranteed by Mopar's factory warranty.


2009 Dodge Challenger Crossmember Bushing, Rear Part Number: 4782861AA
$9.11 MSRP: $13.10You Save: $3.99 (31%)Ships in 1-2 Business DaysProduct Specifications- Other Name: Isolator - Crossmember; Suspension Crossmember Insulator, Rear; Axle Pivot Bushing; Suspension Crossmember Rear Bushing; Isolator; Isolator Crossmember Rear
- Position: Rear
- Item Weight: 3.40 Pounds
- Item Dimensions: 4.7 x 4.1 x 3.3 inches
- Condition: New
- Fitment Type: Direct Replacement
- SKU: 4782861AA
- Warranty: This genuine part is guaranteed by Mopar's factory warranty.
2009 Dodge Challenger Crossmember Bushing Parts and Q&A
- Q: How to Properly Install a Rear Crossmember Bushing on 2009 Dodge Challenger?A: Start by mounting the tapered edge of the new bushing into the crossmember bushing hole at the front of the rear cross-member. Put together the equipment, for instance, Bolt 1, Disc 9520-1, Bushing 3, Nut 4, Washer 5, Installer 9520-2 and Thrust Bearing 7, by going through the crossmember and bushing. Put Installer 9520-2 into the other end of the rim bushing and insert Disc 9520-1 into the middle of the crossmember bushing bore. Holding Nut 4 still to secure the bushing, tighten Bolt 1 with your hands until you feel Installer 9520-2 bump against the inner bore, stop and then release the bolt. Be sure to place the differential mounting bolts through the bushings before the crossmember is mounted, since they can't be inserted afterward. Pass the first differential mount bolt through the mount bushing from the back, then fit the crossmember mount points to the body and lower the crossmember until the shocks fit the recesses in the spring links without bolts. Notice that the rear bolts are longer and should not be used interchangeably at the front. Keep the crossmember up until you can set in the mounting bolts on the left side without tightening them for now. Guide the jack straight down slowly until the right crossmember is lowered enough to install the coil springs, while also confirming that the ends of the springs have their full isolators. Put coil spring 2 into the spring pocket, with the isolators and attach the top of the spring to the body mount. Then carefully use the jack to position shock absorber 1 so the lower mounting hole for the shock absorber fits into the hole on the spring link. Assemble lower bolt 2 and use nut 4, but not too tightly as the shock will still move during installation. Before lifting the crossmember, add spacers on the tops of the right side bushings if the vehicle has AWD. Place the proper crossmember height on the right side and drive on the right mounting bolts, leaving both sides a little loose. Remove both front and back mounting bolts on the left side and slowly lower the jack until the left side crossmember is lowered just enough for fits the spring and isolator properly. Install coil spring 2 by adding isolators and sliding it into the spring pocket, so that the top matches the body mount. After raising the jack, guide spring 2 and shock absorber 1 into place, ending the process once the shock absorber's valley aligns with the round hole in spring 1. Attach bolt 2 and nut 4 to the lower shock bracket, though don't tighten. If your F150 has AWD, set spacers on the upper part of the left crossmember mount bushings before lifting the crossmember. Lift the left corner of the crossmember into its place and bolt it in loosely for now. Place the mounts along the location marks on the body after moving the crossmember, then make certain the distance between the tension link and flange on the body is at least 12 mm to support proper suspension motion. If it's less than 12 mm, slide that side of the rear crossmember toward the front until the distance is fine, then tighten all the crossmember mounting bolts to a torque of 180 Nm (133 ft. lbs.). Take out the jack from under the rear crossmember, put the fuel filler tube into place, connect the left rear wheel speed sensor to the routing clip by the body connector and attach the left sensor connector to the right one. Insert the speed sensor connectors into the cable from the body wiring harness inside the luggage compartment and secure the retaining clip in place before doing anything else. MEG Be extremely careful when putting in caliper guide pin bolts not to misalign them. For standard or premium disc brakes, first slot the caliper guide pins into the caliper adapter, then feed the caliper and brake hose down through the rear suspension, move the caliper onto the pads, match the holes and position the bolts and fasten them to 31 Nm (23 ft. lbs.). For SRT8 disc brakes, fasten the spring link, move the caliper loaded with pads over the brake rotor, position it with the knuckle, remove any slack from the bolts and tighten them with a torque wrench to 130 Nm (96 ft. lbs.). Take the parking brake cable up and above the rear crossmember, attach the front parking brake cable at the connector to the right rear parking brake cable and put in the front parking brake cable bracket. On every side, put the hub and bearing Haldex assembly into the rubber boot and place the second rear axle through the hub on that half shaft. While braking, have the helper turn the hub nut until you reach 213 Nm (157 ft. lbs.), then place the rear exhaust system, tires and wheels back on and tighten their mounting nuts to 150 Nm (110 ft. lbs.). Reduce the frame height, tie the negative cable from the battery to the battery post, press the brake pedal repeatedly, position the car on an alignment rack and fasten the lower shock in place with 72 Nm of torque (53 ft. lbs.). You should also align the wheels, with attention to the thrust angle and if it requires it, shift the rear crossmember to match the thrust angle without affecting the clearance around the tension link.
Related 2009 Dodge Challenger Parts
 2009 Dodge Challenger Control Arm
 2009 Dodge Challenger Ball Joint
 2009 Dodge Challenger Wheel Bearing
 2009 Dodge Challenger Bump Stop
 2009 Dodge Challenger Coil Springs
 2009 Dodge Challenger Control Arm Bolt
 2009 Dodge Challenger Lateral Link
 2009 Dodge Challenger Leaf Spring Bushing
 2009 Dodge Challenger Steering Knuckle
 2009 Dodge Challenger Sway Bar Bracket
 2009 Dodge Challenger Sway Bar Kit
 2009 Dodge Challenger Wheel Hub