JeepParts
My Garage
My Account
Cart
OEM Dodge Challenger Crossmember Bushing
Crossmember Mount- Select Vehicle by Model
- Select Vehicle by VIN
Select Vehicle by Model
orMake
Model
Year
Select Vehicle by VIN
For the most accurate results, select vehicle by your VIN (Vehicle Identification Number).
11 Crossmember Bushings found


Dodge Challenger Crossmember Bushing, Front Driver Side Part Number: 4895391AD
$92.37 MSRP: $138.00You Save: $45.63 (34%)Ships in 1-3 Business Days
Dodge Challenger Crossmember Bushing, Front Passenger Side Part Number: 4895390AD
$92.37 MSRP: $138.00You Save: $45.63 (34%)Ships in 1-3 Business Days


Dodge Challenger Isolator, Front Driver Side Part Number: 4895489AD
$49.82 MSRP: $72.90You Save: $23.08 (32%)Ships in 1-2 Business Days


Dodge Challenger Isolator, Front Passenger Side Part Number: 4895488AD
$49.82 MSRP: $72.90You Save: $23.08 (32%)Ships in 1-2 Business Days


Dodge Challenger Crossmember Bushing, Rear Part Number: 4782861AA
$9.11 MSRP: $13.10You Save: $3.99 (31%)Ships in 1-2 Business Days
Dodge Challenger Crossmember Bushing, Front Driver Side Part Number: 68242707AA
$52.65 MSRP: $78.05You Save: $25.40 (33%)Ships in 1-2 Business DaysDodge Challenger Crossmember Bushing Part Number: 68242706AA
$52.65 MSRP: $78.05You Save: $25.40 (33%)Ships in 1-2 Business Days
Dodge Challenger Crossmember Bushing Part Number: 5181927AA
$56.72 MSRP: $82.95You Save: $26.23 (32%)Ships in 1-2 Business DaysDodge Challenger Crossmember Bushing Part Number: 5181926AA
$56.72 MSRP: $82.95You Save: $26.23 (32%)Ships in 1-2 Business Days
Dodge Challenger Crossmember Bushing Part Number: 68237052AA
$33.70 MSRP: $48.50You Save: $14.80 (31%)
Dodge Challenger Crossmember Bushing Part Number: 68237053AA
$34.05 MSRP: $49.00You Save: $14.95 (31%)
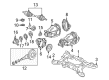
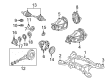
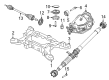
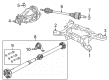
Dodge Challenger Crossmember Bushing
Choose OEM Crossmember Bushing that meet Dodge factory standards. Dodge designs and tests every component for precision and durability. Each Crossmember Bushing follows strict manufacturing steps to lock in quality and fit. If your Dodge Challenger matters to you, OEM parts make the smart choice. You'll get the exact look, feel, and performance you expect. Shop genuine Challenger parts at the highly competitive prices online. Enjoy a manufacturer's warranty, a hassle-free return policy, and rapid delivery. No more guesswork with off brands. Get genuine parts with exact fit and true factory performance. Shop with confidence today at JeepPartsDeal.com.
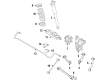
The Dodge Challenger Crossmember Bushing is an essential suspension component which maintains Dodge Challenger vehicles well known for their reliability and performance characteristics. The bushing delivers vital mounting points while letting parts move Smoothly while acting as a shock and vibration absorber to achieve better ride quality. A proper alignment depends on this component which cuts off noise and vibration to deliver uncontested smoothness to the driver. The Crossmember Bushing functions with all Dodge Challenger vehicle versions and operates effectively during standard driving and performance-oriented activities. The standard bushings that come with Dodge vehicles include rubber pieces for comfort yet show reduced accuracy when the driver pushes their performance level. The Dodge Challenger Crossmember Bushing distinguishes itself in the automotive market through its polyurethane and Delrin alternatives which enhance its responsiveness by minimizing bushing deflection. The improved performance aside from safety benefits derives from better handling capabilities which result in enhanced vehicle control. The Dodge Challenger's performance legacy gains support through the high quality of its Crossmember Bushing because this component helps deliver key driving characteristics that fans demand. Users of the the automaker Challenger Crossmember Bushing gain all the benefits of durability and compatibility and improved performance since it represents an essential upgrade for dedicated model owners.
Dodge Challenger Crossmember Bushing Parts and Q&A
- Q: How to Service and Repair a Rear Crossmember Bushing on Dodge Challenger?A:First, you need to raise and support the automobile to service and repair the ends of the cross-member bushing. Open the vehicle and un bolt the damaged rear spring on the side needing repair. When servicing the right side bushing, remove the headlamp leveling sensor connection at the spring link. Unscrew the bolt and nut attaching the spring link to the crossmember and then place the spring link down beneath the crossmember bushing. Be sure to lubricate the screw-drive threads before using Press C-4212F, so that it works easily and will last longer. Lay out the tools above the bushing, making sure that Receiver 9032-1 is touching the crossmember and not the welds. Put Remover 9032-2 over the Press screw-drive and tighten the screw to press the bushing out of the crossmember.
- Q: How Does the Installation of a Crossmember Bushing Affect Ride Quality and Longevity on Dodge Challenger?A:Make sure you have the proper side installed; left side bushings have the travel limiter to the right and those on the right side face to the left. To ensure the vehicle is comfortable and lasts a long time, the bushing replacement position must match the markings from when the part was taken out. Set the bushing in the crossmember opening, so that the can flange lines up with the marks on the frame. Set up Receiver 9031-6, Press C-4212F and Installer 9031-7A, making sure the Installer clears the compression link bracket as you install them. Turn the Press clockwise and apply force until the outside of the can touches the crossmember. Check that the bushing fits where the marks are after removing all tools, then fasten the compression link to the crossmember but do not tighten the final steps. Do not replace the Coil Springs at present. Bring the crossmember to the same level as the body mounting points, set the propeller shaft onto the rear axle differential flange and line up the Shock Absorbers with the openings in the spring links. Note that the rear bolts are the only ones long enough for the job and must be used there. Raise the crossmember up so the bolts on the left install easily, but do not tighten them yet. Slowly move the jack downward to get the crossmember down just low enough for installing the spring, with isolators on both sides. Install the coil spring into the back end of the car with an isolator between them and the top edge of the spring should line up with the body mount. Guide the coil spring and shock absorber lower end while slowly lifting the jack and wait to tighten the lower bolt and nut until afterwards. For an AWD vehicle, slip the spacers onto the right crossmember mount bushings before hoisting the member. Move the right side of the crossmember into its place and attach the right side mounting bolts, giving them a tightening but not stretching them all the way. After removing the left side mounting bolts from the front and rear, carefully lower the jack until the left crossmember drops; this is to install the coil springs with isolators. With the isolators, set the coil spring in place against the body mount and use the jack to get both spring and shock into position, then bolt the lower portion of the shock without tightening the bolt yet. Should the car have AWD, install the spacers onto the top of the crossmember bushings before you raise them. Push the left side of the crossmember up into place and insert the bolts only firmly enough to hold it temporarily, do not tighten it fully. Adjust the crossmember as necessary so that the weld flange and tension link mounts fit onto the indicated marks on the body, with no less than 12 mm between them. Tighten the four crossmember mounting bolts to 180 Nm (133 ft. lbs.), lower the jack from squatting next to the rear axle differential and free the bungee cord on the propeller shaft. Set the propeller shaft and install the bolts from the rear coupler-to-axle flange, turning them to a torque of 81 Nm (60 ft. lbs.). Attach the fuel filler tube, connect the left rear wheel Speed Sensor cable to its routing clip and join the left rear sensor connector to the right sensor connector. Screw the speed sensor connectors into the body wiring harness connector with the retaining clip set correctly. When installing disc brakes on any vehicle with standard or premium calipers, slide the caliper guide pins into the caliper adapter, bring the caliper down through the suspension and place it over the brake pads until it attaches to the caliper adapter, ensuring the caliper guide pin bolts are only screwed in snugly. Turn the bolts to 31 Nm (23 ft. lbs.) and make sure the brake hose is properly in place. For the SRT8 disc brakes, support the spring link and bring the caliper, with pads, over the brake rotor, fit the mounting bolts and tighten them to 130 Nm (96 ft. lbs.). Run the Parking Brake Cable up from the rear crossmember to the right rear cable and join the front cable to it at the connector. The front parking brake cable routing bracket needs to be installed and attached to the rear crossmember. Install both the rear exhaust system and the tire and wheel assemblies and ensure you tighten the wheel mounting nuts to 150 Nm (110 ft. lbs.). Lower the vehicle so the rear wheels almost touch the floor, pull the parking brake lever down and release it and watch to see if the rear wheels continue to rotate as you pull the lever. Reduce the vehicle, link the battery's negative cable to its post and press the brake several times to tighten up the brake pedal. Put the car on an alignment rack, lift it if needed and tighten the lower mounting bolt nuts of the shock absorber to 72 Nm (53 ft. lbs.) and the bolt and nut at the crossmember compression link to 85 Nm (63 ft. lbs.). Once all is aligned, do a wheel alignment and watch over the thrust angle. If you need to move the rear crossmember for the thrust angle, don't reduce the space allowed between the tie rod and the tension link.


Related Dodge Challenger Parts
 Dodge Challenger Wheel Bearing
 Dodge Challenger Sway Bar Link
 Dodge Challenger Axle Vent
 Dodge Challenger Coil Spring Insulator
 Dodge Challenger Coil Springs
 Dodge Challenger Leaf Spring Bushing
 Dodge Challenger Strut Housing
 Dodge Challenger Suspension Strut Rod
 Dodge Challenger Sway Bar Bracket
 Dodge Challenger Sway Bar Link Bushing
 Dodge Challenger Sway Bars
 Dodge Challenger Wheel Hub