JeepParts
My Garage
My Account
Cart
OEM 2009 Chrysler Sebring A/C Condenser
Air Conditioning Condenser- Select Vehicle by Model
- Select Vehicle by VIN
Select Vehicle by Model
orMake
Model
Year
Select Vehicle by VIN
For the most accurate results, select vehicle by your VIN (Vehicle Identification Number).
1 A/C Condenser found


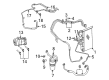
2009 Chrysler Sebring Condenser Part Number: 68004053AA
$250.84 MSRP: $379.00You Save: $128.16 (34%)Product Specifications- Other Name: Cooler - Condenser And Transmission Cooler; A/C Condenser; Automatic Transmission Oil Cooler Assembly; Cooler Condenser And Transmission Cooler; 25 Pc Min Qty, Use Mopar.Com to Order.
- Item Weight: 6.70 Pounds
- Item Dimensions: 4.2 x 20.6 x 37.7 inches
- Condition: New
- Fitment Type: Direct Replacement
- SKU: 68004053AA
- Warranty: This genuine part is guaranteed by Mopar's factory warranty.
2009 Chrysler Sebring A/C Condenser Parts and Q&A
- Q: What Are the Best Practices for Installing an A/C Condenser to Maintain Proper Refrigerant Oil Levels and Prevent System Malfunction on 2009 Chrysler Sebring?A: While installing the A/C condenser, adjust the refrigerant oil level correctly to avoid problems with the A/C system and harm to the compressor. Should you have to replace more than one component, use the Refrigerant Oil Capacities chart to find the needed oil and if it is just the condenser, include 20 milliliters (0.7 fluid ounce) of refrigerant oil. Make sure to replace rubber O-rings and metal gaskets when removing refrigerant lines, since this will discourage leaking problems. Lower the A/C condenser right in front of the radiator, then engage the top condenser brackets. If possible, join the transmission cooling lines to the left of the condenser. First, lift the vehicle and then put the two bolts into the lower condenser brackets on the radiator and tighten them to 4.5 Nm or 40 in. lbs. On gasoline engine models, the A/C liquid line can be reached from the front underneath the hood. Remove all tape or plugs from both the liquid line fitting and condenser outlet port, use clean refrigerant oil to lubricate a new O-ring seal and connect the rubber O-ring and gasket onto the liquid line fitting. Link the A/C liquid line with the condenser, tightening the hold-down nut to 25 Nm (18 ft. lbs.). Lift the car up onto the jackstands and get rid of any tape or plugs you see on the Discharge and Jumper line fittings as well as the condenser inlet port. After lubricating the new rubber O-ring seals, put them along with the new gaskets on the discharge and jumper line fittings. On gasoline engines, give the radiator a gentle push to the back so you can access the condenser, connect the discharge jumper line and leave the retaining nut a little loose. A bolt should be used to connect the jumper line to the radiator and you must tighten the nut on the link to the condenser by 18 Nm (13 ft. lbs.). Screw the retaining nut on the joint between the A/C discharge line and the jumper line until you reach 18 Nm (13 ft. lbs.). When the car uses gas, move the radiator and fit the upper radiator mounts. Be sure to add the front fascia onto models with 2.0L diesel engines. Be sure to attach the negative battery cable and do not operate the engine if a vacuum pump or vacuum is in the A/C system, to protect the compressor. Gas the refrigerant system and, if the condenser gets replaced, add 20 milliliters (0.7 fluid ounce) of refrigerant oil; refer to the chart for other multiple parts. After everything else, add the recommended refrigerant oil to the A/C system.
Related 2009 Chrysler Sebring Parts
 2009 Chrysler Sebring Blower Motor Resistor
 2009 Chrysler Sebring A/C Accumulator
 2009 Chrysler Sebring A/C Compressor
 2009 Chrysler Sebring A/C Hose
 2009 Chrysler Sebring A/C Service Cap
 2009 Chrysler Sebring A/C System Valve Core
 2009 Chrysler Sebring Blend Door Actuator
 2009 Chrysler Sebring Blower Control Switches
 2009 Chrysler Sebring Blower Motor
 2009 Chrysler Sebring Evaporator
 2009 Chrysler Sebring Heater Core
 2009 Chrysler Sebring HVAC Pressure Switch