JeepParts
My Garage
My Account
Cart
OEM Chrysler 300 EGR Valve
Emissions EGR Valve- Select Vehicle by Model
- Select Vehicle by VIN
Select Vehicle by Model
orMake
Model
Year
Select Vehicle by VIN
For the most accurate results, select vehicle by your VIN (Vehicle Identification Number).
3 EGR Valves found


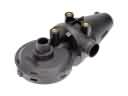
Chrysler 300 EGR Valve Part Number: 4593892AA
$301.67 MSRP: $457.00You Save: $155.33 (34%)Ships in 1-2 Business Days


Chrysler 300 EGR Valve Part Number: 53032509AN
$371.48 MSRP: $495.00You Save: $123.52 (25%)
Chrysler 300 EGR Valve Part Number: 4593894AC
Chrysler 300 EGR Valve
Choose OEM EGR Valve that meet Chrysler factory standards. Chrysler designs and tests every component for precision and durability. Each EGR Valve follows strict manufacturing steps to lock in quality and fit. If your Chrysler 300 matters to you, OEM parts make the smart choice. You'll get the exact look, feel, and performance you expect. Shop genuine 300 parts at the highly competitive prices online. Enjoy a manufacturer's warranty, a hassle-free return policy, and rapid delivery. No more guesswork with off brands. Get genuine parts with exact fit and true factory performance. Shop with confidence today at JeepPartsDeal.com.
The EGR Valve in Chrysler 300 cars regulates the circulation of fumes backward to the combustion chamber to help decrease air pollution. This technique applied in both petrol and diesel engines reduces the temperatures and therefore prevent the formation of NOx. Development of EGR technology has advanced from basic jet to EGR valve that is controlled by various conditions of the engine. Although the newer generation engines such as Chrysler Pentastar 3.6 does not necessarily need EGR, it exists as a powerful means of meeting these standards and enhancing the engine function. The components including the EGR valves for instance require cleaning or replacement due to blocking and this has to be a regular process.
Chrysler 300 EGR Valve Parts and Q&A
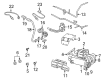
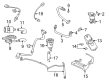
- Q: How to Install an EGR Valve on a 2.7L Engine on Chrysler 300?A:The EGR valve should be installed on a 2.7L engine after the mounting surface is cleaned. After that, attach the EGR valve and fasten it with the bolts (1). Look at the seals around the opening of the EGR Tube at the Intake Manifold, position them correctly and ensure they aren't damaged before inserting the upper tube. Add a gasket to the junction between the EGR valve and upper tube and then screw in the bolts (2). Place the next, lower tube against the Exhaust Manifold, make sure to use a new gasket under the EGR valve and attach with bolts (3). Apply 15 Nm (11 ft. lbs.) of torque to the lower tube to EGR valve bolts and 31 Nm (23 ft. lbs.) torque to the bolts at the lower tube to exhaust manifold. Install bolts at the upper tube to the EGR valve (2) to 15 Nm (11 ft. lbs.) and the EGR valve bolts to the cylinder head (1) to 30 Nm (22 ft. lbs.). Attach the electrical connector to the EGR valve and hold it firm before moving on and putting the purge solenoid into its bracket. After that, reattach the negative battery connection and remove all stored DTC's with a diagnostic scan tool.
- Q: How to Service and Repair an EGR Valve on Chrysler 300?A:Whenever you find it necessary to service the EGR valve, first get to know its parts, a tube with a heat shield on top, the valve itself and another tube below it. Take the negative cable off the battery, take out the purge solenoid from its bracket and set it in a different position. After that, take off the electrical connector from the EGR valve and then unbolt the EGR Tube from the Exhaust Manifold. Remove the lower tube bolts from the EGR valve and pull out the lower tube and afterward take out the upper tube bolts. Then, extract the EGR valve mounting screws and carefully remove the valve. Clean the area on the engine where the EGR valve and bolts are fitted before installation. Check the seals on the Intake Manifold side of the EGR tube first, then put the upper tube into the intake manifold, ensuring the seals are where they should be and not broken. Attach a new gasket between the EGR valve and the upper tube after placing it. Connect the lower tube to the exhaust manifold, including a new gasket between the EGR valve and tube and tighten everything with bolts. The EGR valve bolts to the lower tube should be tightened to 11 Nm and bolts securing the lower tube to the exhaust manifold should be tightened to 31 Nm. Use 11 Nm (95 in. lbs.) on the bolts joining the upper tube and EGR valve and 31 Nm (275 in. lbs.) for the EGR valve bolts on the cylinder head. Lastly, link the electrical connector back to the EGR valve, put the purge solenoid in its original position below the bracket, attach it and reconnect the negative Battery Cable.


Related Chrysler 300 Parts
 Chrysler 300 PCV Valve
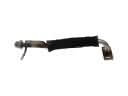 Chrysler 300 EGR Tube
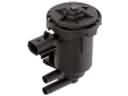 Chrysler 300 Canister Purge Valve
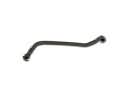 Chrysler 300 Crankcase Breather Hose
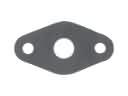 Chrysler 300 EGR Tube Gaskets
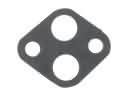 Chrysler 300 EGR Valve Gasket
 Chrysler 300 Exhaust Flange Gasket
 Chrysler 300 Exhaust Resonator
 Chrysler 300 PCV Hose
 Chrysler 300 PCV Valve Hose
 Chrysler 300 Tail Pipe
 Chrysler 300 Vapor Canister