JeepParts
My Garage
My Account
Cart
OEM Chrysler LHS A/C Clutch
Air Conditioning Clutch- Select Vehicle by Model
- Select Vehicle by VIN
Select Vehicle by Model
orMake
Model
Year
Select Vehicle by VIN
For the most accurate results, select vehicle by your VIN (Vehicle Identification Number).
2 A/C Clutches found

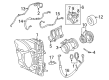
Chrysler LHS Compressor Clutch Part Number: 4723014
$122.41 MSRP: $155.18You Save: $32.77 (22%)Ships in 1-2 Business Days
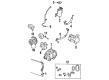
Chrysler LHS Hardware Kit Part Number: 4723011AB
Chrysler LHS A/C Clutch
Choose OEM A/C Clutch that meet Chrysler factory standards. Chrysler designs and tests every component for precision and durability. Each A/C Clutch follows strict manufacturing steps to lock in quality and fit. If your Chrysler LHS matters to you, OEM parts make the smart choice. You'll get the exact look, feel, and performance you expect. Shop genuine LHS parts at the highly competitive prices online. Enjoy a manufacturer's warranty, a hassle-free return policy, and rapid delivery. No more guesswork with off brands. Get genuine parts with exact fit and true factory performance. Shop with confidence today at JeepPartsDeal.com.
The Chrysler LHS A/C Clutch is another part, which was installed in Chrysler LHS autos as their air conditioning system component, and this part has hardly ever failed in its performances. This A/C Clutch enables the transformation of the engine energy into use in powering the A/C compressor as soon as the air conditioning is turned on. The Chrysler LHS A/C Clutch then secure the belt drive through magnetization of a drum within the belt pulley to enhance the cooling of the automobile's interior without exerting pressure on the engine in case the clutch is released. This feature apart from improving the efficiency of the Chrysler LHS also improves safety by avoiding cases of the engine being overstressed. Technological compatibility with all the LHS models manufactured between 1994 and 2001 speaks volumes to the importance of the A/C Clutch in the maintaining the noble streak of the luxury sedan. Overtime, it is characterised by sticking or slipping thus reducing the car's cooling and a corresponding rise in fuel consumption. Thus, maintenance work and timely replacement are vital if the Chrysler LHS A/C system is to have a long life span. Preferably, one of the A/C Clutch's most beneficial characteristics is low wear and tear; hence, its significance in the market. Hence, A/C Clutch of Chrysler LHS is a perfect combination of reliability, high-performance, and brilliant engineering; it remains an instrument that maintains the identity of Chrysler LHS as a luxury full-sized sedan for many years.
Chrysler LHS A/C Clutch Parts and Q&A
- Q: How to Properly Install and Adjust an A/C Clutch on Chrysler LHS?A:Run the A/C clutch several times for five seconds and follow that with five seconds off after installing the clutch, using the highest blower speed possible, keeping the engine running between 1500 and 2000 rpm and making sure the system is in its A/C mode. If the clutch gap is too large, the clutch may not engage properly or may slip. Adding refrigerant is unnecessary before replacing the clutch, pulley, or coil, and all of this work can be done inside the vehicle. At first, unhook the negative cable from the battery, take off the serpentine belt, and unplug the wire harness from the compressor clutch coil. After that, pull out the bolts that hold the compressor and carefully lift the compressor from the mounting bracket in the engine compartment. Once the shaft bolt is out and there is still a band-type oil filter tool around the clutch plate, gently tap the clutch plate with a plastic hammer to get it and any shim(s) out. It is important to avoid using screwdrivers near the area between the clutch plate assembly and pulley. Get the pulley assembly off the compressor by sliding it off the shaft using a round tube and insert the adapter. Take out the screw on the coil wire bracket/ground clip, unplug the wire harness, remove the snap ring, and slide the field coil from the compressor housing. During installation, place the pin on the field coil's back end into the hole in the compressor end housing, hold the field coil so it sits properly, guide the lead wires safely, and secure the bracket for the diode and wire to the compressor housing using the one retaining screw. With the Snap Ring Pliers (C-4574), push the field coil retaining snap ring in, making certain the bevel is pointing outward and both eyelets are set to the side of the pin on the compressor. Set the pulley assembly onto the compressor and use a block of wood to gently hit on each side. Secure it with the retaining snap ring which you should put in place (bevel side facing out) with Snap Ring Pliers (C-4574). Should you decide to reinstate the first front plate and pulley, use the existing shim(s), otherwise cover the shaft shoulder with 2.54 mm (0.10 in.) of shims to support the front plate assembly. If you fit a new front plate and pulley assembly, adjust the dial indicator on the front plate, zero it out, put the clutch in engagement, and make sure the movement is about 0.35 to 0.65 mm (0.014 to 0.026 in.). Make shims thinner or thicker to see the desired level. Once you finish, put in the compressor shaft bolt and tighten it to 17.5 ± 2 Nm (155 ± 20 in. lbs.), checking the air gap at several spots to confirm it has not changed and finally give the pulley a spin for a check.

Related Chrysler LHS Parts
 Chrysler LHS A/C Accumulator
 Chrysler LHS A/C Compressor
 Chrysler LHS A/C Compressor Cut-Out Switches
 Chrysler LHS A/C Condenser
 Chrysler LHS A/C Expansion Valve
 Chrysler LHS A/C Hose
 Chrysler LHS Blower Control Switches
 Chrysler LHS Blower Motor
 Chrysler LHS Blower Motor Resistor
 Chrysler LHS Evaporator
 Chrysler LHS Heater Core
 Chrysler LHS HVAC Pressure Switch