JeepParts
My Garage
My Account
Cart
OEM Chrysler Pacifica Rear Crossmember
Rear Suspension Crossmember- Select Vehicle by Model
- Select Vehicle by VIN
Select Vehicle by Model
orMake
Model
Year
Select Vehicle by VIN
For the most accurate results, select vehicle by your VIN (Vehicle Identification Number).
4 Rear Crossmembers found

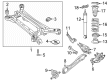
Chrysler Pacifica Crossmember, Rear Part Number: 68269925AD
$739.67 MSRP: $1085.00You Save: $345.33 (32%)
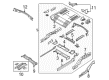
Chrysler Pacifica Rear Cross Bar Part Number: 5054606AA

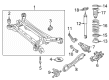
Chrysler Pacifica Suspension Crossmember, Rear Part Number: 68236980AD

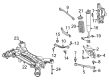
Chrysler Pacifica Suspension Crossmember, Rear Part Number: 4766704AB
Chrysler Pacifica Rear Crossmember
Choose OEM Rear Crossmember that meet Chrysler factory standards. Chrysler designs and tests every component for precision and durability. Each Rear Crossmember follows strict manufacturing steps to lock in quality and fit. If your Chrysler Pacifica matters to you, OEM parts make the smart choice. You'll get the exact look, feel, and performance you expect. Shop genuine Pacifica parts at the highly competitive prices online. Enjoy a manufacturer's warranty, a hassle-free return policy, and rapid delivery. No more guesswork with off brands. Get genuine parts with exact fit and true factory performance. Shop with confidence today at JeepPartsDeal.com.
Chrysler Pacifica Rear Crossmember Parts and Q&A
- Q: How to Remove a Rear Crossmember on Chrysler Pacifica?A:First, isolate the negative battery post by putting the vehicle's negative cable on the ground and removing the spare tire. Block the automatic adjuster in the parking brake lever and lift and support the vehicle. Placed a set of jack stands near the fore-end of the cradle before taking off the rear suspension. Take out the back wheel and tire assembly and afterward get to the rear hub and bearing assembly to remove it. After that, take out the back half of the exhaust system and ease up on the parking brake shoes to create space for the cable to come loose. Pull the button on the left rear Parking Brake Cable into the housing and take out the remaining piece from the equalizer and then secure and slide the right rear parking brake cable button inboard to also remove it. Unbolt the left rear brake hose bracket from the front of the rear crossmember and secure the brake hose so it is not in the way. Then, remove the screw securing the right rear brake hose bracket and tie it back away from the braking system. When your vehicle has AWD and you remove the driveline module from the engine bay, also remove the two rear half shafts. Put a mark at both end points on the body over where the crossmember mounts with a marker, not a scratch awl. Put a jack under the center of the rear suspension crossmember, ease it up to make contact and firmly lock the jack. Compression the rear shock absorbers and loosen or remove all bolts and nuts. Then, unbolt the left-side crossmember at front and rear. Slowly lower the jack enough so that the left side of the crossmember drops just enough for you to take out the coil spring and its isolator. Place the left part of the crossmember back where it belongs and then mount the removed bolts, but don't overtighten them. Then, repeat the process with the right side so that you can remove the coil spring and isolator carefully by lowering the jack slowly. After you have raised the right side back, remove the mounting bolts you previously took off the left side. Take the support away from the jack as you lower it, placing the propeller shaft on what's known as a video worm and then fastening it in place using a bungee or cord. Keep dropping the jack until the crossmember is easy to work on and then take out the bolt and nut attached to each stabilizer bar link, as well as the bolts securing each stabilizer bar cushion retainer to the crossmember. Take the stabilizer bar with cushions and retainers off the crossmember. Collapse the cable retainer fingers on the hind side of the crossmember by using a 13 mm 12-point box wrench and then release and remove the cable wire. After the bolt and nut holding the link to the crossmember are removed, correct the toe link and fit it into its hole, holding the toe bolt adjustment cam bolt still while removing the nut. After that, unscrew the bolts or nuts that anchor the compression link, tension link and camber link to the crossmember. Pull off the knuckle, complete with its links and parking brake cable and if needed, disconnect the ABS wheel speed sensor clips from the crossmember, then detach the crossmember from the jack head.
- Q: How to install a Rear Crossmember on Chrysler Pacifica?A:Hold the rear crossmember at the same spot in the vehicle as before and then install it on the jack head. If the crossmember needs them, fit the ABS wheel speed sensor routing clips. Attach the knuckle with its links and Parking Brake Cable onto the rear suspension crossmember where it sits. Complete by mounting the tension link and compression link onto the crossmember joint with their bolts and nuts unfastened. Put the tooth adjustment cam bolt through the rear crossmember, with the washer on top of the threads and the eccentric in the 12 O'clock position. Add the toe link after that and fasten it with a nut, not tightening it completely. Fix the spring link bolt and nut loosely while leaving it, then using the special tools, place the current suspension side at curb position to make sure the shock bolt hole aligns with the Curb Height Gage hole. Elevate torque at the bolts of the camber link, compression link, spring link, tension link and toe link to the levels indicated by the instructions. Take the special tools out and slide the parking brake cable into the crossmember, attaching it with the retainer. Set up the stabilizer, complete with cushions and retainers and fasten the retainer mounting bolts and the stabilizer bar to the link bolts, but do not tighten them initially. Screw in the cushion retainer mounting bolts and fit the front crossmember underneath so the mount screws are in line with the body brackets. Install the lefthand bolts without tightening, then drop the jack so only the bottom of the right side crossmember is hanging. After fitting the coil spring and isolator into position against the abutment, raise the jack to guide them into the Shock Absorber and bolt the lower side onto it without tightening. Complete the process on the left side by moving the crossmember to the positions marked earlier. When crossmembers are aligned, tighten all four crossmember mounting bolts and the shock absorber lower mounting bolts to the required torque values. Remove the jack and, if the car has AWD, add the rear driveline module and both rear half shafts now. Attach the correct brackets for the rear brake hoses, secure the parking brake cables and -lastly- ensure the rear section of the exhaust is in place. Put the hub and bearings with wheel speed sensors in place, add the tire and wheel assemblies and lastly tighten the nuts that hold the wheels. Lower the car, press the button to unlock the brake adjuster, put the negative Battery Cable in place and speed up to fit the spare. First, set the car on an alignment rack, tighten the fasteners of the stabilizer links and then carry out a wheel alignment.


Related Chrysler Pacifica Parts
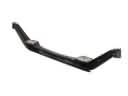 Chrysler Pacifica Axle Beam
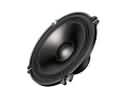 Chrysler Pacifica Car Speakers
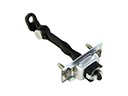 Chrysler Pacifica Door Check
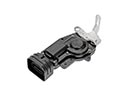 Chrysler Pacifica Door Lock Actuator Motor
 Chrysler Pacifica Floor Pan
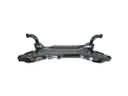 Chrysler Pacifica Front Cross-Member
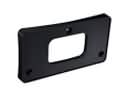 Chrysler Pacifica License Plate
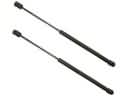 Chrysler Pacifica Liftgate Lift Support
 Chrysler Pacifica Seat Cushion
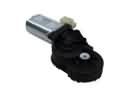 Chrysler Pacifica Seat Motor
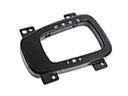 Chrysler Pacifica Shift Indicator
 Chrysler Pacifica Sunroof Cable