JeepParts
My Garage
My Account
Cart
OEM Chrysler PT Cruiser Front Cross-Member
Front Engine Cross Member- Select Vehicle by Model
- Select Vehicle by VIN
Select Vehicle by Model
orMake
Model
Year
Select Vehicle by VIN
For the most accurate results, select vehicle by your VIN (Vehicle Identification Number).
5 Front Cross-Members found


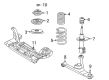
Chrysler PT Cruiser Engine Cradle, Front Part Number: 5272962AE

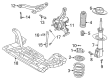
Chrysler PT Cruiser Engine Cradle, Front Part Number: 5272341AG

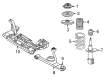
Chrysler PT Cruiser Engine Cradle, Front Part Number: 5272888AC
Chrysler PT Cruiser Engine Cradle, Front Part Number: 5272888AG
Chrysler PT Cruiser Engine Cradle, Front Part Number: 5272970AH
Chrysler PT Cruiser Front Cross-Member
Choose OEM Front Cross-Member that meet Chrysler factory standards. Chrysler designs and tests every component for precision and durability. Each Front Cross-Member follows strict manufacturing steps to lock in quality and fit. If your Chrysler PT Cruiser matters to you, OEM parts make the smart choice. You'll get the exact look, feel, and performance you expect. Shop genuine PT Cruiser parts at the highly competitive prices online. Enjoy a manufacturer's warranty, a hassle-free return policy, and rapid delivery. No more guesswork with off brands. Get genuine parts with exact fit and true factory performance. Shop with confidence today at JeepPartsDeal.com.
Chrysler PT Cruiser Front Cross-Member Parts and Q&A
- Q: How to remove the front cross-member and rear crossmember on Chrysler PT Cruiser?A:To start, lift the vehicle correctly in order to take out the front suspension crossmember. Get rid the front tire and wheel assemblies and after that, take off both stabilizer bar links by holding the top retainer/nut with a wrench and turning the link bolt. Then, remove the bolts and retainers from the stabilizer bar cushion and take out the bar with cushions. Remove the nut and pinch bolt tightening each ball joint stud to the Steering Knuckle while being careful not to pull outward on the knuckle which may separate the inner c/v joint on the driveshaft. Each ball joint stud can be carefully removed from the steering knuckle when you pry down with your hand against the bottom of the Control Arm and the ball joint boss. Remove the two screws holding the cooler to the front suspension crossmember, so it can be suspended partly outside. Tie the power steering gear to the hood with wire or a bungee cord before lowering the crossmember. Screw out the four bolts attaching the power steering gear to the crossmember, then remove the pencil strut from the right front corner of the crossmember and body, taking out the washer from behind the strut bolt too. Take out the front fascias' screws to get to the fasteners holding the drive-belt splash shield and then remove the splash shield. Get rid of the bolt that fastens the engine torque strut to the right front corner of the front suspension crossmember. Draw a line on the body at the spot where the crossmember was to avoid alignment issues after installation since proper repositioning is important for the wheels. Set a transmission jack beneath the center of the crossmember and lift it to support the transmission. Loose the six bolts that attach the crossmember and lower control arms to the body, but do not touch the lower control arm bushings. Next, drop out the crossmember in front and use tools to unbolt each lower control arm.
- Q: How to Install the Front Cross-Member on Chrysler PT Cruiser?A:If the crossmember is being placed due to accident damage, check for harm to the steering column lower coupling before installing the crossmember. First, fit the lower Control Arms onto the crossmember of the front suspension and do not tighten the pivot bolts all the way. Lift the crossmember and lower control arms with a transmission jack until they reach the body and frame rails, positioning the power steering gear as it drops into the housing. Make sure the two lower control arm crossmember bolts travel through the bushings and into the body and then secure all four frame rails bolts to the frame, each rotating them to about 1.94 lb/ft (2 Nm). As when you removed it, attach the crossmember to the vehicle in the same location to keep wheel alignment as planned. Put the crossmember in place, checking with marks and using a hammer and tighten the two main bolts to 250 Nm and the rest to 153 Nm. Tighten the bottom control arm's front pivot bolts to 163 Nm (120 ft. lbs.), take out the suspending wire or bungee cord from the power steering gear and attach the steering gear to the crossmember using four bolts tightened to 61 Nm (45 ft. lbs.). Fasten the screws holding the cooler onto the crossmember and then use the ball joint studs, putting each one inside the steering knuckle, aligning the bolt hole with the notch on the stud. Change the ball joint stud pinch bolt and nut and tighten the nut to 95 Nm (70 ft. lbs.). Mount the engine torque strut to the crossmember in the right forward corner with the mounting bolt, according to the instructions given in the Engine section. Bolt the washer onto the stud from the torque strut bolt, then attach the pencil strut at the right front corner of the crossmember and body, tightening the nuts to a torque of 58 Nm (43 ft. lbs.). Free-hand fasten the splash shield on the drive-belt and then use screws to fix the front fascia to the reinforcement. Be sure the curve on the outer ends of the stabilizer bar is pointing downward, not up, prior to installation. On the crossmember, line up the stabilizer bar so that the slits in the cushions face forward and fit over the raised beads. Position the cushion retainers over the raised rails so the beads fit into the grooves and add but do not fully tighten the bolts. Insert both link rear bushings from the ends of the stabilizer bar and fix them to the nuts on top, but don't tighten anything yet. Fit the wheel on the studs, examine the alignment and secure each wheel with 135 Nm (100 ft. lbs.) of tightness, then bring the car back down. Sometimes, platforms or alignment racks will be required to get to the stabilizer bar bolts at curb height. Turn the upper stabilizer bar link nut counterclockwise with a torque wrench until it reaches 28 Nm (20 ft. lbs.), then tighten the stabilizer bar cushion retainers to the same spec and check the car's front-wheel alignment.


Related Chrysler PT Cruiser Parts
 Chrysler PT Cruiser Wiper Blade
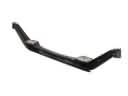 Chrysler PT Cruiser Axle Beam
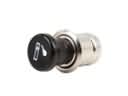 Chrysler PT Cruiser Cigarette Lighter
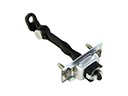 Chrysler PT Cruiser Door Check
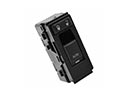 Chrysler PT Cruiser Door Lock Switch
 Chrysler PT Cruiser Exhaust Nut
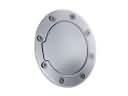 Chrysler PT Cruiser Fuel Door
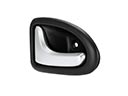 Chrysler PT Cruiser Interior Door Handle
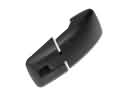 Chrysler PT Cruiser Liftgate Hinge
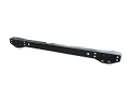 Chrysler PT Cruiser Rear Crossmember
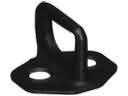 Chrysler PT Cruiser Rear Door Striker
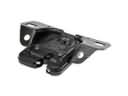 Chrysler PT Cruiser Trunk Lid Latch