JeepParts
My Garage
My Account
Cart
OEM Chrysler Sebring CV Boot
Axle Boot- Select Vehicle by Model
- Select Vehicle by VIN
Select Vehicle by Model
orMake
Model
Year
Select Vehicle by VIN
For the most accurate results, select vehicle by your VIN (Vehicle Identification Number).
5 CV Boots found

Chrysler Sebring Boot Kit, Front Outer Driver Side Part Number: 5017652AA
$50.34 MSRP: $63.81You Save: $13.47 (22%)Ships in 1-2 Business Days
Chrysler Sebring Boot Kit, Inner Part Number: MR176780

Chrysler Sebring Boot Kit Part Number: 4856674

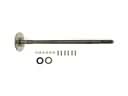
Chrysler Sebring CV Boot
Choose OEM CV Boot that meet Chrysler factory standards. Chrysler designs and tests every component for precision and durability. Each CV Boot follows strict manufacturing steps to lock in quality and fit. If your Chrysler Sebring matters to you, OEM parts make the smart choice. You'll get the exact look, feel, and performance you expect. Shop genuine Sebring parts at the highly competitive prices online. Enjoy a manufacturer's warranty, a hassle-free return policy, and rapid delivery. No more guesswork with off brands. Get genuine parts with exact fit and true factory performance. Shop with confidence today at JeepPartsDeal.com.
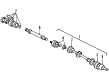
Chrysler Sebring cars have a part called CV Boot of the CV Joint that plays the role of safeguarding the Constant Velocity (CV) joints which as mentioned earlier transmit power from the transaxle to the wheels. This is a flexible rubber or plastic boot which retains the required amount of lubrication for the CV joints but at the same time it is a barrier to dirt and any other debris to get into it. CV joints in the Chrysler Sebring models are of different types: the Rzeppa type for outer ends while the tripod or double offset type for the inner ends. The outer CV joints are used at more extreme rates of each while the inboard joints are used where changes in shaft length are likely due to suspension movements. It is recommended that the CV Boot be checked on a regular basis because if there is any damage such as cracks or tear it becomes easy for the CV joint to fail thus affecting the performance of the vehicle.
Chrysler Sebring CV Boot Parts and Q&A
- Q: How to Service and Repair a CV Boot on Chrysler Sebring?A:When servicing the outer C/V joint boot, begin by removing the big clamp that holds the C/V joint sealing boot in place and discard it and then remove the smaller clamp clamping down the second boot to the shaft and discard that also. After removing all grease from the interconnecting shaft, drop the sealing boot down so that the outer C/V joint and shaft are visible. Put the shaft in a vise, covering it with protective wall caps to prevent scratches, then hit the end of the C/V joint housing with a soft-faced hammer to force the internal circlip off the shaft and slide the outer C/V joint off the end, tapping as needed. Take out the big circlip on the interconnecting shaft before you remove the strap boot. Dirt should be cleaned away and check the outer C/V joint assembly and interconnecting joint for too much wear; if anything is worn, the entire driveshaft assembly should be swapped as they cannot be serviced. To fit the new sealing boot, put it onto the interconnecting shaft so the raised bump inside goes in the slot on the shaft, check the alignment of the splines and start attaching the outer C/V joint assembly to the shaft. With one end of the stub axle next to the frame, sometimes called the knuckle on American cars, apply pressure to seat the C/V joint fully onto the interconnecting shaft and cross the joint assembly into the frame area. Place half the lubricant from the seal boot service package into the outer C/V housing and the other half into the associated sealing boot. Put the C/V joint sealing boot over the interconnecting shaft clamp evenly, then crimp it with Special Tool C-4975-A; handle the boot gently to avoid stretching the seal. Place the sealing boot of the boot into the retaining groove on the outer C/V joint housing, install it to the outer C/V joint retaining clamp evenly and secure the boot completely by clamping it together using the crimper Special Tool C-4975-A.