JeepParts
My Garage
My Account
Cart
OEM Dodge Charger Lateral Link
Lateral Arm- Select Vehicle by Model
- Select Vehicle by VIN
Select Vehicle by Model
orMake
Model
Year
Select Vehicle by VIN
For the most accurate results, select vehicle by your VIN (Vehicle Identification Number).
11 Lateral Links found


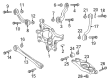
Dodge Charger Axle Assembly, Rear Part Number: 68045330AC
$223.35 MSRP: $505.00You Save: $281.65 (56%)Ships in 1-3 Business Days


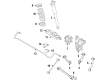
Dodge Charger Front Lateral Link, Rear Upper Part Number: 68045329AB
$175.95 MSRP: $388.00You Save: $212.05 (55%)Ships in 1-2 Business Days


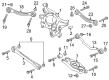
Dodge Charger Front Lateral Link, Rear Upper Part Number: 68206294AB
$224.32 MSRP: $340.00You Save: $115.68 (35%)Ships in 1-2 Business Days

Dodge Charger Rear Lateral Link, Upper Passenger Side Part Number: 68240574AB
$87.07 MSRP: $129.00You Save: $41.93 (33%)Ships in 1-2 Business Days


Dodge Charger Camber Link Assembly Part Number: 68240575AB
$132.69 MSRP: $200.00You Save: $67.31 (34%)Ships in 1-2 Business DaysDodge Charger Rear Lateral Link, Driver Side Part Number: 68241573AB
$90.32 MSRP: $200.00You Save: $109.68 (55%)Ships in 1-3 Business Days
Dodge Charger Rear Lateral Link, Passenger Side Part Number: 68306530AA
$123.17 MSRP: $272.00You Save: $148.83 (55%)Ships in 1-2 Business DaysDodge Charger Rear Lateral Link, Driver Side Part Number: 68306531AA
$179.52 MSRP: $272.00You Save: $92.48 (34%)Ships in 1-2 Business Days
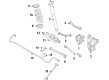
Dodge Charger Rear Lateral Link, Upper Driver Side Part Number: 68224119AA
$179.52 MSRP: $272.00You Save: $92.48 (34%)Ships in 1-2 Business DaysDodge Charger Rear Lateral Link, Passenger Side Part Number: 68241572AB
$132.69 MSRP: $200.00You Save: $67.31 (34%)Ships in 1-2 Business DaysDodge Charger Rear Lateral Link, Upper Passenger Side Part Number: 68224118AA
$182.86 MSRP: $277.00You Save: $94.14 (34%)Ships in 1-2 Business Days
Dodge Charger Lateral Link
Choose OEM Lateral Link that meet Dodge factory standards. Dodge designs and tests every component for precision and durability. Each Lateral Link follows strict manufacturing steps to lock in quality and fit. If your Dodge Charger matters to you, OEM parts make the smart choice. You'll get the exact look, feel, and performance you expect. Shop genuine Charger parts at the highly competitive prices online. Enjoy a manufacturer's warranty, a hassle-free return policy, and rapid delivery. No more guesswork with off brands. Get genuine parts with exact fit and true factory performance. Shop with confidence today at JeepPartsDeal.com.
As a crucial element the Dodge Charger Lateral Link boosts both the performance and reliability of the Dodge Charger vehicle series. The rear axle and wheels find support through the Lateral Link as it keeps the wheel hub correctly centered for lateral movement stabilization. Dodge Charger owners enjoy stable handling and better safety because of these features which make this model a popular choice between efficiency and performance. This component works with multiple Charger platforms through generations making it maintain its crucial function as the Dodge Charger models have evolved. The precise engineering along with its robust design enables precise movement coordination which remains essential for cornering and high-speed driving actions. The car Lateral Link distinguishes itself in automotive markets because it provides reliable performance that boosts driving performance. Dodge demonstrates their focus on innovation and quality through the Lateral Link which offers safety features along with performance enhancements. The Lateral Link constitutes a foundational element for the automaker model evolution because it allows designers to maintain exceptional handling characteristics throughout each new release.
Dodge Charger Lateral Link Parts and Q&A
- Q: How to Remove and Install Lateral Links on Dodge Charger?A:To take out the left toe link, lift and support the car, remove the nuts of the wheel mount and remove the rear tire and wheel assembly. Before you start on the fuel system, first take out the fuel filler tube and then use jack stands to support the forward part of the engine cradle. If your vehicle has dual exhaust, slide a jack or stand under the Muffler, unhook the exhaust isolators and let the exhaust fall onto the jack or stand. Put the jack beneath the center point of the differential, lift it into contact with the differential and hold it in place. Unfasten the Shock Absorber mounting bolt and nut and next remove the bolts attaching the crossmember to the repair side of the car, making sure to not loosen the bolts on the other side. Lift the vehicle slightly and move the jack back down a little so you can see and reach the toe link bolt on the crossmember and take away the wheel speed sensor cable if present. As you grip the toe adjustment cam bolt, remove the nut fastening the toe link where it attaches to the crossmember, slide the cam to the rear and remove the bolt where it is fastened, then pull the tube out of the knuckle finally. For this side, repeat steps 1 to 3, elevate the vehicle, remove the wheel and remove the wheel speed sensor cable if you see one on the nut. Remove the nut at the crossmember after securing the toe adjustment cam bolt, move the cam bolt back and take out the bolt and nut at the knuckle. First, connect the crossmember end of the link to the box bracket, add the cam bolt and fasten the link to the knuckle, leaving some room in the nut for later adjustment. Install the cam washer and nut, attaching them to the crossmember with the cam bolt held and add the wheel speed sensor cable if you have it. Slowly lift the jack to fit the coil spring and the underside of the shock absorber into place, install the lower shock bolt and nut without tightening and confirm that the rear crossmember bolts are not switched. Place the crossmember so the mounting bolts are in position and fasten the bolts without tightening them all the way. Measure the distance between the tension link and the body weld flange and change the rear crossmember if required to ensure there are at least 12 mm between them. Prepare by doubling each side crossmember brace bolt to 180 Nm (133 ft. lbs.), lowering the vehicle and connecting the exhaust isolators. Place the fuel filler tube, attache the tires and wheels and make sure the wheel nuts are tightened to 150 Nm (110 ft. lbs.). After lowering the vehicle and placing it on the alignment rack, tighten the nut of the shock absorber lower mounting bolt to 72 Nm (53 ft. lbs.), the crossmember toe link fasteners to 108 Nm (80 ft. lbs.) and the toe link fasteners at the knuckle to 81 Nm (60 ft. lbs.), then do a wheel alignment. Place the end of the crossmember into the box bracket, slide the cam bolt into the link, fasten the link to the knuckle, but keep it loose, attach the cam washer and the nut at the crossmember using the cam bolt, add the wheel speed sensor cable if provided, lift the exhaust at the back to its place, install the wheel and tire assembly and tighten the wheel mounting nuts. When the vehicle is lowered, place it on an alignment rack to secure the toe link fasteners and carry out a wheel alignment.

Related Dodge Charger Parts
 Dodge Charger Control Arm
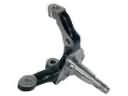 Dodge Charger Spindle
 Dodge Charger Steering Knuckle
 Dodge Charger Axle Support Bushings
 Dodge Charger Bump Stop
 Dodge Charger Coil Springs
 Dodge Charger Crossmember Bushing
 Dodge Charger Leaf Spring Bushing
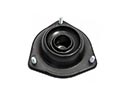 Dodge Charger Strut Mounts
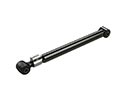 Dodge Charger Suspension Strut Rod
 Dodge Charger Sway Bar Link Bushing
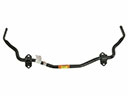 Dodge Charger Sway Bars