JeepParts
My Garage
My Account
Cart
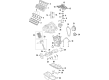
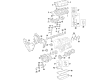
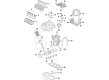
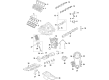
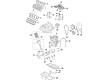
OEM Dodge Charger Piston
Engine Pistons- Select Vehicle by Model
- Select Vehicle by VIN
Select Vehicle by Model
orMake
Model
Year
Select Vehicle by VIN
For the most accurate results, select vehicle by your VIN (Vehicle Identification Number).
20 Pistons found


Dodge Charger Connecting Rod Part Number: 68090672AA
$291.72 MSRP: $439.00You Save: $147.28 (34%)


Dodge Charger Connecting Rod Part Number: 53022257AE
$221.23 MSRP: $328.00You Save: $106.77 (33%)

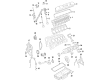
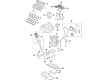
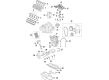
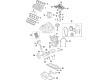
Dodge Charger Piston Part Number: 68067541AA
$253.77 MSRP: $292.00You Save: $38.23 (14%)Ships in 1-2 Business Days
Dodge Charger Piston Part Number: 68262320AA
$605.54 MSRP: $912.00You Save: $306.46 (34%)
Dodge Charger Connecting Rod Part Number: 68090673AA
$288.41 MSRP: $435.00You Save: $146.59 (34%)

Dodge Charger Piston Part Number: 5018627AD
$316.65 MSRP: $576.00You Save: $259.35 (46%)Ships in 1-2 Business DaysDodge Charger Connecting Rod Part Number: 53022258AE
$243.53 MSRP: $318.00You Save: $74.47 (24%)Ships in 1-2 Business Days
Dodge Charger Connecting Rod Part Number: 53010928AD
$509.41 MSRP: $769.00You Save: $259.59 (34%)Ships in 1-2 Business Days

Dodge Charger Piston Part Number: 5037491AB


Dodge Charger Piston Part Number: 53021539AD


Dodge Charger Piston Part Number: 53021538AD


Dodge Charger Piston Part Number: 68031890AD


Dodge Charger Piston Part Number: 68031891AD

Dodge Charger Connecting Rod Part Number: 53010927AD
$527.85 MSRP: $769.00You Save: $241.15 (32%)Dodge Charger Piston Part Number: 68262321AA
$627.46 MSRP: $912.00You Save: $284.54 (32%)
Dodge Charger Piston Part Number: 5241059
Dodge Charger Piston Part Number: 5159461AA

Dodge Charger Piston Part Number: 53022257AC
Dodge Charger Piston Part Number: 53022258AC


Dodge Charger Piston Part Number: R4892194AB
Dodge Charger Piston
Choose OEM Piston that meet Dodge factory standards. Dodge designs and tests every component for precision and durability. Each Piston follows strict manufacturing steps to lock in quality and fit. If your Dodge Charger matters to you, OEM parts make the smart choice. You'll get the exact look, feel, and performance you expect. Shop genuine Charger parts at the highly competitive prices online. Enjoy a manufacturer's warranty, a hassle-free return policy, and rapid delivery. No more guesswork with off brands. Get genuine parts with exact fit and true factory performance. Shop with confidence today at JeepPartsDeal.com.
Dodge Charger Piston Parts and Q&A
- Q: How to Assemble Piston and Connecting Rod Components on Dodge Charger?A:Before installing the piston and connecting rod assembly, place the piston rings and be sure the gaps in the compression rings are not straight across from the gaps in the oil rings. Be certain that the end of the connecting rod's oil hole is on the left side of the block which is the thrust side of the cylinder bore, when you are facing the front with the pan rail above. Carefully check that the ends of the oil ring expander match and that the gaps of the rails are set correctly before using the ring compressor. Place the piston head and rings in clean oil and with the special wrench, firmly clamp the ring compressor around the top of the piston, making certain not to move the rings. Misalignment can damage the engine, so place the round hole in the bearing between the holes on the connecting rod; once aligned, oil the round surface of the bearing with clean engine oil. Attach Special Tools 8189 Connecting Rod Guides onto the connecting rod. Arrows and the letter F point to the front of the engine; these markings must be on the pistons of both cylinder banks. The connecting rod oil squirt hole should be pointed toward the major thrust side of the block. Turn the Crankshaft so the rod journal is right in the middle of the cylinder, then put the rod and piston into the bore as you guide the rod over the journal. Don't put piston assemblies from one bank into another to maintain engine safety. Hammer the piston into place in the cylinder as you also align the connecting rod with its journal. Apply a coating of engine oil to the rod bolts and on the surface under the rod cap, then fit the rod cap and bearing and tighten the bolts to 28 Nm, plus a quarter turn.
- Q: How to Remove and Replace a Piston and Connecting Rod on Dodge Charger?A:Remove and install the piston and connecting rod by ridding the cylinder of the ridge using a good reamer, but keep in mind to leave the piston topped. First, the pistons and connecting rods are pulled from the top of the cylinder block and the Crankshaft must be turned to center each connecting rod while it comes out. Since the bearing caps are designed only for one connecting rod, they should be marked with an ink marker or scribe. It is important to avoid damaging the fractured rod and cap joint surfaces to avoid damaging the engine. When the marking is done, lift the connecting rod cap and install Band 8189 into the rods being changed, then pull every piston-plus-rod unit out of the cylinder, being careful so the crankshaft journals do not get nicked. Put the bearing cap back on the connecting rod after removal to keep the fragile edge of the cracked cap safe.


Related Dodge Charger Parts
 Dodge Charger Timing Belt
 Dodge Charger Timing Chain
 Dodge Charger Transmission Mount
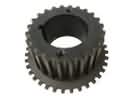 Dodge Charger Crankshaft Gear
 Dodge Charger Crankshaft Timing Gear
 Dodge Charger Engine Mount Bracket
 Dodge Charger Intake Valve
 Dodge Charger Lash Adjuster
 Dodge Charger Rod Bearing
 Dodge Charger Timing Cover
 Dodge Charger Timing Cover Gasket
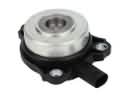 Dodge Charger Variable Timing Solenoid