JeepParts
My Garage
My Account
Cart
OEM Dodge Dakota Instrument Cluster
Speedometer Instrument Cluster- Select Vehicle by Model
- Select Vehicle by VIN
Select Vehicle by Model
orMake
Model
Year
Select Vehicle by VIN
For the most accurate results, select vehicle by your VIN (Vehicle Identification Number).
20 Instrument Clusters found

Dodge Dakota Instrument Cluster Part Number: 68039980AE
$506.09 MSRP: $737.00You Save: $230.91 (32%)Ships in 1-3 Business Days
Dodge Dakota Instrument Cluster Part Number: 56049563AB
Dodge Dakota Instrument Cluster Part Number: 56049561AB
Dodge Dakota Instrument Cluster Part Number: 56045646AJ

Dodge Dakota Instrument Cluster Part Number: 56045646AH
Dodge Dakota Instrument Cluster Part Number: 56045549AJ
Dodge Dakota Instrument Cluster Part Number: 56045549AH

Dodge Dakota Cluster Assembly Part Number: 56044902AO


Dodge Dakota Instrument Cluster Part Number: 56044902AH
Dodge Dakota Instrument Cluster Part Number: 56021655AJ
Dodge Dakota Cluster Assembly Part Number: 56021655AD
Dodge Dakota Instrument Cluster Part Number: 5172999AG
Dodge Dakota Instrument Cluster Part Number: 5172888AG
Dodge Dakota Cluster Assembly Part Number: 5172072AL

Dodge Dakota Instrument Cluster Part Number: 5172018AO

Dodge Dakota Cluster Lens Part Number: 4839000AA
Dodge Dakota Cluster Lens Part Number: 4834696AA

Dodge Dakota Instrument Cluster Part Number: 56049691AJ
Dodge Dakota Instrument Cluster Part Number: 68039981AE
Dodge Dakota Cluster Assembly Part Number: 56045383AE
Dodge Dakota Instrument Cluster
Choose OEM Instrument Cluster that meet Dodge factory standards. Dodge designs and tests every component for precision and durability. Each Instrument Cluster follows strict manufacturing steps to lock in quality and fit. If your Dodge Dakota matters to you, OEM parts make the smart choice. You'll get the exact look, feel, and performance you expect. Shop genuine Dakota parts at the highly competitive prices online. Enjoy a manufacturer's warranty, a hassle-free return policy, and rapid delivery. No more guesswork with off brands. Get genuine parts with exact fit and true factory performance. Shop with confidence today at JeepPartsDeal.com.
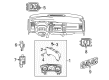
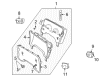
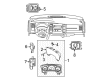
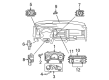
The Instrument Cluster is another component named for Dodge Dakota vehicles which is placed behind the steering wheel and is intended for providing important data regarding the driving scenario. The vehicle's gauges include the speedometer, tachometer, the fuel gauge as well as the warning lights and the indicators that indicate the car's performance, engine issues, and safety issues such as seatbelt. For the years that Dodge Dakota has been in production, it has employed various kinds of Instrument Clusters, which conforms to modern developments and trends. Looking at previous examples of models, it is possible to note that some aspects, such as the presence of an analog display, could be improved with the addition of digital features. It was a progression which has moved to making information provided to drivers more elaborate, to keep him/her abreast with the state of the car. Therefore, the Instrument Cluster of Dodge Dakota vehicles should be kept in perfect condition in order to generate the appropriate readings to assure the safety of individuals that is inside the car during driving.
Dodge Dakota Instrument Cluster Parts and Q&A
- Q: How to Install the Instrument Cluster on Dodge Dakota?A:Before you install the instrument panel, disconnect and isolate the negative Battery Cable and wait about two minutes for the capacitor in the SRS system to discharge. Guide the instrument onto the four a-pillar studs and hold it with the side bolts, fenceline bolt and bolts holding the pedal support bracket. Before fully tightening them, pay attention to how much force must be used, showing up to 12 Nm for side bolts, 14 Nm for pedal support bracket bolts and 9.5 Nm for the fenceline bolt. If equipped, hook up your antenna amplifier connector, fit the two grounds, bolt them, attach the Antenna Cable and secure the end cap on the passenger side and door sill panel cover. Next, put the center wire harness into place, attach the ABS connectors, deal with the grounds and tighten the electrical connectors to 5 Nm. Attach the HVAC electrical connector and set in place the defroster grille. When tightening, tighten the upper left nut initially, then the lower right, lower left and upper right ones. The Steering Column assembly goes first on the brace, put the nuts on, slide the column above the studs towards the steering shaft, make sure it is centered and tighten the nuts to 28 Nm. Install the steering shaft coupler using a new bolt and tighten it to 57 Nm. After that, mount the shifter cable, link the wiring harness to the column and install the SKIM module and the shrouds. Then, insert the lift lever knob, connect the brake switch electrical connector, tighten the steering column opening cover, driver side door sill trim cover and floor console and reattach the battery negative cable.
- Q: How to Remove the Instrument Cluster on Dodge Dakota?A:Removing the instrument panel needs you to first turn off the SRS by separating the negative Battery Cable and letting two minutes pass for the system's capacitor to empty. Use the occupant restraint controller carefully, as the impact sensor is easily damaged and if the Air Bag Control Module is dropped, it must be exchanged. Do not have the Occupant Restraint Controller (ORC) and the Occupant Classification Module (OCM) replaced at the same time on cars with an OCS, as it can cause you to set an error that you cannot reverse. Read all warnings and cautions before you remove the battery negative cable. Take off the floor console (7), driver side door sill trim cover (1) and the cover over the Steering Column (2). Guide the front wheels straight, next pull out the knob on the steering column tilt lever and remove the shrouds. Pull both brackets (1) loose, remove the connection to the column (1, 2 and 3) and unplug the gearshift cable (2). Take the upper steering shaft out of the coupler by removing bolt (2). Following that, remove the nuts holding the steering column onto the frame (4) and unbolt the steering column from its mount (3) from the car. Uninstall the bolts 2 from the support arm and bolts 2 from the defroster grille. Unplug the HVAC's electric wire, disconnect screws (2 and 3) and detach electrical reachers (1, 2 and 3). Carefully get rid of bolt (2) and ground (1) from the left A-pillar, un-hook all the connectors (1) from the ABS module and stop the center wire harness from the center support. Unscrew the two support bolts toward the passenger (3), the two left-side support bolts (2) and then unhook the passenger door sill trim from its location (1). Unfasten and unscrew the end cap on the passenger side, unhook the Antenna Cable and undo the bolt (1) and nut (4) after disconnecting both (2 and 3) ground wires. When an amplifier is fitted, turn off the remote switch, take out the connector for the antenna amplifier and cut side bolts (2) on the right panel.


Related Dodge Dakota Parts
 Dodge Dakota Hood
 Dodge Dakota Window Regulator
 Dodge Dakota Bumper Cover
 Dodge Dakota Cup Holder
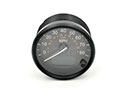 Dodge Dakota Speedometer
 Dodge Dakota Tailgate Lock
 Dodge Dakota Fender Splash Shield
 Dodge Dakota Rear Passenger Door Handle Latch
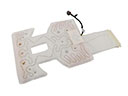 Dodge Dakota Seat Heater
 Dodge Dakota Shift Indicator
 Dodge Dakota Wiper Blade
 Dodge Dakota Wiper Motor