JeepParts
My Garage
My Account
Cart
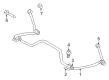
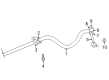
OEM Dodge Durango Sway Bar Bushing
Stabilizer Sway Bar Bushing- Select Vehicle by Model
- Select Vehicle by VIN
Select Vehicle by Model
orMake
Model
Year
Select Vehicle by VIN
For the most accurate results, select vehicle by your VIN (Vehicle Identification Number).
16 Sway Bar Bushings found


Dodge Durango Stabilizer Bar Bushing, Front Part Number: 52013403AA
$20.07 MSRP: $29.10You Save: $9.03 (32%)Ships in 1-3 Business Days


Dodge Durango Stabilizer Bar Bushing, Rear Part Number: 52855391AB
$13.68 MSRP: $20.25You Save: $6.57 (33%)Ships in 1-2 Business Days


Dodge Durango Stabilizer Bar Bushing, Front Part Number: 52855534AA
$29.70 MSRP: $44.30You Save: $14.60 (33%)Ships in 1-3 Business Days

Dodge Durango Link Bushing, Front Part Number: 52037916
$17.48 MSRP: $26.05You Save: $8.57 (33%)Dodge Durango Stabilizer Bar Bushing, Rear Part Number: 52855390AB
$12.83 MSRP: $18.95You Save: $6.12 (33%)Ships in 1-2 Business Days
Dodge Durango Stabilizer Bar Bushing, Front Part Number: 52106420AA
$40.69 MSRP: $51.58You Save: $10.89 (22%)Ships in 1-2 Business Days


Dodge Durango Stabilizer Bar Bushing, Rear Part Number: 52106901AA


Dodge Durango Stabilizer Bar Cushion, Front Part Number: 52106421AA

Dodge Durango Stabilizer Bar Bushing, Front Part Number: 52106492AA
Dodge Durango Stabilizer Bar Bushing, Rear Part Number: 52106280AA
Dodge Durango Stabilizer Bar Bushing, Rear Part Number: 52106279AA

Dodge Durango Stabilizer Bar Cushion, Front Part Number: 52106114AB
Dodge Durango Stabilizer Bar Bushing, Front Part Number: 52106111AA
Dodge Durango Stabilizer Bar Bushing, Rear Part Number: 52106099AA
Dodge Durango Stabilizer Bar Bushing, Front Part Number: 52106727AA

Dodge Durango Stabilizer Bar Bushing, Front Part Number: 68043973AA
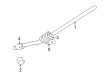
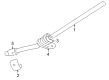
Dodge Durango Sway Bar Bushing
Choose OEM Sway Bar Bushing that meet Dodge factory standards. Dodge designs and tests every component for precision and durability. Each Sway Bar Bushing follows strict manufacturing steps to lock in quality and fit. If your Dodge Durango matters to you, OEM parts make the smart choice. You'll get the exact look, feel, and performance you expect. Shop genuine Durango parts at the highly competitive prices online. Enjoy a manufacturer's warranty, a hassle-free return policy, and rapid delivery. No more guesswork with off brands. Get genuine parts with exact fit and true factory performance. Shop with confidence today at JeepPartsDeal.com.
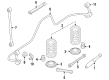
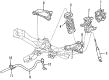
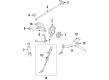
The Sway Bar Bushing in Dodge Durango vehicles provides support and ensures that the sway bar fixed on the car remains intact and in order to perform the required duties of balancing the car and making it handle well the Sway Bar Bushing is very important. These bushings are designed to wear out since the sway bar flexible and when these bushings wear out the sway bar becomes loose and this leads to compromised safety and bad performance. Sway bar bushings need to be checked frequently for signs of wear and to be replaced often so as to maintain the optimal driving conditions. There might have been changes in the kinds of sway bar bushings utilised in the different models of Durango over the years that may be distinctive because of the features that they employ to encourage the improved functionality and safety of the car.
Dodge Durango Sway Bar Bushing Parts and Q&A
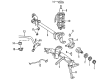
- Q: How to Service and Repair Sway Bar Bushings on Dodge Durango?A:Lift out the lower Control Arm and lock it in a vice, remembering to use a lot of pressure lubricant on any threaded objects so they work well and last for a long time. When replacing a large bush in control arm, use tools C4212-F (Press), 9334-4 (Driver), 9334-6 (Spacer) and 9334-5 (Receiver). For that small bushing, you need the same tools: Press C4212-F, Driver 9334-4, Spacer 9334-6 and Receiver 9334-5 to take it out. After that, remove the torsion bar cross member and hold it in a vise, applying a lot of high-pressure grease. Whit to remove bushing on suspension arm, use C4212-F for pressing, 9335-2 is for the receiver, 9335-3 is for the driver) and 9335-4 is the spacer. To install the lower Control Arm Bushings, push the new large bushing into the control arm while tightly holding the other bushing with tools C4212-F (Press), 9334-3 (Bushing installation depth spacer) and 9334-1 (Driver), all the time applying extreme pressure lubrication. To put in the smaller bushing, you will need to use tools C4212-F (Press), 9334-3 (Bushing installation depth spacer) and 9334-2 (Driver). After you have taken the control arm out of the vise, reinstall it, set the ride height back to the original level and do a wheel alignment. For this operation, install the new sway bar bushing for the cross member using press C4212-F, driver 9335-3, spacer 9335-4 and depth setting cup 9335-1 and confirm the orientation. Take the cross member out of the vise, place the torsion bar cross member back in, correct the vehicle's ride height and align the wheels.

Related Dodge Durango Parts
 Dodge Durango Coil Springs
 Dodge Durango Steering Knuckle
 Dodge Durango Wheel Bearing
 Dodge Durango Wheel Hub
 Dodge Durango Coil Spring Insulator
 Dodge Durango Control Arm Bolt
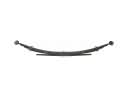 Dodge Durango Leaf Spring
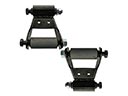 Dodge Durango Leaf Spring Shackle
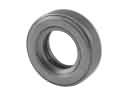 Dodge Durango Strut Bearing
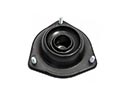 Dodge Durango Strut Mounts
 Dodge Durango Sway Bar Link Bushing
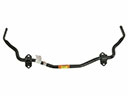 Dodge Durango Sway Bars