JeepParts
My Garage
My Account
Cart
OEM Dodge Intrepid Oil Pan
Oil Drain Pan- Select Vehicle by Model
- Select Vehicle by VIN
Select Vehicle by Model
orMake
Model
Year
Select Vehicle by VIN
For the most accurate results, select vehicle by your VIN (Vehicle Identification Number).
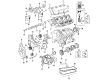
6 Oil Pans found

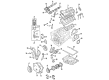
Dodge Intrepid Oil Pan Part Number: 4663740AB
$242.89 MSRP: $317.56You Save: $74.67 (24%)
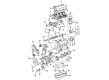
Dodge Intrepid Oil Pan Part Number: 4792956AA
$364.89 MSRP: $441.00You Save: $76.11 (18%)Ships in 1-2 Business DaysDodge Intrepid Oil Pan Part Number: 4663841AD
$174.22 MSRP: $220.86You Save: $46.64 (22%)Ships in 1-2 Business Days


Dodge Intrepid Differential Cover, Front Part Number: 4659520
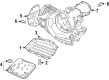
Dodge Intrepid Oil Pan Part Number: 4573510
Dodge Intrepid Oil Pan Part Number: 4792576AA
Dodge Intrepid Oil Pan
Choose OEM Oil Pan that meet Dodge factory standards. Dodge designs and tests every component for precision and durability. Each Oil Pan follows strict manufacturing steps to lock in quality and fit. If your Dodge Intrepid matters to you, OEM parts make the smart choice. You'll get the exact look, feel, and performance you expect. Shop genuine Intrepid parts at the highly competitive prices online. Enjoy a manufacturer's warranty, a hassle-free return policy, and rapid delivery. No more guesswork with off brands. Get genuine parts with exact fit and true factory performance. Shop with confidence today at JeepPartsDeal.com.
The Dodge Intrepid Oil Pan functions as an essential elements which substantially impacts the operational reliability alongside performance capabilities of the Dodge Intrepid automobile which manufactured between 1993 and 2004. As the main storage container for engine oil the oil pan provides adequate lubrication to all engine components thus maintaining peak operating condition. A wet sump arrangement operates in the Dodge Intrepid which uses the oil pan as a storage area to maintain efficient oil circulation. The design element prevents oil leakage while boosting both safety functions and operational efficiency of the vehicle. The oil pan shows versatility because it fits Dodge Intrepid vehicles running with engines that use either the 3.3 L or 3.5 L V6 versions. The Dodge Intrepid Oil Pan contains design elements that make it resistant to engine damage caused by oil movement during sharp maneuvers which help maintain optimal lubrication. The car Oil Pan sets itself apart through its strong design and perfect installation properties which create peace of mind for drivers in the market. The car Oil Pan ensures both performance enhancement and reliability improvements together with safety benefits which makes it an essential component of the automaker model engineering.
Dodge Intrepid Oil Pan Parts and Q&A
- Q: How to Service and Repair an Oil Pan on Dodge Intrepid?A:First, lift the vehicle with a hoist and then take out the dipstick and the tube before doing any repairs. Remove the engine oil and then take out the Oil Filter. First, remove the suspension stabilizer bar and move it out of the way for oil pan room. Lift the structural collar out of the oil pan and remove its attachment bolt that holds the A/C compressor to it, too. If there is an engine oil cooler, remove its line from the pan. Don't forget to remove the two bolts linking the Timing Cover to the oil pan for safety and to avoid any harm. After that, take out the bolts or nuts attaching the oil pan and once they're off, take the oil pan and its gasket away. Clean the area inside the oil pan, plus where the timing chain cover gasket lies, to confirm if any new components are needed. Lay a small bead of Mopar Engine RTV GEN II on the front T-joints between the oil pan gasket and the timing cover gasket and set the oil pan gasket on the block. Always do the following when preventing oil leaks: tighten the bolts on the oil pan by hand, then connect the timing chain cover to the oil pan bolts to 12 Nm (105 in. lbs.) and tighten each bolt to 28 Nm (250 in. lbs.), finishing by tightening the oil pan nuts to 12 Nm (105 in. lbs.). Again use a suitable tool to attach the lower bolt linking the A/C compressor to the oil pan and tighten them to 28 Nm (21 ft. lbs.). If you have an oil cooler, link it to the oil pan. Put the tightening sequence in action for the structural collar: start by torquing the vertical collar to the oil pan bolts to 1.1 Nm, then tighten the horizontal collar to transmission bolts to 55 Nm and finally tighten all the bolts to 55 Nm from the center starting outward. After replacing the oil, put in the new oil filter, secure the drain plug, attach the suspension stabilizer bar, lower the vehicle and set in the dipstick and oil tube. When you are finished, fill the engine crankcase up again with oil to its appropriate level.
- Q: How to Remove and Install an Oil Pan on Dodge Intrepid?A:Remove the dipstick and tube before you use a hoist to lift the vehicle. Remove the engine oil and take out the Oil Filter. Pop the suspension stabilizer bar out and move it aside to allow room for the oil pan. Carefully take out the structural collar from the point where the oil pan attaches to the transmission housing and from the lower fastener connecting the A/C compressor to the oil pan. If available, take out the engine oil cooler line from the pan. Take out the two bolts holding the Timing Cover on the oil pan to keep it from getting damaged. After that, remove the oil pan attaching bolts and take out the oil pan and its gasket. While installing, clean the oil pan, clean the surfaces where the gaskets will seal and check the sealing surfaces as needed. Carefully add one 1/8 inch line of Mopar Engine RTV GEN II around the front and rear T-joints of the gasket. Fit the oil pan gasket onto the block, then set the oil pan and fasteners in place, following this three-step sequence: put in the oil pan bolts and nuts hand-tight, then tighten the timing chain cover to the pan bolts to 12 Nm, next tighten the oil pan bolts to 28 Nm and finally turn the nuts on the oil pan to 12 Nm. Replace the lower bolt between the A/C compressor and the oil pan, turning it until tightening to 28 Nm. If you have an engine oil cooler, join the line from the oil cooler to the oil pan. To install the structural collar, start by rotating the vertical articles on the oil pan bolts to 1.1 Nm, then tighten the horizontal article on the transmission bolts to 55 Nm and finally torque the center vertical bolts to 55 Nm. Place the oil filter and drain plug, connect the arms of the stability bar, lower the car to the ground and set aside the tube and the dipstick. Put the proper oil into the engine crankcase at the right level.


Related Dodge Intrepid Parts
 Dodge Intrepid Timing Belt
 Dodge Intrepid Camshaft
 Dodge Intrepid Cylinder Head Gasket
 Dodge Intrepid Exhaust Valve
 Dodge Intrepid Intake Valve
 Dodge Intrepid Oil Filler Cap
 Dodge Intrepid Oil Pan Baffle
 Dodge Intrepid Oil Pump Gasket
 Dodge Intrepid Piston
 Dodge Intrepid Timing Chain Tensioner
 Dodge Intrepid Transmission Assembly
 Dodge Intrepid Transmission Mount
Browse Dodge Intrepid Oil Pan by Years
2004 2003 2002 2001 2000 1999 1998 1997 1996 1995 1994 1993