JeepParts
My Garage
My Account
Cart
OEM Dodge Intrepid Piston
Engine Pistons- Select Vehicle by Model
- Select Vehicle by VIN
Select Vehicle by Model
orMake
Model
Year
Select Vehicle by VIN
For the most accurate results, select vehicle by your VIN (Vehicle Identification Number).
7 Pistons found


Dodge Intrepid Piston Part Number: 5018627AD
$316.65 MSRP: $576.00You Save: $259.35 (46%)Ships in 1-2 Business Days
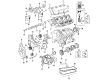
Dodge Intrepid Piston Part Number: 4883223
$26.21 MSRP: $33.22You Save: $7.01 (22%)Ships in 1-2 Business DaysDodge Intrepid Piston Part Number: 4883222

Dodge Intrepid Piston Part Number: 4728709
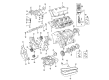
Dodge Intrepid Piston Part Number: R5010332AA

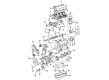
Dodge Intrepid Piston Part Number: R5010335AB

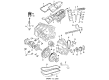
Dodge Intrepid Piston Assembly Part Number: 4798744
Dodge Intrepid Piston
Choose OEM Piston that meet Dodge factory standards. Dodge designs and tests every component for precision and durability. Each Piston follows strict manufacturing steps to lock in quality and fit. If your Dodge Intrepid matters to you, OEM parts make the smart choice. You'll get the exact look, feel, and performance you expect. Shop genuine Intrepid parts at the highly competitive prices online. Enjoy a manufacturer's warranty, a hassle-free return policy, and rapid delivery. No more guesswork with off brands. Get genuine parts with exact fit and true factory performance. Shop with confidence today at JeepPartsDeal.com.
Dodge Intrepid Piston Parts and Q&A
- Q: How to Remove and Replace a Piston in an Engine on Dodge Intrepid?A:Before removing and replacing the piston, get rid of the top of the cylinders with a good ridge reamer, but make certain the tops of the pistons are not disturbed. After removing the pistons and connecting rods from the top of the block, start the Crankshaft to place each connecting rod equally in its bore. Draw lines on the rod and cap indicating their positions with a permanent ink marker or scribe so that you don't infect the fractured joint faces. After taking off the connecting rod cap, insert Special Tool 8189 Connecting Rod Guides into the connecting rod, followed by extracting each piston and rod assembly from the cylinder bore, so you don't scratch the crankshaft journal. Reconnect the bearing cap onto the mating rod to keep the broken surfaces safe during removal. The I.D. line on the No. 2 intermediate ring should be on top and the installation sequence ends with the No. 1 upper ring. Set on side rail by having one end go into the piston ring groove and the expander, press it down using your hands and do not use the piston ring expander. Set the gaps in the piston rings and remember that the oil ring expander gap should be at least 45° from the side rail gaps. You should confirm that the gaps between the compression rings are not equal and that the oil ring expanders are flush before adding the piston and connecting rod assemblies. Apply clean engine oil to the piston and its rings, insert the ring compressor over the piston and tighten the compressor using the needed wrench so the ring positions keep their correct order. Place the connecting rod half over the bearing assembly so its hole matches, apply oil to the end of the bearings and then fit Special Tools 8189 Connecting Rod Guides into the connecting rod. An arrow and the letter "F" (Front) above the pin boss on both pistons should face toward the front of the engine and ensure that the connecting rod oil hole squirts onto the block's major thrust side. Lengthwise rotation of the crankshaft lines up the name displays by entering your region and you can start the floating process. Tap the end of the piston down into the cylinder bore with a hammer handle as you direct the connecting rod onto the connecting rod journal at the same time. Put a little engine oil on the rod bolts and bearing, then place the connecting rod cap and telltale bearing over them while tightening the bolts to the result of 27 Nm (20 ft. lbs.) and 1/4 more.
- Q: How to Properly Handle Piston and Connecting Rod Installation in an Engine on Dodge Intrepid?A:Begin by removing the ridge at the top of the cylinder bores with a ridge reamer and make certain your piston tops are still covered. It is important to extract the pistons and connecting rods first from the top of the cylinder block, while rotating the Crankshaft so that each connecting rod sits exactly in the bore. Put a mark at each end of the connecting rod and both bearing caps with a permanent ink marker or scribe tool, making sure the fractured joint surfaces are not harmed. After you remove the connecting rod cap, fit Special Tool 8189 Connecting Rod Guides into the connecting rod column to be extracted before removing each piston and connecting rod from the bore without denting the crankshaft journals. As soon as you remove the bearing cap, set it back on the rod so it does not get damaged. The first step when installing is to set the piston rings with their compression ring gaps placed differently and the oil ring expanders lined up against the rail gaps. Place the piston, head and rings in engine oil, fit the ring compressor onto the piston, tighten it with the special wrench and keep the positions of the rings unaltered. Check that the opening in the bearing half is aligned with the opening in the connecting rod, smear some clean engine oil onto the bearing and position Special Tools 8189 Connecting Rod Guides in the connecting rod. Both pistons will have a pointed arrow and "F" written above, directed toward the front of the engine and with the oil squirt hole facing the main support area for the block, in every cylinder bank. Rotate the crankshaft to position the connecting rod journal in the bore, put the rod and piston inside and drop the rod onto the crankshaft journal. Push the handle of the hammer down into the cylinder bore to replace the piston and as you do, guide the connecting rod into place on the journal. Smear engine oil on each rod bolt and on the bearing surface and then put on the connecting rod cap and bearing, tightening the bolts to 27 Nm (20 ft. lbs.) plus 1/4 turn.


Related Dodge Intrepid Parts
 Dodge Intrepid Crankshaft
 Dodge Intrepid Crankshaft Pulley
 Dodge Intrepid Crankshaft Thrust Washer
 Dodge Intrepid Crankshaft Timing Gear
 Dodge Intrepid Engine Mount Bracket
 Dodge Intrepid Harmonic Balancer
 Dodge Intrepid Oil Pan Gasket
 Dodge Intrepid Oil Pump
 Dodge Intrepid Pushrod
 Dodge Intrepid Timing Chain Guide
 Dodge Intrepid Timing Cover Gasket
 Dodge Intrepid Variable Timing Sprocket