JeepParts
My Garage
My Account
Cart
OEM Dodge Magnum A/C Accumulator
Accumulator- Select Vehicle by Model
- Select Vehicle by VIN
Select Vehicle by Model
orMake
Model
Year
Select Vehicle by VIN
For the most accurate results, select vehicle by your VIN (Vehicle Identification Number).
2 A/C Accumulators found


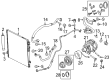
Dodge Magnum Dehydrator Part Number: 5170744AA
$80.40 MSRP: $191.00You Save: $110.60 (58%)Ships in 1-2 Business Days
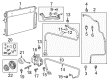
Dodge Magnum Dehydrator Part Number: 5137694AA
$356.92 MSRP: $539.00You Save: $182.08 (34%)Ships in 1-2 Business Days
Dodge Magnum A/C Accumulator
Choose OEM A/C Accumulator that meet Dodge factory standards. Dodge designs and tests every component for precision and durability. Each A/C Accumulator follows strict manufacturing steps to lock in quality and fit. If your Dodge Magnum matters to you, OEM parts make the smart choice. You'll get the exact look, feel, and performance you expect. Shop genuine Magnum parts at the highly competitive prices online. Enjoy a manufacturer's warranty, a hassle-free return policy, and rapid delivery. No more guesswork with off brands. Get genuine parts with exact fit and true factory performance. Shop with confidence today at JeepPartsDeal.com.
A/C Accumulator is located in Dodge Magnum vehicles and it has a critical function of making sure that the Air conditioning system of the automobiles is not compromised. Its major role is to act as moisture trap and filter the contaminants thus reducing corrosion and sludge that leads to system failure. The A/C Accumulator is found in two key components: The receiver drier that is installed in the high pressure liquid line apart from the accumulator which is installed between the evaporator and the compressor. In the course of this development, Dodge Magnum vehicles and products have employed the two distinct variations of A/C Accumulator known as accumulator as well as receiver drier. Each type is used for the same basic function but is placed at a different location in the A/C system. These components need to be changed often, and more frequently after major A/C services in order to maintain efficiency and to prevent problems such as wrong gauge readings and leaks. A/C Accumulator is very important in the durability of air conditioning system of Dodge Magnum since it helps to check the level of moisture in the automotive system.
Dodge Magnum A/C Accumulator Parts and Q&A
- Q: How to Service and Repair an A/C Accumulator on Dodge Magnum?A:First, take out the refrigerant from the refrigerant system and remove the negative Battery Cable. Take away the front panel, then decide which screw to remove to let go of the A/C accumulator mounting bracket at the A/C Condenser's right side. Remove the A/C accumulator from the condenser and take the dual-plane seal out; afterward, install plugs in or use tape to cover both the A/C accumulator fitting and the ports on the condenser. Remember to put 30 milliliters (1 fluid ounce) of oil into the refrigerant system when you change the A/C accumulator. With the engine running, position the A/C accumulator in the engine area and attach it to the central connection at the rubber seal, but do not use the tape or the original plug. After removing the old rubber plug and tape from the ports of the A/C condenser and A/C accumulator connection, put a new dual-plane seal in place onto the upper A/C accumulator fitting using only the R-134a system's official seal. Connect the A/C accumulator to the condenser at the top right, put in its bolt and tighten to 16 ft.lbs. (22 N.m). The next step is to attach the A/C accumulator bracket to the A/C condenser and screw it down so it holds at 5 N.m (44 in.lbs.). After finishing the front fascia work, put it back on, attach the negative cable to the battery again, get rid of the refrigerant and charge the required amount.
- Q: How to Install the A/C Accumulator on Dodge Magnum?A:Make sure the refrigerant oil is adjusted before you install the A/C accumulator. When an internal failure of the A/C compressor happens, replace the A/C accumulator before installing a new compressor. The Refrigerant Oil Capacities chart will tell you how much oil is needed when replacing several A/C components. If you only replace the A/C accumulator, put in 30 milliliters (1 fluid ounce) of recommended refrigerant oil. It is important to change both the O-ring seals and gaskets each time you want to work on the refrigerant line. Install the accumulator in the engine, completely remove any plugs or tape from the fitting and A/C Condenser ports, oil the new dual-plane seal with clean refrigerant oil and put it onto the accumulator fitting. Route the accumulator into the opening of the A/C condenser and join them with bolt 4, tighten to 22 Nm (16 ft. lbs.). Place and secure the accumulator mounting bracket 2 to the A/C condenser using screw 1 tightened to 5 Nm (44 in. lbs.). Attach the front fascia, hook up the negative cable to the battery, remove the refrigerant from the system and if replacing the A/C accumulator, inject 30 ml (1 fl oz) of refrigerant oil. Following this, charge all the refrigerant in your system.


Related Dodge Magnum Parts
 Dodge Magnum Cabin Air Filter
 Dodge Magnum Heater Core
 Dodge Magnum A/C Compressor
 Dodge Magnum A/C Compressor Clutch
 Dodge Magnum A/C Condenser
 Dodge Magnum A/C Expansion Valve
 Dodge Magnum A/C Hose
 Dodge Magnum A/C Service Cap
 Dodge Magnum A/C System Valve Core
 Dodge Magnum Blower Motor
 Dodge Magnum Evaporator
 Dodge Magnum HVAC Pressure Switch