JeepParts
My Garage
My Account
Cart
OEM Dodge Magnum A/C Condenser
Air Conditioning Condenser- Select Vehicle by Model
- Select Vehicle by VIN
Select Vehicle by Model
orMake
Model
Year
Select Vehicle by VIN
For the most accurate results, select vehicle by your VIN (Vehicle Identification Number).
2 A/C Condensers found

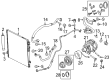
Dodge Magnum Condenser Assembly Part Number: 5137693AE
$402.14 MSRP: $539.00You Save: $136.86 (26%)
Dodge Magnum Condenser Assembly Part Number: 5175368AA
Dodge Magnum A/C Condenser
Choose OEM A/C Condenser that meet Dodge factory standards. Dodge designs and tests every component for precision and durability. Each A/C Condenser follows strict manufacturing steps to lock in quality and fit. If your Dodge Magnum matters to you, OEM parts make the smart choice. You'll get the exact look, feel, and performance you expect. Shop genuine Magnum parts at the highly competitive prices online. Enjoy a manufacturer's warranty, a hassle-free return policy, and rapid delivery. No more guesswork with off brands. Get genuine parts with exact fit and true factory performance. Shop with confidence today at JeepPartsDeal.com.
The a/c condenser in Dodge Magnum motor vehicles is a heat exchanger that takes the gaseous refrigerant, cools it and evaporates it to form a liquid form and it is then taken to the accumulator. Sometimes located in front of the radiator but more commonly located at the front of the car, the A/C Condenser is made up a set of tubes which are used in this cooling process. The former does not include any information about various types or kinds of A/C Condenser used in a number of Dodge Magnum versions However, the basic structure is the same for all vehicles. The main function of the A/C Condenser in Dodge Magnum vehicles focuses on proper management of refrigerant, which is very useful in maintaining the optimal performance of the car's air conditioning system.
Dodge Magnum A/C Condenser Parts and Q&A
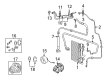
- Q: How to Service an A/C Condenser to Prevent Compressor Damage on Dodge Magnum?A:When servicing the air conditioning refrigerant, set the refrigerant oil correctly to ensure the compressor is protected. Should the installation be limited to the A/C condenser, inject 30 milliliters (1 fluid ounce) of refrigerant oil, but use only what the A/C compressor's instructions recommend. You should always replace the o-ring seals and gaskets on the refrigerant line whenever it will be opened to the environment. Place the Radiator and condenser air seals in the right location to get the most out of your A/C and engine cooling. If you need the brackets, fix them to the A/C condenser first, before positioning the A/C condenser on the radiator and bolting it down with a torque of 5 Nm (44 in. lbs.). Install the A/C receiver/drier on the A/C condenser next and put the power steering fluid cooler on last. Link the A/C discharge line and A/C liquid line with the A/C condenser. For those with 3.0L diesel engines, make sure to put in the charge air cooler. Take out any tape or plugs from both the automatic transmission cooler lines and cooler ports and link the cooler lines to the top ports on the A/C condenser. Fit the front fascia and then attached the negative cable to the battery. Drain the refrigerant system, add any necessary refrigerant oil after replacing several parts, add the correct amount of refrigerant and finish by checking the oil level in the automatic transmission.
- Q: How to Remove and Install an A/C Condenser on Dodge Magnum?A:The first step to remove the A/C condenser is to recover the refrigerant from the system and then turn off the vehicle's negative Battery Cable. After that, remove the front fascia and release the automatic transmission cooler lines from the A/C condenser on the left end. Attach plugs onto or tape over the automatic transmission cooler cooler fittings and ports. If your engine is a 3.0L diesel, go ahead and remove the charge air cooler. Separate the A/C discharge line and the A/C liquid line from the A/C condenser and align the power steering fluid cooler out of view. Take out the receiver/drier from the condenser unit and take off the four bolts that hold the condenser to the radiator. Slowly rest the A/C condenser forward and slide it out of the car through the bottom. When needed, put the A/C condenser on a workbench and take off the Power Steering Cooler brackets. Add 30 milliliters of oil to the refrigerant system when the A/C condenser is being replaced, always using the right kind of oil for the compressor. If the car demands it, fit the power steering cooler brackets to the A/C condenser, then carefully line up the A/C condenser over the radiator and insert the four bolts to secure it, tightening them until they reach 5 N.m. Place the receiver/drier on the A/C condenser and attach the power steering cooler to the A/C condenser as well. Link the A/C discharge line and A/C liquid line with the A/C condenser and if you have the 3.0L diesel engine, add the charge air cooler. Take out the tape or plugs from the transmission cooler lines as well as the cooler ports and next, join the automatic transmission cooler lines to the cooler ports at the top of the A/C condenser. Attach the front fascia, connect the negative terminal of the battery, remove all the refrigerant, fill the refrigerant system, check the ATF level and top up as needed.


Related Dodge Magnum Parts
 Dodge Magnum Cabin Air Filter
 Dodge Magnum Heater Core
 Dodge Magnum A/C Accumulator
 Dodge Magnum A/C Compressor
 Dodge Magnum A/C Compressor Clutch
 Dodge Magnum A/C Expansion Valve
 Dodge Magnum A/C Hose
 Dodge Magnum A/C Service Cap
 Dodge Magnum A/C System Valve Core
 Dodge Magnum Blower Motor
 Dodge Magnum Evaporator
 Dodge Magnum HVAC Pressure Switch