JeepParts
My Garage
My Account
Cart
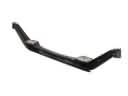
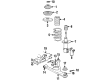
OEM Dodge Neon Front Cross-Member
Front Engine Cross Member- Select Vehicle by Model
- Select Vehicle by VIN
Select Vehicle by Model
orMake
Model
Year
Select Vehicle by VIN
For the most accurate results, select vehicle by your VIN (Vehicle Identification Number).
5 Front Cross-Members found

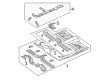
Dodge Neon Crossmember, Front Part Number: 5066345AA
$42.87 MSRP: $246.00You Save: $203.13 (83%)Ships in 1-2 Business Days
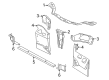
Dodge Neon Lower Tie Bar, Front Part Number: 4783295AF

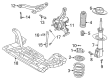
Dodge Neon Engine Cradle, Front Part Number: 5290203AC
Dodge Neon Engine Cradle, Front Part Number: 5272341AG

Dodge Neon Engine Cradle, Front Part Number: 4656117
Dodge Neon Front Cross-Member
Choose OEM Front Cross-Member that meet Dodge factory standards. Dodge designs and tests every component for precision and durability. Each Front Cross-Member follows strict manufacturing steps to lock in quality and fit. If your Dodge Neon matters to you, OEM parts make the smart choice. You'll get the exact look, feel, and performance you expect. Shop genuine Neon parts at the highly competitive prices online. Enjoy a manufacturer's warranty, a hassle-free return policy, and rapid delivery. No more guesswork with off brands. Get genuine parts with exact fit and true factory performance. Shop with confidence today at JeepPartsDeal.com.
The Dodge Neon Front Cross-Member represents Dodge's commitment to constructing reliable vehicles that perform at outstanding levels. The key structural component Front Cross-Member operates as a stability framework that aligns engine and transmission systems to support the operational safety of Dodge Neon vehicles. The steel component endures deflection with strength properties to enhance vehicle handling and body panel stability. The Dodge Neon Front Cross-Member functions with different models of Neon vehicles thus providing versatility to repair or maintain nearly all vehicle types. This K member design of the Front Cross-Member stands out in the automotive market because it works optimal for models with longitudinally-mounted engines. The Front Cross-Member serves a critical purpose which goes beyond solidification because it promotes engine and transmission coordination to enhance both performance and safety aspects. The Dodge Neon receives its distinctive performance characteristics from its compact design and innovative features through the implementation of the Front Cross-Member design. The car Front Cross-Member represents the automaker's dedication to both product excellence and compact car engineering achievements which ensure the model offers dependable driving performance to its users.
Dodge Neon Front Cross-Member Parts and Q&A
- Q: How to Remove and Reinstall the Front Cross-Member on Dodge Neon?A:In order to replace the front suspension crossmember, one should hoist the car and take both front wheels and tires. Unbolt both of the stabilizer bar links by grasping the upper stabilizer bar retainer/nut with a wrench and turning the stabilizer bar link bolt, and remove the stabilizer bar cushion retainers bolts, as well as the stabilizer bar cushions pad attached together. Take off nut and pinch bolt holding each ball joint stud to Steering Knuckle and be careful not to pull knuckle as you may pull the inner CN joint off the driveshaft. Using a pry to push down on the lower Control Arm and up on the ball joint boss of the steering knuckle separate each ball joint studs from the steering knuckle. Unscrew the two bolts that hold the cooler to the front suspension crossmember and then have the cooler hang out of the way. Tie off the power steering gear to the underbody of the vehicle, then loosen and unbolt the four bolts which fasten the power steering gear to the front suspension crossmember. Take off the drive-belt splash shield fasteners and shield, the pencil strut on the right front and the corner of the crossmember and vehicle body, then the engine torque strut mounting bolts. Mark where the front suspension crossmember goes on the vehicle just in case you have to put it back in place. Place the transmission jack underneath the center of the front suspension crossmember and raise it so as to keep the crossmember off the ground. Back off and undo the two front bolts which hold the crossmember to the frame rails then loosen the two rear bolts until they move out of the threaded tapping plates in the body but do not take them out. Drop the crossmember of the front suspension and remove, one arm at the crossmember by taking out the front pivot bolt at a time. Install Steps to install, install the lower control arms and fix the suspension crossmember (in the front). Install the pivot bolts but do not tighten. Installing the front suspension, lift the suspension crossmember and lower control arms: when the crossmember makes contact with its mounting point, position the power steering gear. Put the two rear crossmember mounting bolts in the tapping plates and fit in the two front crossmember mounting bolts and lightly (2 N.m/20 in.lbs.) tighten them all. Position the front suspension crossmember using the marks where the positioning was already scribed upon and tighten two rear mounting bolts to 203 N.m (150 ft.lbs.) and the front two bolts to 142 N.m (105 ft.lbs.). The bolts on the lower control arm body pivot should be tightened up to 163 N.m (120 ft.lbs.), steering gear should be fitted, to the front suspension crossmember, the four bolts which go on to the power steering gear should be tightened up to 61 N.m (45 ft.lbs.). Remove the wire or cable holding the power steering gear, position the 2 screws holding the cooler and position each of the ball joint studs inside of the steering knuckle with the screw hole up against the hole in the stud of the ball joint. Fit new ball joint stud pinch bolt and nut and tighten the nut to 95 N.m (70 ft.lbs.). Install a torque engine strut (and the mounting bolts) then mount the washer on to the end of the stud in torque strut bolt. Fixed the pencil strut to the right front end of the crossmember and screw the nuts to 58 N.m (43 ft.lbs.). Fit the drive-belt splash shield and mounting plates with the stabilizer bar so as not to be upside down and other other after fitting these installors it should be placed in position on the front suspension crossmember. Place the cushion retainers and bolts loosely on the vehicle with the bolt starting at the bottom and reinstall both the stabilizer bar links back to the vehicle. With vehicle on level, reinstall the tire and wheel assemblies and torque the wheel mounting nuts to 135 N.m (100 ft.lbs.) and then lower the vehicle. Engage all the stabilizer bar links and cushion retainer bolts against 23 N.m (200 in.lbs.) and 34 N.m (300 in.lbs.) respectively and align the front wheels.
- Q: How to Service and Repair the Front Cross-Member on Dodge Neon?A:You should start by lifting the car and then first remove the front tire and wheel assemblies. Loosen the upper retainer/nut from one stabilizer bar link and turn the link bolt with a wrench to let it go, then disconnect the stabilizer bar cushion retainer bolts and the bar with cushions. Remove the clamp at every ball joint stud and take care not to strain the knuckle upward, because it could pull the inner C/V joint off the driveshaft. Remove each ball joint stud from the Steering Knuckle using the same technique on the lower Control Arm. Screwdriver the two screws out of the crossmember near the front bumper, so the cooler can be pulled away and out of the way. Ensure the power steering gear won't fall while you lower the crossmember by holding it with wire or cord. Next, loosen the four bolts joining the gear to the front crossmember. Disconnect the shield fasteners and the splash shield using a screwdriver, then remove the pencil strut in the right front corner of the crossmember and body and detach the engine torque strut. Use a marker to outline the place of the crossmember onto the car's body, raise the crossmember on the transmission jack and add support underneath it. Unscrew the two side bolts fastening the crossmember to the frame rails and leave the bolts on the plates inside, so the lower control arm does not move. Take out the front pivot bolt to let go of each lower control arm and lower the front suspension crossmember. For installation, secure the lower control arms to the front suspension crossmember and set the pivot bolts with only gentle force for now. Lift the crossmember and lower control arms so that they touch the holes where they will be fitted, side-guiding the power steering gear into the required area. Put the bolts for the two rear crossmember mounts into the tapping plates first, then install and loosely tighten the front mounting bolts to around 2 N.m (20 in.lbs.). Hit the crossmember with the hammer along the pre-drawn lines and afterward tighten all bolts as directed: 150 ft.lbs. for the rear bolts and 105 ft.lbs. for the front bolts. Friction-weld the lower control arm as directed, securely tighten the lower pivot bolts to 163 N.m (120 ft.lbs.), connect the steering gear to the crossmember and tighten all four bolts onto it to 61 N.m (45 ft.lbs.). Take out the wire or cord hanging the power steering gear, replace the screws on the cooler and insert both ball joint studs into the steering knuckle. Replace the existing ball joint stud with a new pinch bolt and nut and then tighten the nut to 95 N.m (70 ft.lbs.). Mount the engine torque strut onto the block using the mounting bolts, set them up so they align, then mount the washer to the end of the torque strut bolt. Reconnect the pencil strut, secure it with bolts tightened to 58 N.m (43 ft.lbs.) and then put on the drive-belt splash shield and fasten it into place. With the curve on the outboard parts of the stabilizer bar facing downward and the slits in each cushion toward the front, fit the cushion retainers and partly secure the bolts. Replace both stabilizer bar links on the vehicles and before fully tightening the bolts, start by adding the bushings from the bottom. Replace the tire and wheel assemblies and tighten the wheel nuts to 135 N.m (100 ft.lbs.). After that, you can lower the vehicle. Apply 23 N.m (200 in.lbs.) of tightness to each stabilizer bar link and 34 N.m (300 in.lbs.) to the cushion retainer bolts and afterward, set front wheel alignment.