JeepParts
My Garage
My Account
Cart
OEM Dodge Ram 1500 Sway Bar Bushing
Stabilizer Sway Bar Bushing- Select Vehicle by Model
- Select Vehicle by VIN
Select Vehicle by Model
orMake
Model
Year
Select Vehicle by VIN
For the most accurate results, select vehicle by your VIN (Vehicle Identification Number).
24 Sway Bar Bushings found


Dodge Ram 1500 Stabilizer Bar Bushing, Front Part Number: 52013793AB
$91.82 MSRP: $140.00You Save: $48.18 (35%)


Dodge Ram 1500 Stabilizer Bar Bushing, Rear Part Number: 68048854AA
$17.03 MSRP: $25.30You Save: $8.27 (33%)Ships in 1-2 Business Days


Dodge Ram 1500 Stabilizer Bar Bushing, Front Part Number: 55366781AA
$19.01 MSRP: $28.10You Save: $9.09 (33%)Ships in 1-2 Business Days


Dodge Ram 1500 Stabilizer Bar Bushing, Front Part Number: 52013793AA
$30.83 MSRP: $45.95You Save: $15.12 (33%)Ships in 1-2 Business Days

Dodge Ram 1500 Link Bushing, Front Part Number: 52037916
$17.48 MSRP: $26.05You Save: $8.57 (33%)


Dodge Ram 1500 Stabilizer Bar Bushing, Front Part Number: 52126350AA
$24.12 MSRP: $35.80You Save: $11.68 (33%)Ships in 1-2 Business Days


Dodge Ram 1500 Stabilizer Bar Bushing, Front Part Number: 52013697AA
$25.93 MSRP: $38.40You Save: $12.47 (33%)Ships in 1-2 Business Days


Dodge Ram 1500 Stabilizer Bar Bushing, Rear Part Number: 68031838AA
$67.78 MSRP: $94.25You Save: $26.47 (29%)Ships in 1-2 Business Days
Dodge Ram 1500 Stabilizer Bar Bushing, Front Part Number: 52106590AC
$17.25 MSRP: $37.30You Save: $20.05 (54%)Ships in 1-2 Business Days
Dodge Ram 1500 Stabilizer Bar Bushing, Rear Part Number: 55398940AB
$120.42 MSRP: $183.00You Save: $62.58 (35%)Ships in 1-2 Business Days
Dodge Ram 1500 Stabilizer Bar Bushing Part Number: 55398939AB
$16.74 MSRP: $24.90You Save: $8.16 (33%)Ships in 1-2 Business DaysDodge Ram 1500 Stabilizer Bar Bushing, Front Part Number: 52110060AD
$31.33 MSRP: $46.70You Save: $15.37 (33%)Ships in 1-2 Business Days


Dodge Ram 1500 Stabilizer Bar Bushing, Front Part Number: 68067545AA
$20.18 MSRP: $29.25You Save: $9.07 (32%)


Dodge Ram 1500 Stabilizer Bar Bushing, Front Part Number: 55398036AA
$23.26 MSRP: $33.70You Save: $10.44 (31%)

Dodge Ram 1500 Stabilizer Bar Bushing, Front Part Number: 52038851


Dodge Ram 1500 Stabilizer Bar Bushing, Rear Part Number: 5290379AA
Dodge Ram 1500 Stabilizer Bar Bushing, Front Part Number: 55398037AA
Dodge Ram 1500 Stabilizer Bar Bushing, Front Part Number: 52106590AA

Dodge Ram 1500 Stabilizer Bar Bushing Part Number: 52038843

Dodge Ram 1500 Stabilizer Bar Bushing, Orange Part Number: 52037548
| Page 1 of 2 |Next >
1-20 of 24 Results
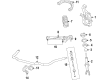
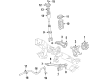
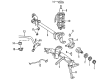
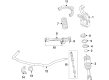
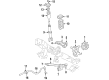
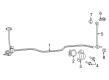
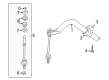
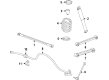
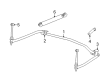
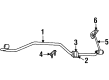
Dodge Ram 1500 Sway Bar Bushing
Choose OEM Sway Bar Bushing that meet Dodge factory standards. Dodge designs and tests every component for precision and durability. Each Sway Bar Bushing follows strict manufacturing steps to lock in quality and fit. If your Dodge Ram 1500 matters to you, OEM parts make the smart choice. You'll get the exact look, feel, and performance you expect. Shop genuine Ram 1500 parts at the highly competitive prices online. Enjoy a manufacturer's warranty, a hassle-free return policy, and rapid delivery. No more guesswork with off brands. Get genuine parts with exact fit and true factory performance. Shop with confidence today at JeepPartsDeal.com.
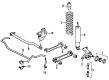
Sway Bar Bushing is one of the vital linkages which considerably increases the dependability and capability of the Dodge Ram 1500 series. Responsible for dampening shocks and reducing noise from road surfaces, the Sway Bar Bushing further holds the sway bar or stabilizer bar whose duty is to keep the car body from rolling Side to Side during cornering. The function is quite useful in such aspects as stability and safety while driving under different conditions. The Sway Bar Bushing is designed to fit a range of Ram 1500 models, making sure that the ride is progressive and stable - quite deserving of the Dodge Ram 1500's reputation for strength and functionality. Maintenance and lubrication of the Sway Bar Bushing are critical because abused bushings will slow the handling of the car and produce rattle sounds, which affects the efficiency and reliability of the car. Over the years the outside of the Dodge Ram 1500 has been progressively changed and for the interiors more hi-tech features such as the Rambox system and the keyless drive have been added. The Sway Bar Bushing is a unique product in the Automotive Market because it controls movement essential for the improvement of a car's performance and makes the Dodge Ram 1500 a pick among full-size pickup truck consumers. Through embracing a Sway Bar Bushing that is made with these attributes, the owners can fully experience a Dodge Ram 1500 that is reliable both on the field and off.
Dodge Ram 1500 Sway Bar Bushing Parts and Q&A
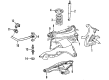
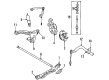
- Q: How to Service and Repair a Sway Bar Bushing on Dodge Ram 1500?A:You should start by taking out the Control Arm Bushing by using bushing remover tools 8682-2 (receiver, adapter and driver) and removing the threaded rod and two bearings. Initially, take away the crossmember, place it in a vise and use widely lubricated force on the moveable parts for longer use and correct tool performance. After installing the special tools 8838 threaded rod, 8835-1, 8835-4 and 8835-3, press out the sway bar bushing. HD bushings for 2WD models cannot be removed and need to be changed as a set with the outer arm. Take out the lower control arm and place it in a vise, applying lots of pressure lubricant. For the large bushing, fill your order with tools 8836-2 (receiver), 8836-4 (spacer) and 8836-5 (driver), threaded rod 8839 and a bearing. The small bearing uses 8836-6 (the driver), 8836-3 (the spacer) and 8836-2 (the receiver), along with threaded rod 8839 and a bearing. Make sure to fit the new bushing into the crossmember using tools 8835-2, 8835-4 and 8835-3, along with bearing and threaded rod 8838 for proper alignment during installation. After taking the crossmember from the vise, put it back in and reset the car's height along with a wheel alignment. When installing lower control arm bushings, should you use the large bushing, install it with tools 8836-2 for the driver, 8836-1 for the receiver, along with a spacer, a bearing and threaded rod 8839. When everything looks correct, remove the control arm from the vise, reinstall it, reset the vehicle height and wheel alignment is required.

Related Dodge Ram 1500 Parts
 Dodge Ram 1500 Sway Bar Link
 Dodge Ram 1500 Steering Knuckle
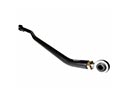 Dodge Ram 1500 Track Bar
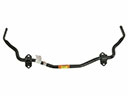 Dodge Ram 1500 Sway Bars
 Dodge Ram 1500 Wheel Hub
 Dodge Ram 1500 Control Arm
 Dodge Ram 1500 Control Arm Bolt
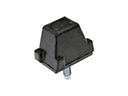 Dodge Ram 1500 Control Arm Bumper
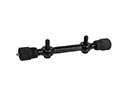 Dodge Ram 1500 Control Arm Shaft Kit
 Dodge Ram 1500 Crossmember Bushing
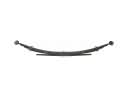 Dodge Ram 1500 Leaf Spring
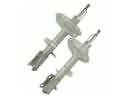 Dodge Ram 1500 Strut Housing