JeepParts
My Garage
My Account
Cart
OEM Dodge Ram 1500 Van Coil Springs
Strut Spring- Select Vehicle by Model
- Select Vehicle by VIN
Select Vehicle by Model
orMake
Model
Year
Select Vehicle by VIN
For the most accurate results, select vehicle by your VIN (Vehicle Identification Number).
3 Coil Springs found

Dodge Ram 1500 Van Coil Spring, Front Part Number: 52039175
Dodge Ram 1500 Van Coil Spring, Front Part Number: 52039170

Dodge Ram 1500 Van Spring, Front Part Number: 52039271
Dodge Ram 1500 Van Coil Springs
Choose OEM Coil Springs that meet Dodge factory standards. Dodge designs and tests every component for precision and durability. Each Coil Springs follows strict manufacturing steps to lock in quality and fit. If your Dodge Ram 1500 Van matters to you, OEM parts make the smart choice. You'll get the exact look, feel, and performance you expect. Shop genuine Ram 1500 Van parts at the highly competitive prices online. Enjoy a manufacturer's warranty, a hassle-free return policy, and rapid delivery. No more guesswork with off brands. Get genuine parts with exact fit and true factory performance. Shop with confidence today at JeepPartsDeal.com.
Dodge Ram 1500 Van Coil Springs Parts and Q&A
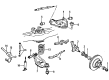
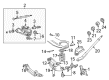
- Q: How to service and repair the front Coil Springs on Dodge Ram 1500 Van?A:Before working on the front coil spring, lift the vehicle and secure it with stands and afterward eliminate the front wheel and tire assembly. Following that, pull the brake caliper loose from the steering knuckle and remove the shock. Release the tension strut from the lower arm suspension. Push the Spring Compressor DD-1278 down into the lower suspension arm, coil spring and shock hole in the frame, keeping the adapter's bell shape toward the arm. Screw the nut securely at the top of the shock tool, but only to where it can be turned by hand and then turn it back half a turn to stop the spring moving before parting the suspension arm from the steering knuckle. Put the cotter pin aside and take out the lower ball joint nut from the steering knuckle, after which you connect Ball Joint Remover C-3564-A to the lower ball joint, making sure it is tight. Use the tool on the lower ball joint while you hit the steering knuckle with a hammer to remove the joint. When necessary, turn the control arm pivot bolt to free it for downward movement. After removing the spring compressor tool, pull the lower suspension arm down to remove both the coil spring and isolator pad. To set up, fasten the isolator pad to the top of the coil spring and secure it in the downward suspension arm, so the flat or closed part faces upward. Put the Spring Compressor DD-1278 back on and turn the tool nut slightly to press the coil spring. With the steering knuckle on the lower ball joint, put in the retaining nut, tighten it to 183 Nm (135 ft. lbs.) for the LD 11/16 bolt or 237 Nm (175 ft. lbs.) for the HD 3/4 bolt and then put on new cotter pins. Attach the tension strut, remove the spring compressor and put back the shock absorber and disc brake caliper. First, check the wheel and tire now mounted onto the hub and axle shaft, then lower the vehicle and then adjust front wheel alignment if necessary.

Related Dodge Ram 1500 Van Parts
 Dodge Ram 1500 Van Axle Shaft Seal
 Dodge Ram 1500 Van Ball Joint
 Dodge Ram 1500 Van Bump Stop
 Dodge Ram 1500 Van Control Arm
 Dodge Ram 1500 Van Control Arm Bolt
 Dodge Ram 1500 Van Control Arm Bushing
 Dodge Ram 1500 Van Shock Absorber
 Dodge Ram 1500 Van Suspension Strut Rod
 Dodge Ram 1500 Van Sway Bar Bracket
 Dodge Ram 1500 Van Sway Bar Link
 Dodge Ram 1500 Van Sway Bar Link Bushing
 Dodge Ram 1500 Van Wheel Bearing